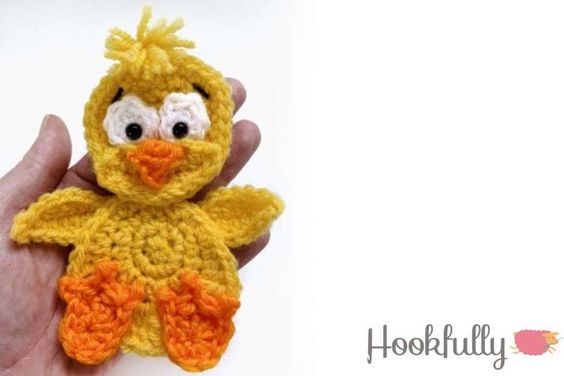
Crochet Chick Appliqué
Introducing the Crochet Chick Appliqué, a delightful and charming addition to any craft project! This adorable little chick is perfect for adding a touch of cuteness to your crochet creations. Whether you're making a baby blanket, a hat, or a scarf, this appliqué will bring a smile to anyone's face. With its intricate stitches and intricate design, the Crochet Chick Appliqué is sure to impress both beginners and experienced crocheters alike. The pattern includes step-by-step instructions and detailed diagrams, making it easy to follow along and create your own adorable chick. So why not add a touch of whimsy and playfulness to your next crochet project with the Crochet Chick Appliqué? It's the perfect way to bring a little bit of springtime joy to your crafting!
Yarn
- Weight: DK / Light worsted / #3
- Brand: King Cole Pricewise DK
- A: Yellow
- B: White
- C: Orange
- D: Brown
- Total: 31 yards
Abbreviations
USA Terminology (U.K. translation)
- ch – Chain
- dc – Double crochet
- 2dc – 2 dc in 1 space (increase)
- hdc -Half double crochet
- 2hdc – 2 hdc in 1 space (increase)
- MR – Magic ring
- sc – Single crochet
- 2sc – 2 sc in 1 space (increase)
- sc2tog – sc 2 together (decrease)
- sl st – Slip stitch
- st / sts – Stitch / Stitches
- tr – Treble crochet
- 2tr – 2 tr in 1 space (increase)
Size & Gauge
- 2” x 2” gauge swatch = 11 rows of 9 hdc
- Finished size – 11cm wide x 12cm high
Pattern Notes
- I do not count chains in my stitch count.
- Numbers in brackets are the number of rows/stitches.
- Stitches separated with a comma are to be made in separate spaces. eg. (sc, inc) would mean sc in first stitch then inc in next stitch. eg. (sc x 2, inc) would mean sc in first stitch, sc in second stitch, then inc in next stitch.
- When fastening off leave a long tail for sewing if you are attaching the appliqué to something. If you are not sewing the appliqué to anything weave in ends.
Chick Applique – Free Crochet Pattern
Chick Head
Round 1
Use colour A (yellow)
• sc x 6 into a MR
• sl st to join to 1st stitch & ch 1
(6 sts)
Round 2
• 2sc x 6
• sl st to join to 1st stitch & ch 1
(12 sts)
Round 3
(2sc, sc) x 6• sl st to join to 1st stitch & ch 1(18 sts)
Round 4
(2sc, sc x 2) x 6• sl st to join to 1st stitch(24 sts)
Round 5
(2sc, sc x 3) x 6• sl st to join to 1st stitch• Fasten off but don’t weave in ends. This finishing point will be a marker for the chicks hair.
(30 sts)
Cheeks
Round 1
Use colour A (yellow)
• ch x 9 then start working in 2nd ch from the hook
• hdc, dc, hdc, sc2tog, hdc, dc, hdc (top)
• ch 1 & turn to work in the same chains on the opposite side
• (2sc, sc x 3) 2 times (bottom)
• sl st to join to 1st stitch
• Fasten off, leave a tail for sewing
(17 sts)
Eyes
Round 1
Use colour B (white)
• Make a MR then make in the following stitches into it
• sc, hdc, dc x 2, hdc, sc
• sl st to join to 1st stitch
• Fasten off, leave a tail for sewing
• Insert a 6mm safety eye into the MR.
• Repeat the steps to make another eye
(6 sts for each eye)
Beak
Round 1
Use colour C (orange)
• ch x 4 then start working in 2nd ch from the hook
• sl st, dc, tr
• Fasten off, leave a tail for sewing
(3 sts)
Face
• Sew the bottom of the cheeks onto the bottom half of the face. Don’t sew all the way around yet.
• Place eyes slightly underneath the cheeks. The eyes should be touching each other. The sc’s should be at the bottom, dc at the top. Sew eyes into position.
• Sew the top of the cheeks to the head, slightly covering eyes.
• Sew the beak onto the top of the cheeks, directly under the eyes.
• Using a tapestry needle and yarn colour A (yellow) we will start to make hair. Sew the yarn through the top of the head and around your finger and several times.
• Remove your finger and tie the hoops together tightly.
• Cut the ends of the loops to create hair.
• Using yarn colour D (brown), make some tapestry eyebrows.
Body
Round 1
Use colour A (yellow)
• sc x 6 into a MR
• sl st to join to 1st stitch & ch 1
(6 sts)
Round 2
• 2sc x 6
• sl st to join to 1st stitch & ch 1
(12 sts)
Round 3
2sc, sc, 2hdc, hdc, 2dc, dc, 2dc, dc, 2hdc, hdc, 2sc, sc• sl st to join to 1st stitch & ch 1(18 sts)
Round 4
2sc, sc, 2hdc, hdc, 2dc, 2tr x 3, tr,2tr x 3, 2dc, hdc, 2hdc, sc, 2sc, sc• sl st to join to 1st stitch
• Fasten off, leave a tail for sewing
(29 sts)
Wings
Round 1
Use colour A (yellow)
• ch x 9 then start working in 2nd ch from the hook
• sl st, sc, hdc, dc x 2, hdc, sc, sl st
• ch 1 & turn to work in the same chains on the opposite side
• sl st, sc, hdc, dc x 2, hdc, sc, sl st
• sl st to join to 1st stitch
• Fasten off, leave a tail for sewing
• Repeat the steps to make another wing
(16 sts for each wing)
Feet
Round 1
Use colour C (orange)
• Make a MR then make in the following stitches into it
• sc, hdc x 2, dc x 3, hdc x 2, sc
• sl st to join to 1st stitch & ch 1
(9 sts)
Round 2
• sl st x 3
• (hdc in next stitch, ch 3, sl st into 2nd & 3rd ch from the hook) 3 times
• sl st x 3
• sl st to join to 1st stitch
• Fasten off, leave a tail for sewing
• Repeat the steps to make another foot
(15 sts)