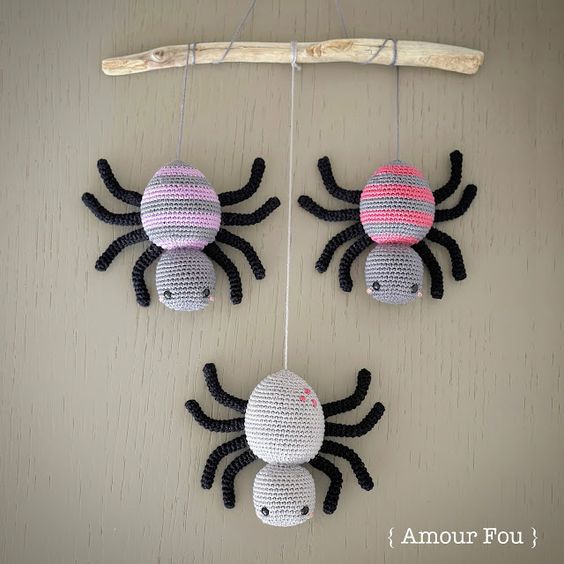
Crochet Hanging Spiders
Unleash your creativity and add a touch of spookiness to your Halloween decorations with these adorable crochet hanging spiders. These little critters are the perfect addition to any haunted house or eerie party setting. With just a few simple materials and some basic crochet skills, you can bring these creepy crawlers to life. These little creatures are not only perfect for Halloween, but they also make a whimsical addition to any spider-themed party or spooky decor. With just a few basic crochet techniques and some imagination, you can bring these adorable critters to life.
Materials
— 2.00 mm crochet hook (US C)
— 100 % cotton yarn for a 2.00 mm hook
— A pair of 6 mm safety eyesfor each spider
— Tapestry needle
— Polyfiber fill
-130 cm of craft wire
— Pliers
-A thick twig or wooden stick to hang the spiders.
Abbreviations (US Terms)
st = stitch
ch = chain
sc = single crochet
You will need:
The colors of your choice for the body of your spiders and black yarn for the legs. Also a bit of pink to embroider the cheeks.
I’ve used 100% cotton yarn (8/4 — Fingering).
Finished size:
From head to toe,each spidersmeasures 10cm approximately.
Of course, should you choose a different hook and yarn, final measures will vary
Head
Using grey…
1. Magic ring of 6 sc
2. Crochet 2 sc in each st (12)
3. Crochet 2 sc in each st (24)
4. Crochet *3 sc, 2 sc in the next st*, repeat * (30)
5. Crochet 2 sc, 2 sc in the next st, *4 sc, 2 sc in the next st*, repeat * 5 times, 2 sc (36)
6. to 15. Crochet 36 sc
Place safety eyes between rounds 7 and 8, with a distance of 8 stitches between them, and embroider the cheeks with a bit of pink yarn.
16. Crochet 2 sc, one decrease,*4 sc, one decrease*, repeat * 5 times, 2 sc (30)
17. Crochet *3 sc, one decrease*, repeat * (24)
Stuff the head firmly.
18. Crochet 1 sc, one decrease, *2 sc, one decrease*, repeat * 5 times, 1 sc (18)
19. Crochet *1 sc, one decrease*, repeat * (12)
TIP: If you want your spiders to have stripes, make the first color change here and every three rounds...
20. Crochet 2 sc in each st (24)
21. Crochet *1 sc, 2 sc in the next st*, repeat * (36)
22. Crochet *5 sc, 2 sc in the next st*, repeat * (42)
23. Crochet 3 sc, 2 sc in the next st, *6 sc, 2 sc in the next st*, repeat * 5 times, 3 sc (48)
24. to 33. Crochet 48 sc
34. Crochet 3 sc, one decrease, *6 sc, one decrease*, repeat * 5 times, 3 sc (42)
35. Crochet 42 sc
36. Crochet *5 sc, one decrease*, repeat * (36)
37. Crochet 36 sc
38. Crochet 2 sc, one decrease, *4 sc, one decrease*, repeat * 5 times, 2 sc (30)
39. Crochet 30 sc
Stuff firmly…
40. Crochet *3 sc, one decrease*, repeat * (24)
41. Crochet 24 sc
42. Crochet 1 sc, one decrease, *2 sc, one decrease*, repeat * 5 times, 1 sc (18)
43. Crochet *1 sc, one decrease*, repeat * (12)
44. Crochet 6 decreases
Fasten off yarn, leaving a long yarn tail (you will use it to hang your spiders from the twig). Close the remaining 6 stitches through the front loops only.
Legs
Make 8, using black…
1. Magic ring of 6 sc
2. to 14. Crochet 6 sc
No need to stuff.
Fasten off yarn, leaving a long tail for sewing.
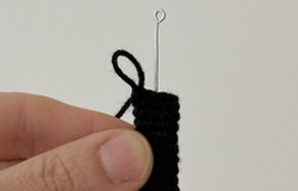
Cut a piece of 5 cm of craft wire. Using a pair of pliers, make a loop on both ends of the wire and place it inside the leg.
Assembly
— Sew the legs to the body, four on each side.
— Weave in all ends.
— You can also emboider dots and spots to the body of your spider.
— Shape the legs, bending two on each side forward and two on each side backwards.
— Using the long remaining yarn tail from the body of the spiders to tie them to the twig and hang them.