Crochet V-Stitch Toilet Paper Topper
Discover the art of creating a unique and stylish Crochet V-Stitch Toilet Paper Topper. This delightful project combines the practicality of a toilet paper cover with the beauty of the V-stitch crochet technique. With just a few simple materials and some basic crochet skills, you can transform an ordinary roll of toilet paper into a charming and eye-catching accessory for your bathroom. This project is perfect for beginners looking to expand their crochet skills or experienced crafters seeking a quick and enjoyable project. Once completed, your Crochet V-Stitch Toilet Paper Topper will not only keep your toilet paper neatly covered but also add a touch of handmade charm to your bathroom. So grab your crochet hook, select your yarn, and let your imagination run wild as you bring this delightful project to life!
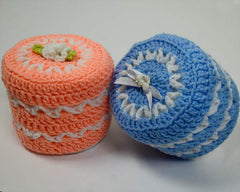
Easy Skill
Size: 5" across top x 4-1/2" long.
Materials:
- Worsted Weight Yarn:
- Blue (MC) — 3 oz, 165 yd (84 g, 149 m);
- White (CC) — 1 oz, 55 yd (28 g, 50 m)
- Small amount Green (optional — for Leaves);
- Craft or Hot Glue (optional);
- White Ribbon Flowers (optional);
- 3/8" wide White Satin Ribbon — 8" long (optional);
- Yarn Needle.
- Crochet Hook: Size I-9 (5.50 mm) or size needed to obtain gauge.
Gauge: Rnds 1-2 = 2 ½" across.
Abbreviations
- beg — beginner
- CC — contrasting color
- ch — chain
- dc — double crochet
- lp — loop
- MC — Main Color
- rem — remaining
- rep — repeat
- rnd — round
- sc — single crochet
- sl st — slip stitch
- sp — space
- st — stitch
- yo — yarn over
JOINING WITH SC
When instructed to join with sc, begin with sl knot on hook, insert hook in st or sp indicated, yo and pull up a loop, yo and draw through both loops on hook.
Special Stitches
V-Stitch (v-st):(dc, ch 1, dc) in same st or sp indicated.
TP TOPPER
Rnd 1(Right Side): Starting at top with MC, ch 1, (center ch), ch 3(counts as dc now and throughout), work 11 dc in center ch; join with sl st to first dc. (12 dc)
Rnd 2:Ch 3, 2 dc in each st around; join. (24 dc) Finish off and weave in ends.
Rnd 3:With right side facing, join CC with sl st to any dc, ch 4 (counts as dc, ch 1), dc in same st as joining, skip next st, (v-st in next st, skip next st) around; join. (12 v-sts) Finish off and weave in ends.
Rnd 4:With right side facing, join MC with sl st to any ch-1 sp, ch 3, 2 dc in same sp, dc in sp between next 2 v-sts, (3 dc in next ch-1 sp, dc in sp between next 2 v-sts) around; join.
Rnd 5:Working in back lps only, ch 3, dc in each st around; join. (48 dc)
Rnd 6:Working in both lps, ch 3, dc in each st around. Finish off and weave in ends.
Rnd 7:With right side facing, join CC with sl st to any dc, ch 4, skip next 2 sts, (v-st in next st, skip next 2 sts) around; join. (16 v-sts) Finish off and weave in ends.
Rnd 8:With right side facing, join MC with sl st to any ch-1 sp, ch 3, 2 dc in same sp, 3 dc in each ch-1 sp around; join. (48 dc)
Rnd 9-12:Rep Rnds 6-8, ending with Rnd 6.
At the end of Rnd 9, finish off and weave in ends.
Rosebud (optional)
With White, ch 8, (4 sc, sl st) in 2ndch from hook, [(4 sc, sl st) in next ch] across. Finish off leaving long end.
— Curl Rose into shape.
Leaves (optional)
With Green, ch 1 (center ch), [ch 10, sl st in center ch] twice. Finish off and weave in ends.
Finishing
Option 1: Using long end and yarn needle, sew Rose through Leaves to TP Topper.
Option 2: Tie Ribbon in a bow. Glue to top of cover. Glue Flowers over center of Bow.