Crochet Easter Bunny Face Applique
Create a charming Easter Bunny Face Applique using the art of crochet. This delightful project involves using various crochet stitches to form the shape of a cute bunny face, complete with whiskers, eyes, and a nose. You can choose pastel-colored yarn to give your bunny a festive Easter look, or opt for a more neutral palette for a classic touch. This crochet appliqué can be attached to a variety of items such as blankets, hats, or bags to add a whimsical touch to your Easter decorations. This project is perfect for crocheters of all skill levels, from beginners looking to practice basic stitches to more experienced crafters wanting to create a fun and festive Easter decoration. Enjoy the process of crocheting your very own Easter Bunny Face Appliqué and bring a touch of handmade charm to your holiday celebrations.
Skill Level: Easy Skill
Size: Bunny Face – about 4” diameter
Materials: Sport Weight Yarn
Small amounts of the following: White (W); Pink (P);Hot Pink (HP)
Additional Materials: Yarn needle; Hot/Craft Glue
15mm Moveable Eyes (2)
Crochet Hook:Size F-5 (3.75 mm) or size needed to obtain gauge.
Gauge: 9 sts = 2 inches; 5 rows = 2 inches
Abbreviations
beg beginning rep repeat
ch chain rnd round
CC contrasting color sc single crochet (s)
dc double crochet sl st (s) slip stitch (es)
hdc half double crochet sp (s) space (s)
lp (s) loop (s) st (s) stitch (es)
MC main color tr treble crochet
rem remaining yo yarn over
JOINING WITH SC
When instructed to join with sc, begin with sl knot on hook, insert hook in st or sp indicated, yo and pull up a loop, yo and draw through both loops on hook.
Special Stitches
Double Crochet Decrease (dc dec): Keeping last loop of each st on hook, dc in next 2 sts, yo and pull through 3 loops on hook.
BUNNY FACE
Rnd 1: (Right Side) Starting at center, with W, ch 3; 11 dc in 3rd ch from hook (skipped ch counts as first dc); join with sl st to first dc. (12 dc)
DO NOT TURN EACH ROUND.Rnd 2: Ch 2 (counts as first dc now and throughout) 2 dc in each dc around; join. (24 dc)
Rnd 3: Ch 2, dc in same st as joining, dc in next dc, (2 dc in next dc, dc in next dc) around; join. (36 dc) Finish off and weave in ends.
EARS (Make 2)
Inner Ear
Row 1: (Right Side) Starting at top, with P, ch 3; dc in 3rd ch from hook (skipped ch counts as first dc). (2 dc)
Row 2: Ch 2, turn, dc in first dc, dc in turning chain. (3 dc)
Rows 3-7: Ch 2, turn, (dc in next dc) across. (3 dc)
Row 8: Ch 2, turn, dc dec. (2 dc) Finish off P.
Outer Ear
Rnd 1: With right side facing, join W with sc (See: “Joining with Sc”) to last st of Row 8, sc in same sp as joining, sc evenly around outer edge of Ear; last sc in same sp as joining; join with sl st to first sc. Finish off and weave in ends.
NOSE
Rnd 1: (Right Side) Starting at center, with HP, ch 2; 6 sc in 2nd ch from hook; join with sl st to first sc. (6 sc) Finish off leaving long end. Tighten starting ch.
Finishing
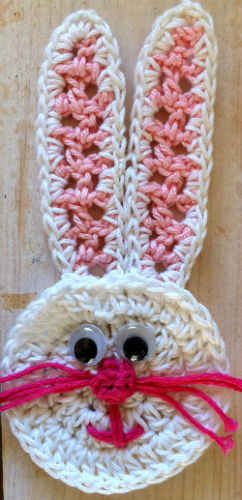
USE PHOTO AS A GUIDE
Whiskers & Nose – Cut four 3” pieces of HP yarn. Place pieces horizontally across center of face. Position Nose over center of whiskers and sew in place, securing whiskers in place.
Mouth – Using double strand of HP and straight stitches, embroider mouth.
Eyes – Position and sew (or glue) 15mm Eyes in place.
Ears – Position and sew Ears in place. Tack Ear edges together about 2” from tip.