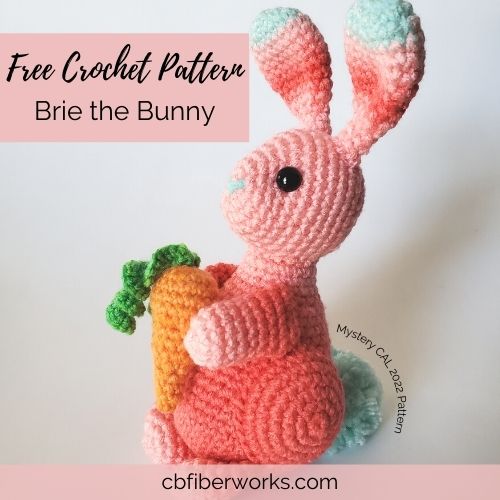
Crochet Brie the Bunny
Crochet Brie the Bunny is a delightful amigurumi pattern that brings a touch of charm and whimsy to any craft project. With its soft, fuzzy yarn and adorable floppy ears, Brie the Bunny is sure to melt hearts wherever it goes. Whether you're a seasoned crocheter or just starting out, following the clear and detailed instructions will guide you through creating your very own cuddly companion. From choosing the perfect yarn colors to stitching up each intricate detail, every step of the process is a joy to experience. Once completed, Brie the Bunny will be there to brighten your day with its sweet smile and lovable presence, making it a truly special creation to cherish.
Project Materials
- Yarn: Red Heart Super Saver Ombre (worsted, 2 skeins)
- Sea Coral (30yds)
- Color A: Lightest Pink
- Color B: Medium Light Pink
- Color C: Medium Dark Pink
- Color D: Dark Pink
- Spearmint (10yds)
- Color E: Light Mint
- Sea Coral (30yds)
- Yarn: Lionbrand Mandala (DK, 1 skein)
- Gnome
- Color F: Green (1yd)
- Color G: Orange (5yds)
- Gnome
- D/3-3.25mm hook
- Stitch markers (preferably the locking kind)
- Poly-fill
- Tapestry needle
- 12mm Safety eyes
- Scissors
- Sewing pins
- Felting needle (optional)
- Wool roving (optional)
- Pom-pom/pom-pom maker
- Scrap yarn (for the pom pom)
Stitch Abbreviations
(**) — See Project Notes Section
- MR – magic ring (**)
- Sc – single crochet (**)
- Sl st – slip stitch
- Inc – increase (**)
- Dec – decrease (**)
- St(s) – stitch(es)
Project Notes
- Final dimensions: H: 8.5in. x W: 3.5in. x L: 5in.
- This project is written in US terminology.
- Brie the Bunny is worked in the round with several elements seamed together.
- Unless otherwise specified, work in continuous rounds without using a slip stitch to join rows.
- Move stitch markers up every row as you go.
- Magic Ring: Create a magic ring and work the specified number of single crochet into it (ex. MR6 = 6sc into the ring).
- Single Crochet: Unless otherwise specified, this project uses the yarn under technique. Insert your hook into the stitch, yarn under, pull up a loop (2 loops on your hook), yarn over, and pull through both loops.
- Increase: work 2sc into the same stitch.
- Decrease: Unless otherwise specified, use the invisible decrease method. Insert your hook into the front loop of the next stitch, then insert your hook into the front loop of the following stitch, yarn over and pull through the first loop (3 loops on the hook), then yarn over and pull through all 3 loops on the hook.
Pattern
Front Paws x2
Start with Color A and a 3.25mm hook.
Color Changes
Color A (Rows 0-1), Color B (2-3), Color C (Rows 4-6), Color D (Rows 7-10)
Row 0: MR6(Place your stitch marker in the first st)
Row 1: inc 6 times. (12)
Rows 2-8: sc around. (12)
Row 9: 6sc, ch 1, turn. (6)
Row 10: 6sc. (6)
Fasten off with an 8-10in. tail.
NOTE: If you are NOT changing colors, lightly stuff the front paws. If you are changing colors, the yarn tails inside are enough stuffing.
Back Paws x2
Start with Color A and a 3.25mm hook.
Color Changes
Color A (Rows 0-1), Color B (Row 2), Color C (Rows 3-4), Color D (Rows 5-6)
Row 0: MR6(Place your stitch marker in the first st)
Row 1: inc 6 times. (12)
Row 2: [inc, sc] 6 times. (18)
Rows 3-6: sc around. (18)
Fasten off with an 8-10in. tail.
NOTE: If you are NOT changing colors, lightly stuff the back paws. If you are changing colors, the yarn tails inside are enough stuffing.
Back Thighs x2
Start with Color D and a 3.25mm hook.
Row 0: MR6(Place your stitch marker in the first st)
Row 1: inc 6 times. (12)
Row 2: [inc, sc] 6 times. (18)
Row 3: [sc, inc, sc] 6 times. (24)
Row 4: [inc, 3sc] 6 times. (30)
NOTE: Rows 5-12 are worked in flat rows, so use regular (yarn over) single crochet. The ch 1 does not count as a stitch.
Rows 5-12: 6sc, ch 1, turn. (6)
Row 13: 5sc, inc, (working in the sides of the short rows) 7sc, 24sc, (working in the sides of the short rows) 7sc, sl st into the first st. (45)
Fasten off with a 12-15in. tail.
Ears x2
Start with Color E and a 3.25mm hook.
Color Changes
Color E (Rows 0-2), Color A (Rows 3-4 & Rows 12-13), Color B (Row 5 & Rows 10-11), Color C (Row 6 & Row 9), Color D (Rows 7-8)
Row 0: MR6(Place your stitch marker in the first st)
Row 1: inc 6 times. (12)
Row 2: [inc, sc] 6 times. (18)
Rows 3-7: sc around. (18)
Row 8: [dec, sc] 6 times. (12)
Rows 9-10: sc around. (12)
Row 11: dec 6 times. (6)
Rows 12-13: sc around. (6)
Fasten off with a 6in. tail. Don’t stuff the ears, just press flat.
Head
Use Color A and a 3.25mm hook.
Row 0: MR6(Place your stitch marker in the first st)
Row 1: inc 6 times. (12)
Row 2: [inc, sc] 6 times. (18)
Row 3: sc around. (18)
Row 4: [inc, sc] 3 times, 12sc. (21)
Place an additional stitch marker around the second increase of Row 4. This indicates the center line of the face.
Row 5: [inc, 2sc] 3 times, 12sc. (24)
Row 6: [inc, 3sc] 6 times. (30)
Rows 7-12: sc around. (30)
Place eyes between Rows 4 and 6 with 6-7 stitches in between, using the marked increase as a center point. Don’t add the backs on the eyes just yet.
OPTIONAL: Cut a length of Color A (about 8in. long) and use a tapestry needle to shape the face. I indented the eyes slightly, so the bridge of the nose is more pronounced.
Once you’ve shaped the face (if you’re going to) put the backs on the safety eyes to secure them and continue to Row 13.
Row 13: [dec, 3sc] 6 times. (24)
Row 14: [sc, dec, sc] 6 times. (18)
Start stuffing the head.
Row 15: [dec, sc] 6 times. (12)
Row 16: dec 6 times. (6)
Fasten off with a 6in. tail. Sew the hole closed and weave the remaining yarn tail into the head.
Nose
You can embroider, felt or use a safety nose (if using a safety nose, be sure to add it before Row 13). I used a light mint color of wool roving and a felting needle to felt a small nose.
Place the nose on or just above the magic ring, between the eyes.
Body
Start with Color D and a 3.25mm hook.
Color Changes
Color D (Rows 0-15), Color C (Rows 16-19), Color B (Row 20-23), Color A (Row 24-26)
Row 0: MR6 (Place your stitch marker in the first st)
Row 1: inc 6 times. (12)
Row 2: [inc, sc] 6 times. (18)
Row 3: [sc, inc, sc] 6 times. (24)
Row 4: [inc, 3sc] 6 times. (30)
Row 5: [2sc, inc, 2sc] 6 times. (36)
Row 6: [inc, 5sc] 6 times. (42)
Rows 7-10: sc around. (42)
Row 11: [dec, 5sc] 6 times. (36)
Rows 12-14: sc around. (36)
Row 15: [2sc, dec, 2sc] 6 times. (30)
Rows 16-18: sc around. (30)
Row 19: [dec, 3sc] 6 times. (24)
Start stuffing the body.
Rows 20-22: sc around. (24)
Row 23: [sc, dec, sc] 6 times. (18)
Rows 24-26: sc around. (18)
Fasten off with a 14-16in. tail.
Pom-Pom
You can use either a store-bought pom-pom or make one using yarn and a pom-pom maker. I used the lightest shade from Red Heart Super Saver Ombre (Spearmint) to create a light mint pom-pom for Brie’s tail. I used the smallest size of pom-pom makers and it was still a bit large, so I trimmed mine down.
Carrot
Start with Color G and a 3.25mm hook.
NOTE: For this section, I held two strands of orange (Color G) together. This creates a carrot about 2.25in. long, but if you want a smaller carrot, just use one strand.
Row 0: MR6 (Place your stitch marker in the first st)
Row 1: inc 6 times. (12)
Row 2: [inc, sc] 6 times. (18)
Rows 3-5: sc around. (18)
Row 6: [dec, sc] 6 times. (12)
Start stuffing.
Rows 7-9: sc around. (12)
Row 10: dec 6 times. (6)
Rows 11-13: sc around. (6)
Fasten off with a 6-8in. tail and sew the remaining hole closed.
Carrot Stem
Start with Color F and a 3.25mm hook.
Ch 15
Row 1: 3sc in the second ch from the hook, 3sc in each of the next 13 ch, ch 12. (42)
The stitch count above only includes the sc, not the chains.
Fasten off with a 5-6in. tail.
Assembly
Carrot & Stem
Pin the stem to the top of the carrot where the ch meets the curly part of the stem and use the yarn tail from the initial ch and a tapestry needle to sew the stem to the carrot. Weave the other yarn tail either through the chain or into the carrot (if you want it fixed to the carrot).
Back Paws & Back Thighs
Press the back legs flat so the seams are flush and use a tapestry needle to sew each leg shut. Don’t weave in the yarn tail yet.
Then place the back thighs on a flat surface. Line up each back paw with the short rows on one side of each back thigh. Make sure to line them up on the same side, so you get a left and a right leg.
Using the yarn tail from each back paw, sew the seamed edge of the back paw to the short row side of the back thigh.
Weave in the yarn tails left over from the back paws.
Pin the back legs on each side of the body, slightly toward the back. The straight edges on the bottom should line up.
Then sew along the outside edges of each of the thighs, lightly stuffing each thigh as you go. Weave any remaining yarn tails into the body.
Head
Pin the head to the neck of the body. Using the yarn tail from the neck and a tapestry needle to sew the head to the neck. Weave any remaining yarn tail into the body.
Front Paws
Pin the front paws at a diagonal just above the top edge of the thigh. Sew along the outside edge of the arm, then along the inside of the arm. Weave the remaining yarn tail inside the body.
Ears
Pin the ears between Rows 9 and 12 with about 2-3 stitches between. Use the yarn tails and a tapestry needle to sew the ears to the body. Weave any remaining yarn tails into the head.
Tail
Pin the pom-pom to the backside of your bunny, 3-4 rows above the seam of where the back legs are connected to the body. Use a tapestry needle to sew the pom-pom to the body.
Carrot
You can either sew the carrot in place between Brie’s paws or just pin it (in case you don’t want the carrot to be permanent).