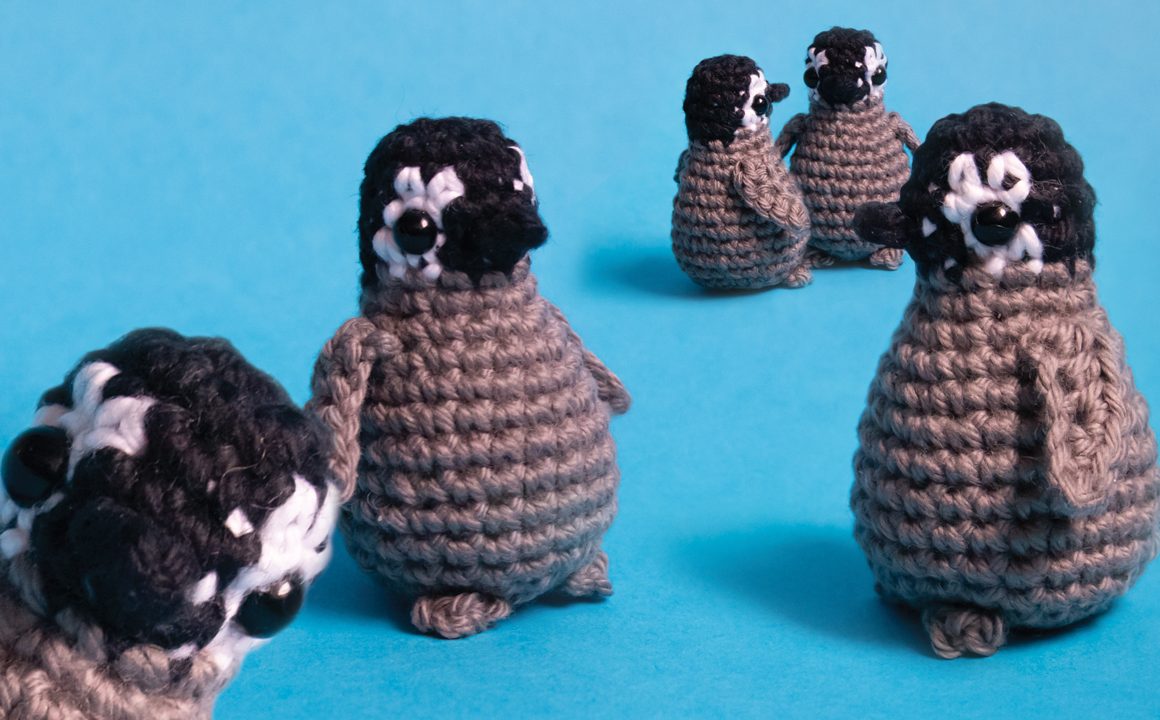
Crochet Beautiful Penguin
Crocheting a beautiful penguin can be a delightful and rewarding experience! From their adorable black and white color pattern to their cute little flippers, penguins make a charming subject for your next crochet project. With a few skeins of yarn, a hook, and a bit of patience, you can bring these sweet creatures to life stitch by stitch. Whether you're making one as a gift for a friend or simply indulging in some creative therapy for yourself, crafting a crocheted penguin is a sure way to spread smiles and warmth. So go ahead and dive into this fun and heartwarming crochet project!
About the pattern
Terminology
This pattern is written in American terminology.
Size
The penguin will be approx. 5 cm/1” short if using the indicated hook and yarn. If you want it to be larger or smaller, you can use a different yarn weight and adjust the hook size accordingly.
Construction
The feet are crocheted on the body. The beak and wings are sewn on. The eyes can be embroidered if you don’t want to use safety eyes.
Techniques
This pattern will require techniques such as the magic ring, invisible sc decreases, and changing colors.
Tips and tricks
- You crochet in seamless spirals.
- Crochet as tightly as you comfortably can. This will ensure your amigurumi will have the right scale and no filling will show through any gaps. If you tend to crochet quite loosely, try using a smaller-sized hook.
- For safety reasons, please don’t use safety eyes if young children will play with this amigurumi.
- Have fun! In my opinion, crocheting shouldn’t be just about the result, but mainly about enjoying the process.
Materials and Tools
- DK/light worsted yarn in black, white and gray [I used Paintbox Yarns Cotton DK in Pure Black (402) Paper White (401) and Slate Grey (406)]
- 2.5mm crochet hook / Size B-1 or C-2 depending on how tightly you crochet
- Fiberfill
- 5mm or smaller safety eyes (optional)
- Stitch marker
- Yarn needle
- Sewing pin
- Scissors
(Affiliate links)
Abbreviations
R(s) = row(s)
Rnd(s) = round(s)
St(s) = stitch(es)
Ch(s) = chain(s)
sk = skip
Sl st = slip stitch
Sc = single crochet
Hdc = half double crochet
Inc = sc increase: 2 sc in same st
Dec = single crochet invisible decrease
BLO = back loops only
FLO = front loops only
tog = together
[…] = series of stitches to be repeated
(…) = stitch count of a completed round
*… = number of repetitions
img = image
Instructions
In rounds 3 to 5 you will crochet with two different colours. I recommend carrying the yarn that you are not currently using through the stitches. For more guidance on this, watch this part of the video tutorial.
Change colors in the stitch before the first stitch in the new color. Stitches to be crocheted in black are marked with B:, white with W: and gray with G:.
B = black W = white G = gray
Crochet the Head
Make a magic ring in black.
Rnd 1: 6 sc in magic ring (6)
Rnd 2: 6 inc (12)
Rnd 3: 3 sc, W: 2 sc, B: 2 sc, W: 2 sc, B: 3 sc (12)
Rnd 4: 3 sc, W: 2 sc, B: 2 inc, W: 2 sc, B: 3 sc (14)
Rnd 5: 3 sc, W: 2 sc, B: 2 dec, sc, W: 2 sc, B: 2 sc (12)
Rnd 6: 3 sc, G: 9 sc (12)
Rnd 7: [3 sc, inc]*3 (15)
Rnd 8: [4 sc, inc]*3 (18)
Secure the last stitch with a stitch marker while you attach the eyes.
Insert the safety eyes on the white patches in between rounds 4 and 5.
OR embroider the eyes, as explained below and in this part of the video tutorial.
- Cut a piece of black yarn approximately 12 inches (30 cm) long. Tie a double-knot in the yarn, leaving one end approximately 4 inches (10 cm) long and the other about 8 inches (20 cm) long.
- Thread the longer end of the yarn (8 inches/20 cm) onto a yarn needle. Insert the needle at the center of one white patch (where the eye will be, between rounds 4 and 5) and bring it out at the corresponding spot on the opposite white patch.
- Pull the yarn through gently until the double-knot on the starting side stops the yarn from moving further.
- Tie another double-knot on the second white patch, pulling it snugly against the head to secure the yarn in place. <img 3="" and="" 4="">
- Bring both yarn ends to the inside of the head by inserting them through the same openings between stitches on each side. Be careful not to distort the surface stitches as you pull the yarn through. <img 5="" and="" 6="">
- Tie the yarn ends together securely in a knot to prevent the embroidery from loosening. Use the yarn ends to fill the head. <img 7="">
Fill the head with fiberfill.
Continue crocheting the body
Rnd 9: [5 sc, inc]*3 (21)
Rnd 10: 21 sc (21)
Rnd 11: [6 sc, inc]*3 (24)
Rnd 12 to 15 (4 rnds): 24 sc (24)
Rnd 16: [6 sc, dec]*3 (21)
Rnd 17: [5 sc, dec]*3 (18)
Fill the body with fiberfill.
Rnd 18: BLO: [sc, dec]*6 (12)
Rnd 19: 6 dec (6)
Fasten off and close the round.
Crochet the beak in black
Ch 2, sc in 2nd ch from hook (1)
Fasten off, leaving a long enough yarn end for sewing.
Crochet the wings in gray
Both wings are crocheted the same way.
One of the wings will have the ‘wrong side’ facing outward in order to have two symmetrical, slightly forward-pointing wings.
Ch 6
R 1: Sc 2 (starting in 2nd), inc, 2 hdc (6)
Fasten off, leaving a long enough yarn end for sewing.
Crochet the feet
- Find the center front loop of round 17 and mark it with a stitch marker.
- Join the gray yarn at the third front loop of round 17, counting the center front loop with the stitch marker in as the first.
- Ch 1 to secure the yarn, [ch 1, sl st in same back loop]*3
- Fasten off and weave both yarn ends in.
- Join the gray yarn at the third front loop in the other direction, counting the center front loop with the stitch marker in as the first.
- Repeat the above steps for the second foot.
Assembly
- Sew the beak in between rounds 4 and 5, centered between the eyes, using both yarn ends. Then weave them in at the back of the head and cut them short.
- Sew the base of the wings in between rounds 8 and 9 on each side of the body. One of the wings will have the wrong side of the work facing outward. Weave the yarn ends in and trim them short.
Congratulations! Your little penguin is now complete!