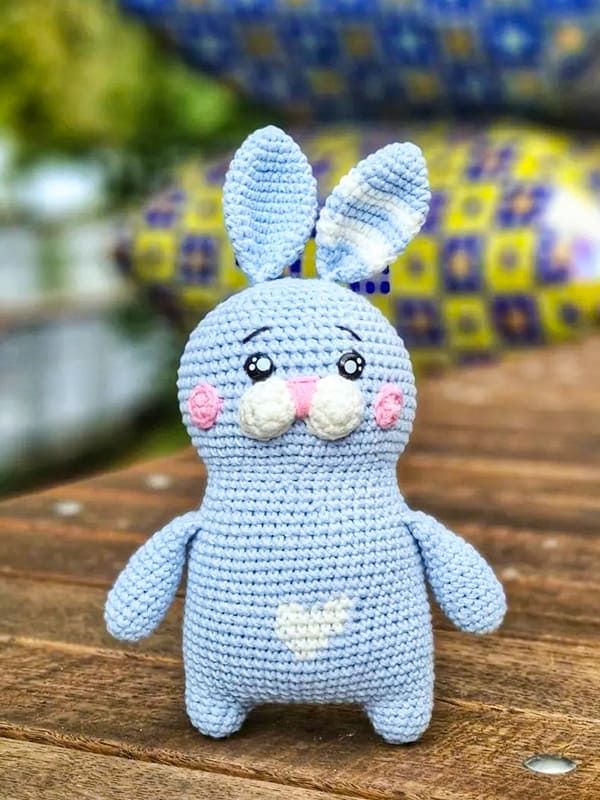
Crochet Love Bunny Amigurumi
Crochet Love Bunny Amigurumi is an adorable and fun little project that brings joy to both the creator and the recipient. With its cute design and soft yarn, this amigurumi bunny is perfect for spreading love and cheer. The intricate details and customizable features make it a unique and personal gift for someone special. Whether you're an experienced crocheter or just starting out, crafting a Love Bunny Amigurumi is a delightful way to brighten someone's day with a handmade touch.
Materials and tools:
1. hook 2 mm
2. 8mm eyes on secure mount
3. yarn: pink – YarnArt Jeans 78 – 30g milky – YarnArt Jeans 01 – 6g white – YarnArt Jeans 62 – 1g light pink – YarnArt Jeans 36 – 1g
4. thin black thread for embroidery of eyebrows and eyelids
5. marker thread
6. scissors
7. pins
8. needle
9. filler
Abbreviations
- MR: Magic ring
- Sc: Single crochet
- Dec: Decrease
- Inc: Increase
- Ch: Chain
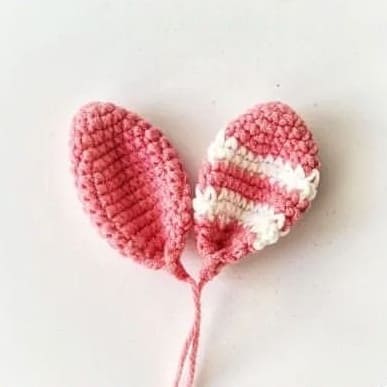
Ears:
We crochet in pink. Don’t stuff your ears.
Rnd 1. 6 sc in MR (6)
Rnd 2. (1 sc, inc) x3 (9)
Rnd 3. (2 sc, inc) xs (12)
Rnd 4. (3 sc, inc) x3 (15)
Rnd 5. (4 sc, inc) x3 (18)
Rnd 6. (5 sc, inc) x3 (21)
color change – milky.
Rnd 7-8. 21 sc (21) -2 rows
color change – pink
Rnd 9-10. 21 sc (21) -2 rows
color change – milky
Rnd 11-12. 21 sc (21) – 2 rows
color change – pink
Rnd 13. (5 sc, dec) x3 (18)
Rnd 14. (1 sc, dec) x6 (12)
+3 sc
Rnd 15. Fold the part in half and crochet 6 sc for both sides 16. Fold the part in half and crochet: ch, 3 sc for both sides Cut the thread, leaving a short tail. We crochet the second ear in the same way, but do not change the color. The ear must be uniform.
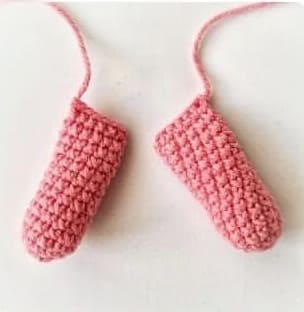
Arms (Make 2):
We crochet in pink.
Stuff your hands 1/3.
Rnd 1. 6 sc in MR (6)
Rnd 2. inc x 6 (12)
Rnd 3-14.12 sc (12) – 12 rows
Rnd 15. Fold the part in half and crochet 6 sc for both sides.
Cut off the thread, leaving a short tail.
Muzzle (Make 2):
We crochet with milky color.
Rnd 1. 6 sc in MR (6)
Rnd 2. inc x 6 (12)
Rnd 3. 12 sc (12), slst.
Cut the thread, leaving a long tail for sewing.
Cheeks (Make 2):
Light pink color.
Rnd 1. 6 sc in MR (6), slst.
Cut the thread, leaving a long tail for sewing.
Legs (Make 2):
We crochet in pink
Rnd 1. 6 sc in MR (6)
Rnd 2.inc x 6(12)
Rnd 3-4. 12 sc (12) -2 rows slst.
On the first leg, cut the thread, leaving a short tail.
On the second leg, do not cut the thread, but continue crocheting.
Body and Head:
We crochet in pink.
Rnd 5. 10 ch, connect to the first leg with sc (this is the first sc along the leg), 11 sc, 10 sc along the chain of ch, 12 sc, 10 sc along the chain of ch (44)
We put a marker thread.
Rnd 6.44 sc (44)
Rnd 7. 12 sc, (inc, 2 sc) x 4, 20 sc (48)
Rnd 8-12. 48 sc (48) – 5 rows
Rnd 13. 18 sc,
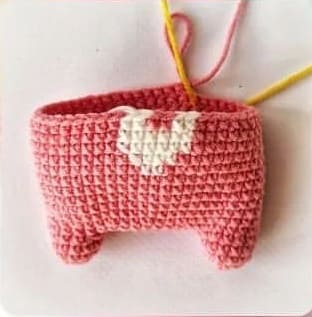
color change – milky 2 sc (this is the lower part of the heart – it should be placed in the center of the tummy), color change – pink 23 sc, popcorn (this is the tail) – it should be placed in the back center of the back, 4 sc (48)
Rnd 14. 17 sc,
color change – milky 4 sc,
color change – pink 27 sc (48)
Rnd 15. 16 sc,
color change – milky 6 sc,
color change – pink 26 sc (48)
Rnd 16. 16 sc,
color change – milky 6 sc,
color change – pink 26 sc (48)
Rnd 17. 16 sc,
Color change – milky 2 sc,
Color change – pink 2 sc,
color change – milky 2 sc,
color change – pink 26 sc (48)
Cut off milk yarn.
Rnd 18-23.48 sc (48) -6 rows
Rnd 24. crochet handles on the sides of the calf 48 sc (48)
Rnd 25. 48 sc (48)
Rnd 26. (6 sc, dec) x6 (42)
Rnd 27. 42 sc (42)
Rnd 28. (5 sc, dec) x6 (36)
Rnd 29. 36 sc (36)
Stuff tightly.
Rnd 30. (5 sc, inc) x6 (42)
Rnd 31. (6 sc, inc) x6 (48)
Rnd 32. (7 sc, inc) x6 (54)
Rnd 33-41. 54 sc (54) -9 rows
Insert eyes between 38 and 39 rows at a distance of 6-7 sc. 42. (7 sc, dec) x6 (48)
Rnd 43. (6 sc, dec) x6 (42)
Rnd 44.42 sc (42)
Rnd 45. (5 sc, dec) x6 (3b)
Rnd 46. (4 sc, dec) X6 (30)
Rnd 47. (3 sc, dec) X6 (24)
Fill.
Rnd 48. crochet ears on the sides of the head (2 sc, dec)x6 (18)
Rnd 49. (1 sc, dec) x6 (12)
Fill.
Rnd 50. dec x 6(6), slst.
Cut the thread, pull the hole, hide the thread inside the part.
Assembly and decoration
1. Hem the ears.
2. Sew both parts of the muzzle at a distance of 1-2 vertical rows between them. Stuff the muzzle while sewing.
3. Sew both parts of the muzzle in the center with a few stitches. 4. Embroider the spout in light pink.
5. Sew cheeks at a distance of 1-2 vertical rows from the muzzle.
6. Embroider the white of the eyes in white.
7. Embroider the upper eyelid and eyebrows with a thin black thread.