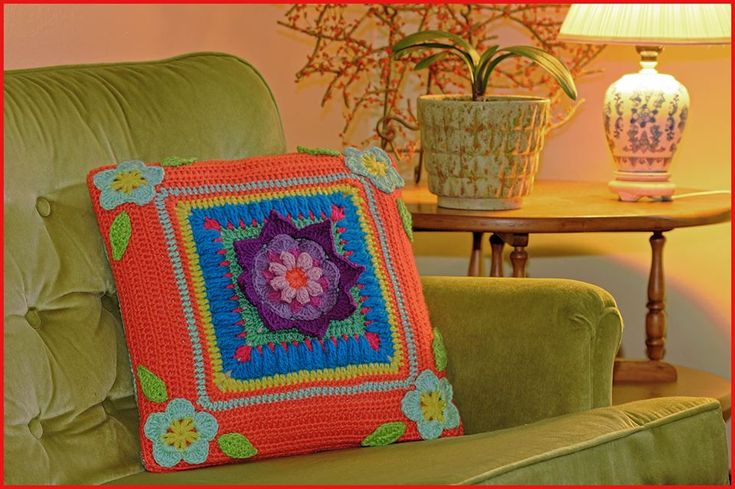
Crochet Blooming Daydreams Throw Pillow
The Crochet Blooming Daydreams Throw Pillow is the perfect cozy addition to any living space! With its intricate design and vibrant colors, it adds a touch of whimsy and charm to your home decor. This lovely pillow is not only visually appealing but also incredibly soft and comfortable, making it ideal for lounging or adding a pop of color to your couch or bed. Snuggle up with this beautiful throw pillow and let your daydreams bloom in style and comfort!
Materials:
–Red Heart Super Saver Yarn in Flamingo
–Red Heart Super Saver Yarn Orchid (Dark and Light)
–Red Heart Super Saver Yarn Jade
–Red Heart Super Saver Yarn Yellow
–Red Heart Super Saver Yarn Pool
–Red Heart Super Saver Yarn Aruba Sea
–Red Heart Super Saver Yarn Spring Green
–G-6/4.25mm Crochet Hook
–Yarn Needle
–Scissors
-16 Inch Pillow Form
NOTES:
-You can use a smaller or larger hook to make this square depending on your tension. I wouldn’t use anything larger than an I-5.5mm Crochet Hook though.
-The finished square measures 16 inches, but you can stop at any round to make this smaller, or you can continue on to make it larger just repeating the last few rounds.
-This square is worked from the center outward and then small appliques are made to sew on (the appliques are optional)
-This project used about 600 yards of yarn
-The backside of the pillow was a solid granny square type of square, but you can make rows or any other backing to make yours the way you want.
-You could make a bunch of these squares and make a throw blanket and then make the pillow as a matching set!
-Colors used:
Rnd 1: Coral
Rnd 2: Orchid
Rnd 3: Bright Orchid
Rnd 4: Boysenberry
Rnd 5: Dark Orchid
Rnd 6: Jade
Rnd 7: Jade
Rnd 8: Flamingo
Rnd 9: Pool
Rnd 10: Yellow
Rnd 11: Flamingo
Rnd 12: Egg Blue
Rnds 13-22: Flamingo
Back of Pillow: Egg Blue
Flowers: Center: Yellow Outside: Egg Blue
Special stitches:
- Ch(s): chain(s)
- YO: Yarn Over
- St(s): Stitch(es)
- Sl st: slip stitch
- SK: Skip
- SC: Single Crochet
- HDC: Half-Double Crochet
- DC: Double Crochet
- TR: Treble Crochet
- Popcorn: 6 DC in same sp, remove hook from last dc, insert hook into 1st dc of grouping, put loop back onto hook, pull through, pull tight, popcorn made
- Picot: Ch 3, sl st to 3rd ch from hook (Picot made)
- BPSC: Back Post Single Crochet
- 3TC Cluster: [YO twice, Insert Hook into sp, YO pull through, YO pull through 2 loops] 3 times, YO pull through all 4 loops on the hook
Pattern:
Start with Magic Ring or ch 4 or 5 and sl st to beginning to form ring.
Rnd 1: ch 3, 15 DC in ring. sl st to beginning ch up 3. (16 sts)
Rnd 2: In any st, ch 3, Beg. Popcorn in same stitch, * Ch 2, sk next st, Popcorn in next st, repeat from * around, ch 2, sl st to beg. popcorn. (8 popcorns, 8 ch 2 sps)
Rnd 3: in any ch 2 sp, ch 3, work a 4 DC in same sp, * sc in popcorn, 5 DC in next sp, repeat from * around, sl st to beginning. (8 Shells)
Rnd 4: In any sc, ch 3, 6 DC in same st, *Sc in middle st of shell, 7 DC in next sc, repeat from * around, sl st to beginning ch up 3. (8 Shells)
Rnd 5: In any SC, ch 1, sc in same st, * Ch 5, sk shell, sc in next sc, repeat from * around, sl st to beginning sc. (8 ch 5 sps)
Rnd 6: In any ch 5 sp, ch 1, [sc, hdc, 2dc, tc, picot, tc, 2dc, hdc, sc] in each ch 5 sp around. Sl st to beginning sc. Fasten off, weave in ends. (8 Pointed Petals)
Rnd 7: Working BEHIND your work, Attach Yarn to sc from Round 4. Ch 6, *BPSC around next sc from Round 4, ch 5, Repeat from * around, Sl st to 1st ch of beginning ch 6. (8 Ch 5 sps) (Optional: Instead of BPSC’s you could just slip stitch)
Rnd 8: In any ch 5 sp: Ch 3, 5 DC in same sp, * [5DC, ch 2, 5 DC] in next sp, 5 DC in next sp, repeat from * around, ending with [5DC, ch 2, 5DC] in last sp, sl st to ch up 3. (60 DC)
Rnd 9: Ch up 3, DC in each st around putting [2DC, ch 2, 2 DC] in the corners, sl st to beginning. (19 DC on each side)
Rnd 10: In any corner: Ch 3, [DC, ch 2, 2DC] in same corner sp, * Ch 1, sk 1 st, DC in next, repeat from * until next corner, [2 DC, ch 2, 2 DC] in corner. Repeat around. Sl st to ch up 3.
Rnd 11: In any corner, ch 3, [DC, ch 2, 2 DC] in same corner sp, * DC in next 2 sts, [3TC cluster in skipped st from rnd 9, DC in next st] 10 times. DC in next st, [2DC, ch 2, 2 DC] in corner, repeat from * around, sl st to ch up 3.
Rnd 12: In any corner: Ch 2, [HDC, ch 2, 2HDC] In same corner sp, HDC in each st around putting [2HDC, ch 2, 2 HDC] in each corner.
Rnd 13: Repeat round 12
Rnd 14: In any corner: Ch 2, HDC in each st around putting [HDC, ch 2, HDC] in corners
Rnds 15-22: Repeat Round 14, Turn your work each round or every other round so your square doesn’t get wonky!
You can continue to make the square bigger, or you can fasten off sooner depending on the size you need to make your square.
Fasten off,
Weave in all ends.
Backside of Pillow:
Ch 4 or 5, sl st to beginning to form a ring (you can start with magic ring if you want)
Rnd 1: Ch up 3 (counts as DC), 2 DC in ring, ch 2, [3 DC in ring, Ch 2] 3 times, sl st to beg. ch.
Rnd 2: DC in each st putting [2DC, ch 2, 2 DC] in corners.
Repeat Round 2 as many times as you need until your square is big enough. I did a total of 15 Rounds for the back of my pillow.
Fasten off with REALLY LONG TAIL for sewing.
Optional: Crochet your front and back together using single crochet or slip stitches.
Flower: Make 4.
Ch 4, Sl st to beg. to form a ring.
Rnd 1: Ch 4 (counts as DC+Ch 1 sp), [DC, Ch 1] 9 times in ring. Sl st to 3rd ch of beg. ch up 4. (10 DC/10 ch sps) Fasten off
Rnd 2: In any ch 1 sp, Ch 3 (counts as DC), [2DC, 3 TC, 3 DC] in same sp, *Sl st in next sp, [3 DC, 3TC, 3DC] in next sp, repeat from * around. (5 petals made)
Fasten off with long tail for sewing.
Leaves: Make 8.
Ch 9
sc in 2nd ch from hook, HDC in next, DC in next 3, HDC in next, SC in next, Sl St in last ch, ch 2, Sl st in same ch
Work on opposite side of foundation ch: SC in next, HDC in next, DC in next 3, HDC in next, SC in last, Sl st to beginning sc, Fasten off with long tail for sewing.
Assembly:
Sew appliques onto front of pillow cover. Sew front and back together but before closing completely, insert pillow form, then sew up the rest.
Fasten off, weave in any loose ends.
Enjoy!