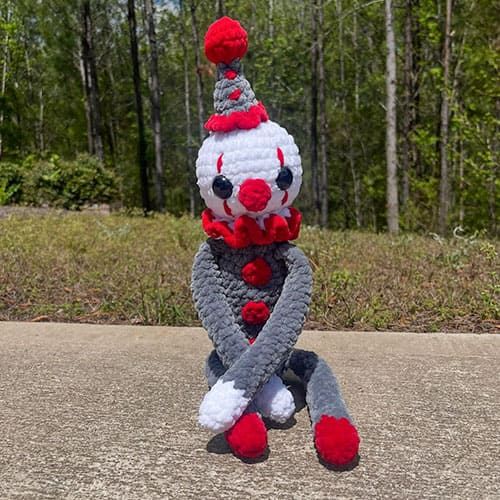
Crochet Plushie Clown Doll Amigurumi
Creating a Crochet Plushie Clown Doll Amigurumi is not only a delightful craft project but also a whimsical way to add charm to any room! These charming little dolls are perfect for bringing a smile to anyone's face with their colorful outfits and sweet expressions. The process of crafting your own amigurumi allows for endless creativity, from choosing the perfect yarn colors to adding unique touches like tiny hats or juggling balls. Whether you're a seasoned crocheter or just starting out, this adorable project is sure to spark joy and bring a touch of fun to your handmade collection.
Abbreviations:
- MR- magic ring
- sc- single crochet
- inc- increase
- dec- decrease
- slst- slip stitch
- ch- chain
- st- stitch
Materials:
- Weight 6 yarn (I used sweet snuggles lite & chenille home slim)
- Your preferred crochet hook size (I used 5mm)
- Safety eyes- 22mm
- Needle for sewing
- Scissors
- Stitch marker
Arms & legs (make 4)
Starting with foot/hand color.
R1. sc 6 in MR (6)
R2. inc, sc 4, inc (8)
R3-4. sc around (8) (2 rounds)
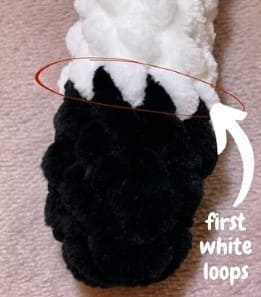
Switch to body color.
R5-22. sc around (8) (18 rounds)
Leave limbs unstuffed.
Fold in half, sc 4 across top, leaving a small tail (these will be crocheted into the body later).
Arm & leg ruffles
Attach with a slipknot to the back of row 5 (see photo).
Sc 3 in first st, slst into next repeat around (slst back into beginning st to connect sides together).
Fasten off, tie 2 yarn tails together & weave in ends.
Body
Using body color.
R1. sc 6 in MR (6)
R2. inc x6 (12)
R3. (sc,inc)x6 (18)
R4. (sc2,inc)x6 (24)
R5. sc 2, attach 1st leg with 4 sc into body, sc 7, attach 2nd leg with 4sc into body, sc 7 (24)
R6-18. sc around (24) (13 rounds)
R19. (sc2,dec)x6 (18)
Stuff body.
R20. sc 3, attach 1st arm with 4sc into body, sc 5, attach 2nd arm with 4 sc into body, sc 2 (18)
R21. (sc,dec)x6 (12)
R22-23. sc around (12) (2 rounds)
Finish stuffing.
Slst into next st and fasten off, leaving small tail.
Head
R1. sc 6 in MR (6)
R2. inc x6 (12)
R3. (sc,inc)x6 (18)
R4. (sc2,inc)x6 (24)
R5. (sc3,inc)x6 (30)
R6. (sc4,inc)x6 (36)
R7-10. sc around (36) (4 rounds)
R11. (sc4,dec)x6 (30)
R12. (sc3,dec)x6 (24)
Insert eyes to your liking.
(I put mine between rows 9 & 10, 5 visible stitches apart) – see photo.
R13. (sc2,dec)x6 (18)
Stuff & shape head.
R14. (sc,dec)x6 (12)
Finish stuffing.
Slst into next st and fasten off, leaving long tail to sew to body.

Hat
R1. sc 4 in MR (4)
R2. sc around (4)
R3. (sc,inc)x2 (6)
R4. (sc2,inc)x2 (8)
R5. (sc3,inc)x2 (10)
R6. (sc4,inc)x2 (12)
R7. (sc5,inc)x2 (14)
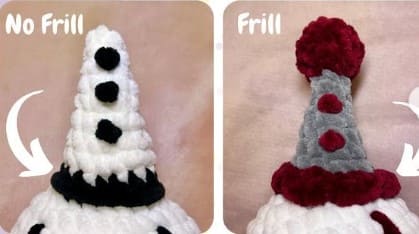
No frill variant.
R8. (sc6,inc)x2 (16)
Change to accent color.
R9. sc around (16)
Frill variant.
Change to accent color.
R8. 4 sc all in one st, slst into next st x7
Stuff the tip of the hat lightly.
Slst into next st & fasten off, leaving long tail for sewing.
Hat pompom
R1. sc 6 in MR (6)
R2. inc x6 (12)
R3. sc around (12)
R4. (sc,dec)x6 (8)
Lightly stuff.
Slst into next st, fasten off & leave a tail to sew to hat.
Nose
R1. sc 4 in MR (4)
R2. inc x4 (8)
Slst into next st & fasten off, leaving a tail to sew to face later in assembly.
Outfit pompoms (make 3)
R1. sc 6 in MR (6)
Slst into next st to connect, fasten off & leave tail to sew to body in assembly.
Makeup
Add eye makeup design of your choice and optional blush (you can also add a mouth if that’s the look you’re going for)
Hat details
Add any details to your hat you’d like.
I added dots using the french knot method.
Neck ruffle
Ch 14
R1. starting in 2nd ch from hook, inc down ch x13 (26)
Ch 1, turn
R2. inc x26 (52)
Switch to accent color in last st of last round.
Ch 1, turn
R3. sc across (52)
Weave in short tails, leaving a long tail from the working accent color yarn & leaving long tail from working main color (see image below).
Assembly