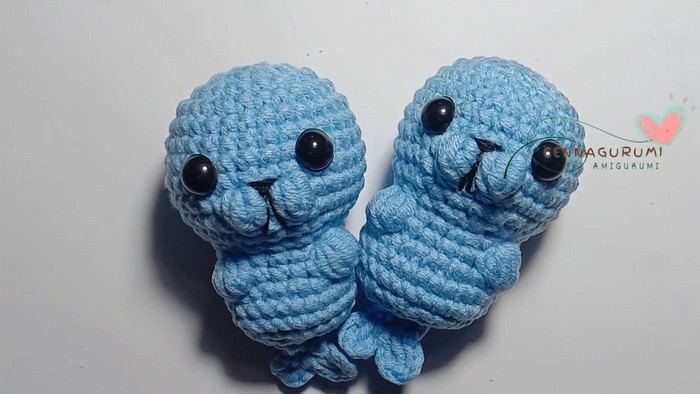
Crochet Little Baby Seal Amigurumi
Crocheting a Little Baby Seal Amigurumi is a delightful and charming project that brings joy to both the maker and the recipient. With soft yarn and a pattern full of cuteness, creating this tiny seal brings warmth and smiles. The intricate details in each stitch give the amigurumi its unique character, making it a wonderful handmade gift for any occasion. Whether you're an experienced crocheter or just starting out, crafting this adorable seal is a fun and rewarding adventure that will surely melt hearts with its sweetness.

Baby Seal Amigurumi Crochet Pattern
Terms Used:
- Magic Ring (MR): A technique to start crochet in the round.
- Single Crochet (SC): A basic crochet stitch.
- Increase SC (Inc): Two single crochets made in the same stitch.
- Decrease SC (Dec): Two stitches joined together into one stitch.
- Slipstitch (Slst): Used to join stitches or rounds.
- Bubble Stitch (Bobble): Group of 3 or 5 double crochet stitches in the same stitch, worked together to form a small bump.
- Chain (Ch): Basic crochet foundation.
Step-by-Step Pattern
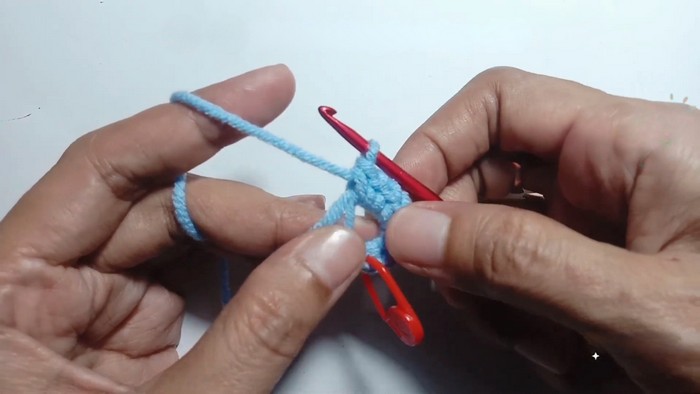
Row 1: Create Magic Ring
Make 8 Single Crochet (SC) into the magic ring.
Slipstitch (Slst) to join.
Row 2: Increase
Chain 1, then make 1 SC increase in each stitch around (Inc x 8).
Total number of stitches: 16 stitches.
Slst to join.
Row 3: Gradual Increase
Chain 1, then repeat (1 SC, Inc) around the row (8 times).
Total number of stitches: 24 stitches.
Slst to join.
Row 4: Further Increase
Chain 1, then repeat (3 SC, Inc) around (6 times).
Total number of stitches: 30 stitches.
Slst to join
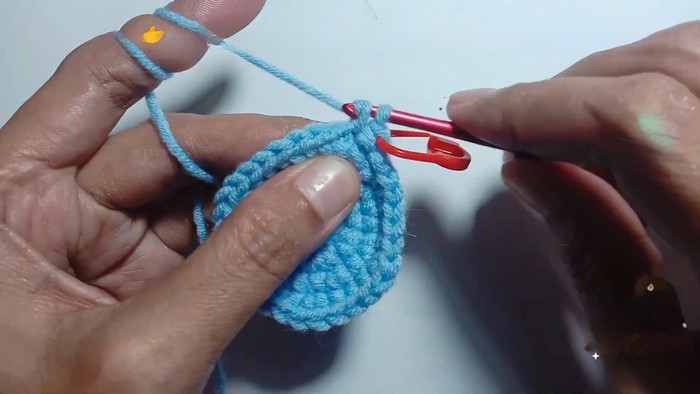
Row 5-8: Maintain Shape
Chain 1, make 1 SC in each stitch around.
Total number of stitches: 30 stitches each row.
End each row with a Slst.
Row 9: Adding Bubble Stitch
Chain 1, work 10 SC, then create Bobble Stitch (3 DC), 1 SC, another Bobble Stitch (3 DC), and finish with 17 SC.
Total: 30 stitches.
Slst to join.
Row 10: Regular Row
Chain 1, make 1 SC in each stitch around.
Total: 30 stitches.
Slst to join.
Row 11: Start Decreasing
Chain 1, repeat (3 SC, Dec) around (6 times).
Total: 24 stitches.
Slst to join.
Row 12: Decrease Further
Chain 1, repeat (1 SC, Dec) around (8 times).
Total: 16 stitches.
Slst to join.
Row 13: Shaping with Front Loop Only (FLO)
Chain 1, use front loop only (FLO) and repeat (3 SC, Inc) around (4 times).
Total: 20 stitches.
Slst to join.
Start stuffing the body as needed.
Row 14: Adding More Bubble Stitches
Chain 1, work 5 SC, then create Bobble Stitch (5 DC), 4 SC, another Bobble Stitch (5 DC), and finish with 9 SC.
Total: 20 stitches.
Slst to join.
Row 15: Gradual Increase
Chain 1, work 6 SC, then Inc (4 times) across the row, and finish with 10 SC.
Total: 24 stitches.
Slst to join.
Row 16-17: Maintain Shape
Chain 1, make 1 SC in each stitch around.
Total number of stitches: 24 stitches each row.
End each row with a Slst.
Row 18: Start Final Decreasing
Chain 1, repeat (2 SC, Dec) around (6 times).
Total: 18 stitches.
Slst to join.
Row 19: Continue Decreasing
Chain 1, repeat (1 SC, Dec) around (6 times).
Total: 12 stitches.
Slst to join.
Stuff the body as needed.
Row 20: Final Decrease
Chain 1, repeat Dec around (6 times).
Total: 6 stitches.
Slst to join.
Closing and Adding Flippers
Place the seal facing forward and fold to form the tail section.
Row 21: Create Flippers
Chain 1, make 2 SC, then work the flipper by chaining 3, turning, and making 1 Double Crochet (DC), then chain 3 and slipstitch (Slst) into the same stitch.
Repeat for the second flipper: Chain 3, make 1 DC, chain 3, and Slst into the same stitch.
Finally: Cut the yarn and fasten off.
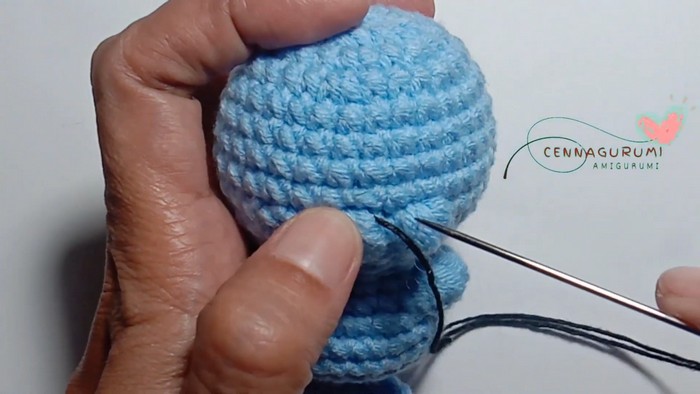
Finishing Touches
Sew the nose using black yarn.
Attach safety eyes.
Is there a printable pattern somewhere for this?