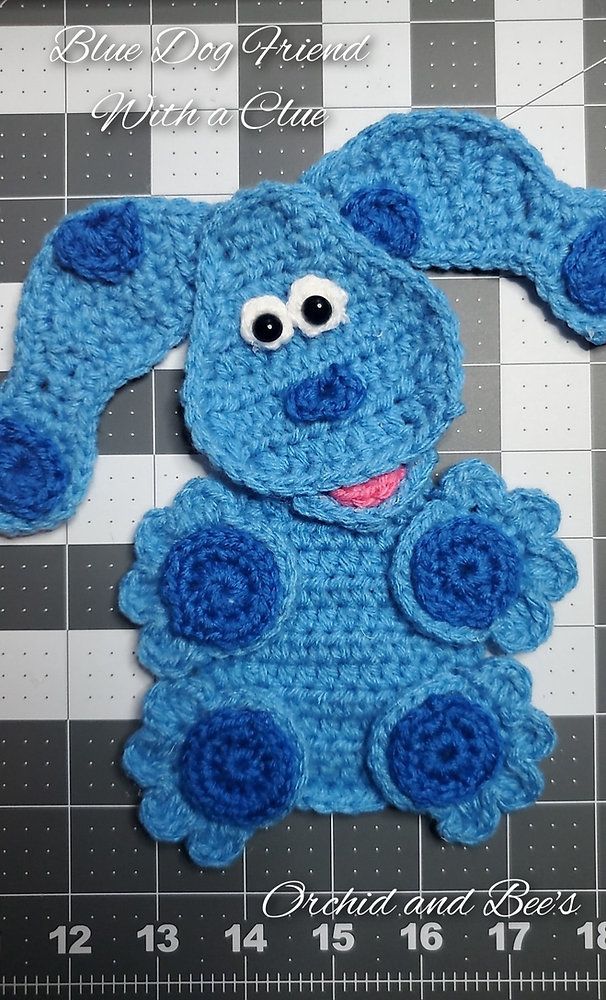
Crochet Blue Dog Applique
If you're looking to add a touch of charm to your crafting project, consider the adorable crochet blue dog applique! This little cutie is perfect for embellishing blankets, bags, or even clothes with a playful and fun vibe. With its intricate details and lovely blue color, it's sure to bring a smile to anyone's face. Get creative and have a blast personalizing your creations with this charming crochet blue dog applique! It's a fantastic way to add a pop of cuteness to your crafting endeavors.
Materials:
- Worsted Weight 4 yarn
- Light Blue
- Dark Blue
- White
- Pink
- Hook — G 4mm, E 3.5mm *optional for inner eyes
- Scissors
- Hot Glue — optional for assembly
- Yarn Needle
- 2 Small Safety eyes — size of choice — my safety eyes did not have sizes listed but they’re approximately ⅓ inch and ¼ inch — or use E3.5 mm hook and see eye option instructions
Stitches:
- MR — Magic Ring
- Ch — chain
- Sc — single crochet
- Sl st — slip stitch
- Hdc — half double crochet
- Dc — double crochet
- Tr — triple crochet
- Sc2tog / Hdc2tog/ Dc2tog — single, half double, or double crochet two stitches together to decrease, or do an invisible decrease
- Sp — space
- St(s) — stitch(es)
- #st — complete # number of sts in same space
- St # — complete stitch in next # number of spaces
- ( ) — do all in the same stitch
Language:
American Standard Terms
Pattern Instructions
Note: work first st of round in same sp as ch
Note: leave long tails if sewing together or weave in ends if gluing together
Note: turning chains do not count as stitches
Note: use G 4mm hook for all parts unless otherwise noted
Head: Light Blue
Begin: Ch 6
Round 1: Sc in 2nd ch from hook, hdc, 2hdc, hdc, sc, top of head is made, continue around to unworked side of ch, hdc 5, ch 1. (11st)
Note: switching to rows to make the bottom portion of the head
Row 2: Turn, 2hdc, hdc 3, 2hdc, ch 1, leave the rest of the stitches from round 1 unworked. (7st)
Row 3: Turn, 2hdc, hdc 5, 2hdc, ch 1. (9st)
Row 4: Turn 2hdc, hdc 7, 2hdc, ch 1. (11st)
Row 5: Turn, 2hdc, 2hdc, hdc 7, 2hdc, 2hdc, ch 1. (15st)
Row 6: Turn, hdc2tog, hdc 11, hdc2tog, ch 1. (13st)
Row 7: Turn, hdc2tog, hdc 9, hdc2tog, ch 1. (11st)
Row 8: Turn, hdc2tog, hdc 2, dc, 2dc, dc, hdc 2, hdc2tog, ch 1. (10st)
Row 9: Turn, sc a border around edge of headpiece, fasten off.
Inner Eye Option: Black — make 2 — E 3.5mm hook or smaller if desired
Begin: MR, ch 1.
Round 1: Sc 3 in MR, pull tight to close, sl st to join, fasten off. (3st)
Outer Eye: White — make 2
Begin: MR, ch 1.
Round 1: Sc 5 in MR, pull tight to close, sl st to join, fasten off. (5st)
Lower Jaw: Light Blue
Begin: Ch 7
Row 1: Hdc in 2nd ch from hook, sc 5, ch 1. (6st)
Row 2: Turn, sc, hdc, 2dc in next two sts, hdc, sc, fasten off. (8st)
Tongue: Pink
Begin: Ch 4
Row 1: Hdc in 2nd ch from hook, hdc 2, ch 1. (3st)
Row 2: Hdc, dc, hdc, sl st in same sp, fasten off, (4st)
Nose: Dark Blue
Begin: MR, ch 1.
Round 1: (Sc, dc, sc, sl st, sc, dc, sc, sl st) in MR, pull tight to close, do not sl st to join, fasten off. (8st)
Left Ear: Light Blue
Begin: Ch 4
Row 1: Hdc in 2nd ch from hook, hdc 2, ch 1. (3st)
Row 2: Turn, hdc 3, ch 1. (3st)
Row 3: Turn, hdc 2, 2hdc, ch 1. (4st)
Row 4: Turn, 2hdc, 2hdc, hdc 2, ch 1. (6st)
Row 5: Turn, hdc 4, 2hdc, 2hdc, ch 1. (8st)
Row 6: Turn, sl st, sc 3, hdc2tog, dc2tog, ch 2. (6st)
Row 7: Turn, dc2tog, hdc, sc 2, sl st, ch 1. (5st)
Row 8: Turn, sl st, sc2tog, dc 2, ch 1. (4st)
Row 9: Turn, sc2tog, sc2tog, ch 1. (2st)
Row 10 — 11: Turn, sc 2, ch 1. (2st)
Row 12: Turn, 2hdc in each st, ch 1. (4st)
Row 13: Turn, 2hdc, hdc 2, 2hdc, ch 1. (6st)
Row 14: Turn sc, hdc, dc 2, hdc, sc, ch 1. (6st)
Row 15: Turn, sc, hdc, dc 2, hdc, sc, continue around the entire edge of the ear and sc a border, sl st to join to the first sc of the row, fasten off.
Right Ear: Light Blue
Begin: Ch 4
Row 1: Hdc in 2nd ch from hook, hdc 2, ch 1. (3st)
Row 2: Turn, hdc 3, ch 1. (3st)
Row 3: Turn, 2hdc, hdc 2, ch 1. (4st)
Row 4: Turn, hdc 2, 2hdc, 2hdc, ch 1. (6st)
Row 5: Turn, 2hdc, 2hdc, hdc 4, ch 2. (8st)
Row 6: Turn, dc2tog, hdc2tog, sc 3, sl st, (6st)
Row 7: Turn, sl st, sc 2, hdc, dc2tog, ch 2. (5st)
Row 8: Turn, dc 2, sc2tog, sl st, ch 1. (4st)
Row 9: Turn, sc2tog, sc2tog, ch 1. (2st)
Row 10 — 11: Turn, sc 2, ch 1. (2st)
Row 12: Turn, 2hdc in each st, ch 1. (4st)
Row 13: Turn, 2hdc, hdc 2, 2hdc, ch 1. (6st)
Row 14: Turn sc, hdc, dc 2, hdc, sc, ch 1. (6st)
Row 15: Turn, sc, hdc, dc 2, hdc, sc, continue around the entire edge of the ear and sc a border, sl st to join to the first sc of the row, fasten off.
Big Dots on Ear Ends: Dark Blue- make 2
Begin: MR, ch 1.
Round 1: Sc 3, Dc 3, sc 3, dc 3, in MR, pull tight to close, sl st to join, fasten off. (12st)
Smaller Dots on Upper Ears: Dark Blue — make 2
Begin: MR, ch 1.
Row 1: (Sc, hdc, dc 2, hdc, sc) in MR, pull tight to close, do not sl st to join, you should have a fan shape as result, fasten off. (6st)
Tummy: Light Blue
Begin: Ch 6
Row 1: Hdc in 2nd ch from hook, hdc 4, ch 1. (5st)
Row 2: Turn, 2hdc, hdc 3, 2hdc, ch 1. (7st)
Row 3: Turn, 2hdc, hdc 5, 2hdc, ch 1. (9st)
Row 4: Turn, 2hdc, hdc 7, 2hdc, ch 1. (11st)
Row 5: Turn, 2hdc, hdc 9, 2hdc, ch 1. (13st)
Row 6 — 8: Turn, hdc 13, ch 1. (13st)
Row 9: Turn hdc2tog, hdc 9, hdc2tog, ch 1. (11st)
Row 10: Turn, hdc2tog, hdc 7, hdc2tog, ch 1. (9st)
Row 11: Turn, hdc2tog, hdc 5, hdc2tog, ch 1. (7st)
Row 12: Turn, hdc2tog, hdc 3, hdc2tog, ch 1. (5st)
Row 13: Turn, sc, hdc, dc, hdc, sc, continue with the sc stitch around the entire edge of the body to make a border, sl st to join, fasten off.
Paws: Light Blue — make 4
Begin: MR, ch 1.
Round 1: Hdc 10 in MR, pull tight to close, sl st to join, ch 1. (10st)
Round 2: 2hdc in each st around, sl st to join, ch 1. (20st)
Note: switching to a row
Row 3: (Hdc, dc), (dc, hdc, sl st), *(sl st, hdc, dc), (dc, hdc, sl st)*, repeat *to* two more times, fasten off. (4 toes made) *see diagram below for assistance.
Paw Pads: Dark Blue — make 4
Begin: MR, ch 1.
Round 1: Sc 10 in MR, pull tight to close, sl st to join. (10st)
Round 2: 2Sc in each st around, sl st to join, fasten off. (20st)
Final Assembly:
Note: I assemble my appliques with hot glue, which is a fast and safe method. The glue adheres to the fibers quite well and the applique is very secure. The hot glue packaging that I use says it is non-toxic so it is safe, in my opinion, as well. In addition, you can machine wash on cold, and lay flat to dry or tumble dry/lowest heat setting. You may also use other fabric-safe glue or use the traditional method of sewing your pieces together.
How I assembled my dog:
I laid out all my pieces to get the look I wanted. You can use pins to hold it together if you desire and/or take a picture of your layout with your phone to reference as you are putting it together.
First I attached the Blue dots to my ears. The Big dots in the lower parts of the ears and the smaller dots on the upper parts of the ears.
Next, I attached the eyes to the head about 5 rows from the top of the head.
Then, I attached the nose about 3 rows below the eyes.
I proceeded to the mouth next by attaching the tongue and lower jaw to the bottom, back center, of the head. Row 1 of both the tongue and jaw will not show, you only want row 2 of each piece “peeking out.”
Next, I attached the paw pads to the paws.
Then I attached the tummy to the back of the head and the paw to the top of the tummy.
Last, I attached the ears to the head. You can angle them in any direction desired!