

Cute Crochet Mushroom Doll Amigurumi — Complete 9 cm Pattern & Step-by-Step
Make a charming Crochet Mushroom Doll Amigurumi — a tiny, whimsical companion perfect as a gift or decorative accent. This pattern produces a 9 cm (3.5") tall mushroom when worked with the indicated yarn and materials. The instructions below include the full stem, gills, cap, and scales construction, plus placement and finishing tips so you can assemble your Mister Mushroom with a neat, professional look.
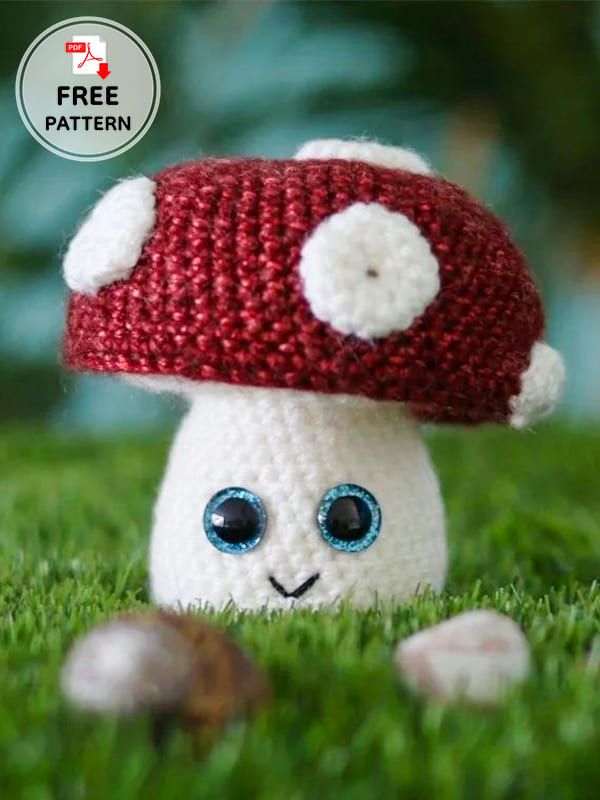
Size: 9 cm (3,5″) tall when made with the indicated yarn.
Materials
- 3.5 mm (E-4) crochet hook
- Medium weight yarn (from the same brand) in light blue, white and (left over) black
- Pair of 12 mm blue glitter safety eyes
- Fiber fill
- Yarn needle
- Pins
- Scissors
- Stitch markers
Abbreviations
Rnd: Round
Mr: Magic ring
St: Stitch
Slst: Slip stitch
Ch: Chain
Sc: Single crochet
Inc: Increase
Dec: Decrease
STEM and GILLS
Use white yarn.
Rnd 1: start 6 sc in mr [6]
Rnd 2: inc in all 6 st [12]
Rnd 3: (sc in next st, inc in next st) x 6 [18]
Rnd 4: (sc in next 2 st, inc in next st) x 6 [24]
Rnd 5: (sc in next 3 st, inc in next st) x 6 [30]
Rnd 6: (sc in next 4 st, inc in next st) x 6 [36]
Rnd 7-14: sc in all 36 st [36]
Rnd 15: (sc in next 4 st, dec) x 6 [30]
Rnd 16+17: sc in all 30 st [30]
Rnd 18: (sc in next 3 st, dec) x 6 [24]
Rnd 19+20: sc in all 24 st [24]
Place the safety eyes between Rnd 13 and 14 with an interspace of 4 st. Fill the stem with fiberfill. Next two rounds will form the gills.
Rnd 21: ch 2, (dc in next st, 2 dc in next st) x 12 [36]
Rnd 22: (dc in next st, 2 dc in next st) x 18 [54]
Slst in next st. Fasten off and weave in the yarn end.
CAP
Use light blue yarn (from the same brand as the white yarn, to make sure that the cap fits onto the gills).
Rnd 1: start 6 sc in mr [6]
Rnd 2: inc in all 6 st [12]
Rnd 3: (sc in next st, inc in next st) x 6 [18]
Rnd 4: (sc in next 2 st, inc in next st) x 6 [24]
Rnd 5: (sc in next 3 st, inc in next st) x 6 [30]
Rnd 6: (sc in next 4 st, inc in next st) x 6 [36]
Rnd 7: (sc in next 5 st, inc in next st) x 6 [42]
Rnd 8: (sc in next 6 st, inc in next st) x 6 [48]
Rnd 9: (sc in next 7 st, inc in next st) x 6 [54]
Rnd 10-17: sc in all 54 st [54]
Take the stem and gills and join the cap to the gills while filling it (not too firm) with fiberfill.
Rnd 18: sc in all 54 st of both the cap and the gills [54]
Slst in next st. Fasten off and weave in the yarn end.
To bring the cap down, put a strand of white yarn through the bottom of the stem, one st from the center, to the top of the cap, one st from the center. Then back down through the top of the cap, one st from the center on the opposite side, to the bottom of the stem, one st from the center on the opposite side. Then pull on both strands to bring the cap down as far as you like and tie the two strands together at the bottom. The small piece of white yarn and the likely small dent now visible at the top will be hidden under a white scale.
LARGE SCALE (make 3)
Use white yarn.
Rnd 1: start 6 sc in mr [6]
Rnd 2: inc in all 6 st [12]
Rnd 3: (sc in next st, inc in next st) x 6 [18]
Slst in next st. Fasten off and leave a long tail.
SMALL SCALE (make 2)
Follow the steps from the large scale, except for Rnd 3.
Sew the scales onto the cap. Place one large scale on the top in the center, to cover up the piece of white yarn and the dent. Place the rest of the scales anywhere you like.
With black yarn embroider a little smiling mouth under the eyes, between Rnd 9 and 12 and your Mister Mushroom is finished!