Apps we think you'll love
Helpful apps for your crafts, hobbies & everyday life


Cozy Crochet Moss Stitch Fingerless Gloves — Easy Pattern & Sizing Tips
Make a pair of cozy, textured fingerless gloves using the moss stitch. This easy project uses worsted-weight yarn and a simple combination of single crochet and chain spaces to create a dense, warm fabric with a lovely pebbled texture. The pattern below includes cuff construction, the moss stitch hand section, a thumb opening, and finishing tips. Adjust stitch counts and length to fit your hand.
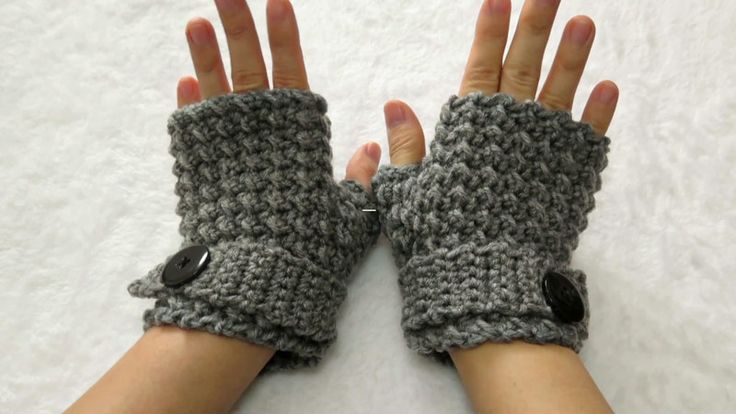
Materials Needed & Measurements:
- Worsted weight yarn (approx. 150-200 yards)
- Crochet hook (size H-8 / 5mm)
- Yarn needle for weaving in ends
- Scissors
- Button (optional for flaps)
Measurements:
- Length: Approximately 7-8 inches from wrist to the top of the glove.
- Width: Fits an average adult hand; adjust by adding or reducing stitches.
- Gauge:
- 4 sc = 1 inch
- 4 rows = 1 inch
Abbreviations:
- ch: chain
- sc: single crochet
- sl st: slip stitch
- sp: space
- st: stitch
- BLO: back loop only
- RS: right side
- WS: wrong side
Stitching Instructions for Making the Moss Stitch Fingerless Gloves Pattern:
Step 1: Cuff
- Foundation Row: Ch 12. This determines the cuff width; adjust chain length for a wider or narrower cuff.
- Row 1: Sc in the second ch from the hook and in each remaining ch across. (11 sc total)
- Row 2: Ch 1, turn. Sc in the back loop only (BLO) of each st across to create a ribbed texture.
- Repeat Row 2: Continue until the cuff wraps snugly around the wrist — about 30 rows (≈7 inches) for most adults; adjust as needed.
- Join the Cuff: Bring the short ends together and sl st through the BLO of one side and the foundation loops of the other side to seam the cuff into a circle.
Step 2: Hand Section (Moss Stitch Pattern)
- Set-Up Round: With the RS facing, ch 1. Work sc stitches evenly along the edge of the cuff to form a foundation for the hand section — aim for about 28–32 sc, adjusting to fit your hand. Sl st to the first sc to join.
- Round 1 (Start Moss Stitch): Ch 1, sc in the first st, ch 1, skip the next st, sc in the next st. Repeat (ch 1, skip 1, sc in next) around. Sl st to the first sc to join.
- Round 2: Ch 1, sc in the first ch-1 space, ch 1, skip the next sc, sc in the next ch-1 space. Repeat around and sl st to join.
- Repeat Moss Stitch Rounds: Continue repeating Round 2, working sc into each ch-1 space and creating ch-1 spaces between, until the glove measures about 6–7 inches from the cuff edge.
Step 3: Thumb Opening
- Round for Thumb Opening: Work the moss stitch across the first 20 sts (adjust for thumb placement). Leave 6 sts unworked (adjust for thumb width), ch 6, skip those unworked sts, and continue the moss stitch around. Sl st to the first sc to join.
- Resume Moss Stitch: On the next round, work moss stitch into the newly created ch-6 space and continue around.
- Continue for Hand Length: Work moss stitch rounds until the glove reaches your desired length — about 1–2 inches above the thumb opening is typical.
Step 4: Finishing
- Fasten Off: Cut the yarn, leaving a tail, and pull the tail through the loop to secure.
- Weave in Ends: Use a yarn needle to weave in loose ends neatly.
- Optional Decoration: Sew on a button, add embroidery, or attach a flap if you like — embellishments personalize your gloves.
Tips for Adjustments:
- Width: Change the number of sc stitches in the foundation round of the hand section to make gloves looser or tighter.
- Length: Add or reduce the number of moss stitch rounds to shorten or lengthen the gloves.
- Thumb Opening: Adjust the number of skipped stitches and chain stitches to fit larger or smaller thumbs.
No comments
Write a comment