

Crochet Plush Sheep Amigurumi — Step-by-Step Pattern to Make a Fluffy Toy
Create an adorable Crochet Plush Sheep Amigurumi with this detailed step-by-step pattern. This guide includes the materials list, common abbreviations, and full instructions for legs, ears, arms, tail, head and two body/assembly options. Perfect as a handmade gift or a cute home decoration—grab your yarn and hooks and follow along!
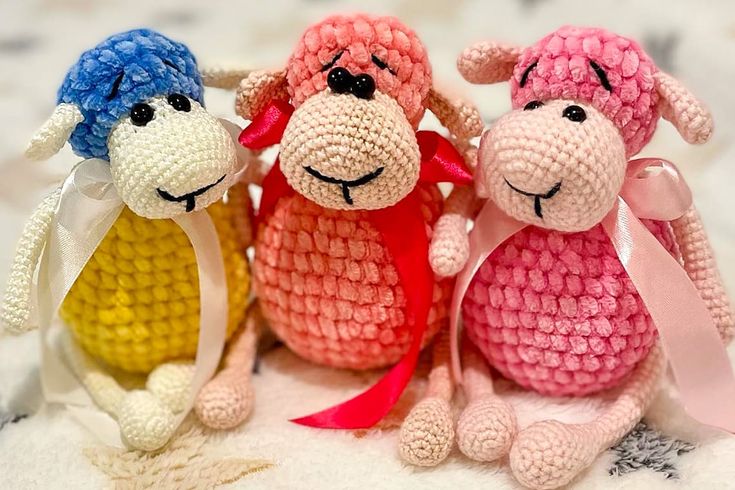
Finished plush sheep amigurumi crocheted in plush and baby yarns — soft, squishy and ready to cuddle.
Materials
- Himalaya velvet pink yarn for head and body.
- YarnArt baby light pink yarn for legs, arms, ears, muzzle and tail.
- YarnArt baby black yarn embroidery floss.
- 3.0 mm crochet hook.
- 1.25 mm crochet hook.
- 8 mm safety eyes, or 8 mm eye beads.
- Sewing needle and scissors.
- Fiberfill.
Abbreviations
MR — Magic ring
St — Stitch
Sc — Single crochet
Inc — Increase
Dec — Decrease
F.o — Fasten off
[..] — Number of stitches you should have at the end of the round.
(..) — Repeat whatever is between the brackets given number of times.
Legs (Make 2)
Let’s start with light pink:
Rnd 1. 6 sc in MR
Rnd 2. (inc)*6 [12]
Rnd 3. (1sc,inc)*6 [18]
Rnd 4-6. 18 sc (3 rows)
Rnd 7. (dec,7sc)*2 [16]
Rnd 8. (dec,6sc)*2 [14]
Rnd 9. (dec,5sc)*2 [12]
Rnd 10. (dec,4sc)*2 [10]
Rnd 11. (dec,3sc)*2 [8]
Rnd 12-27. 8sc (16 rows)
Rnd 28. 1 sc and fold the top opening flat and 4sc. through both sides across.
Fiberfill put up to 11 rows.
Leaving yarn for legs to sew.
Ears (Make 2)
Let’s start with light pink:
Rnd 1. 6 sc in MR
Rnd 2. (inc)*6 [12]
Rnd 3-9. 12 sc (7 rows)
Rnd 10. 1 sc and fold the top opening flat and 6 sc. through both sides across.
Leaving yarn for ears to sew, and sending a little bend.
Arms (Make 2)
Let’s start with light pink:
Rnd 1. 6 sc in MR
Rnd 2. (inc)*6 [12]
Rnd 3-6. 12 sc (4 rows)
Rnd 7. (dec,4sc)*2 [10]
Rnd 8. (dec,3sc)*2 [8]
Rnd 9-22. 8 sc (14 rows)
Rnd 23. 1 sc. and fold the top opening flat and 4sc. through both sides across.
Fiberfill put up to 8 rows.
Leaving yarn for arms to sew.
Tail
Rnd 1. 6 sc in MR
Rnd 2. (inc)*6 [12]
Rnd 3. (3sc,dec) [6]
Fasten off.
Leaving yarn for arms to sew.
Head
Let’s start with light pink:
Rnd 1. 6 sc in MR
Rnd 2. (inc)*6 [12]
Rnd 3. (1sc,inc)*6 [18]
Rnd 4. (2sc,inc)*6 [24]
Rnd 5. (3sc,inc)*6 [30]
Rnd 6. (4sc,inc)*6 [36]
Rnd 7-12. 36 sc (6 rows)
Rnd 13. (4sc,dec)*6 [30]
Rnd 14-15. 30 sc (2 rows)
Rnd 16. (3sc,dec)*6 [24]
Change to plush pink yarn and a 3.0 mm crochet hook.
Rnd 17-19. 24 sc (3 rows)
Rnd 20. (2sc,dec)*6 [18]
Rnd 21. (1sc,dec)*6 [12]
Rnd 22. 6 dec
Fasten off.
Fiberfill to fill the head.
Change yarn:
If you use safety eyes, insert eyes between Rnd 14 side, between the eyes 4sc.
If you eye beads, tie the eyes in row Rnd 14 to each other.
There are two options for assembling parts of the toy:
1. Sew your arms and legs to your body.
2. Tie your arms and legs to the body.
Body
1. Option
Let’s start with plush pink yarn and a 3.0 mm crochet hook.
Rnd 1. 6 sc in MR
Rnd 2. (inc)*6 [12]
Rnd 3. (1sc,inc)*6 [18]
Rnd 4. (2sc,inc)*6 [24]
Rnd 5. (3sc,inc)*6 [30]
Rnd 6. (4sc,inc)*6 [36]
Rnd 7-10. 36 sc (4 rows)
Rnd 11. (4sc,dec)*6 [30]
Rnd 12. 30 sc
Rnd 13. (3sc,dec)*6 [24]
Rnd 14. 24 sc
Rnd 15. (2sc,dec)*6 [18]
Rnd 16. 18 sc
Rnd 17. (1sc,dec)*6 [12]
Rnd 18. 6 dec
Fasten off.
Fiberfill to fill the body.
Assembly
1. Option
Sew head to the body.
Sew legs rnd 7 side and arm rnd 16 side to the body, symmetrically.
Sew tail between the legs.
Ears are attached to the head symmetrically.
We do muzzle stretching or embroidered face without stretching.
Embroidered eyebrows.
Body
2. Option
Let’s start with plush pink yarn and a 3.0 mm crochet hook.
Rnd 1. 6 sc in MR
Rnd 2. (inc)*6 [12]
Rnd 3. (1sc,inc)*6 [18]
Rnd 4. (2sc,inc)*6 [24]
Rnd 5. (3sc,inc)*6 [30]
Rnd 6. (4sc,inc)*6 [36]
Rnd 7. 4 sc together with the leg, 14 sc, 4sc along with the leg, crochet to the middle 7sc. [36]
Rearrange the marker.
Rnd 8-10. 36 sc (3 rows)
Rnd 11. (4sc,dec)*6 [30]
Rnd 12. 30 sc
Rnd 13. (3sc,dec)*6 [24]
Rnd 14. 24 sc
Rnd 15. (2sc,dec)*6 [18]
Rnd 16. 3sc, 4sc arms, 4sc, 4sc arms, 3sc [18]
Rnd 17. (1sc,dec)*6 [12]
Rnd 18. 6 dec
Fasten off.
Fiberfill to fill the body.
Assembly
2. Option
Sew head to the body.
Sew tail between the legs.
Ears are attached to the head symmetrically.
We do muzzle stretching or embroidered face without stretching.
Embroidered eyebrow.