

Crochet Frog Princess Amigurumi — Free Step-by-Step Pattern
Bring a touch of fairy-tale whimsy to your crochet collection with this Crochet Frog Princess amigurumi. This free step-by-step pattern walks you through making a sweet frog with a crown, eyelids, little bag and flower — finished amigurumi is approx. 24 cm, but you can scale the size by changing yarn and hook.
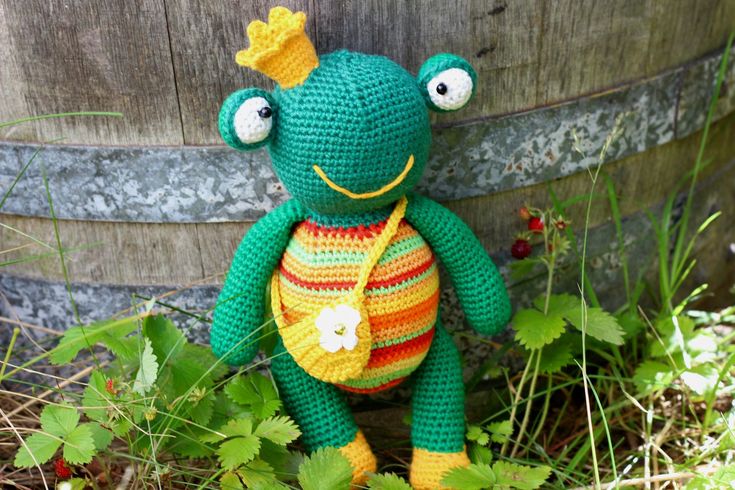
Below you will find the complete materials list, skill level, tips and the full stitch-by-stitch instructions to make the Frog Princess. The pattern uses standard amigurumi techniques worked in continuous rounds.
SUPPLIES
cotton yarn (e.g. Schachenmayr Catania 125m/50g) in two main colors: green and yellow, a bit of white yarn for the eyes and flower, yarn scraps for additional details, crochet hooks 3 mm and 2.5 mm, polyester fiberfill stuffing, scissors, 2 black beads or small safety eyes, yarn needle.
SKILL LEVEL
Easy
SIZE
The finished amigurumi is approx. 24 cm; adjust yarn and hook to make it larger or smaller.
SKILLS YOU NEED
chain, single crochet (sc), half double crochet (hdc), double crochet (dc), slip stitch (sl st), increase (inc), decrease (dec). Work in continuous spiral (do not join rounds) unless noted.
ABBREVIATIONS
Ch = chain
St = stitch
Sc = single crochet
Sl st = slip stitch
dec = decrease stitch (two single crochets together)
inc = increase stitch (two single crochets into one stitch)
Dc = double crochet
Rnd = Round
TIPS
- Work in a continuous spiral (do not join rounds).
- Use a stitch marker or a scrap of yarn to mark the beginning of each round.
- Unless stated otherwise, work all stitches into both loops.
- You can make the amigurumi in any color combination you like.
Seamless color change (when working in the round)
Pick up the new color at the end of the round: insert your hook into the stitch, yarn over with the new color and pull through the stitch and the loop on your hook to complete the stitch.
INSTRUCTIONS
ARM (make 2)
Start with green yarn.
Round 1: 6 sc into Magic Ring
Round 2: inc 6 times (12 sts)
Round 3: *sc in next st, inc* around (18 sts)
Rounds 4–9: sc in each of next 18 sts
Round 10: *dec, sc in each of next 4 sts* around (15 sts)
Rounds 11–24: sc in each of next 15 sts. Stuff the arm slightly.
Round 25: *dec, sc in each of next 3 sts* around (12 sts). Bind off leaving a long tail for sewing.
BOOTIE (make 2)
Work with yellow yarn.
Round 1: 6 sc into Magic Ring
Round 2: inc 6 times (12 sts)
Round 3: *sc in next st, inc* around (18 sts)
Round 4: (*sc in next st, inc* repeat from * to * three times, sc in each of next 3 sts) repeat twice (24 sts)
Round 5: (*sc in each of next 2 sts, inc* repeat from * to * three times, sc in each of next 3 sts) repeat twice (30 sts)
Round 6 (working in the back loop): sc in each of next 30 sts
Round 7: sc in each of next 30 sts
Round 8: sc in each of next 2 sts, *dec* six times, sc in each of next 16 sts (24 sts)
Round 9: *dec* five times, sc in each of next 6 sts, dec, sc in each of next 6 sts (18 sts). Bind off.
LEG (make 2)
Change to green yarn.
Round 1 (working into the back loop): sc in each of next 18 sts
Rounds 2–17: sc in each of next 18 sts. Stuff firmly.
Round 18: *dec, sc in each of next 4 sts* around (15 sts)
Round 19: sc in each of next 15 sts
Round 20: *dec, sc in each of next 3 sts* around (12 sts)
Round 21: *dec* 6 times. Bind off the first leg; work the second leg the same way.
SHIFT STITCH
Working in spiral amigurumi can cause the piece to twist slightly to the right. To keep the work symmetrical, periodically move the position of your round marker by working an extra stitch at the end of a round (a «shift stitch») and moving the marker one stitch. This does not change the stitch count — it only repositions the marker so the piece folds evenly.
BODY and HEAD
Work a shift stitch every 3–4 rounds as needed for symmetry. Use any color you prefer for the body base.
Round 1: 6 sc into Magic Ring
Round 2: inc 6 times (12 sts)
Round 3: *sc in next st, inc* (18 sts)
Round 4: *sc in each of next 2 sts, inc* (24 sts)
Round 5: *sc in each of next 3 sts, inc* (30 sts)
Round 6: *sc in each of next 4 sts, inc* (36 sts)
Round 7: *sc in each of next 5 sts, inc* (42 sts)
Round 8: *sc in each of next 6 sts, inc* (48 sts)
Round 9: *sc in each of next 7 sts, inc* (54 sts)
Round 10: *sc in each of next 8 sts, inc* (60 sts)
Rounds 11–25: sc in each of next 60 sts. Start stuffing the body.
Round 26: *dec, sc in each of next 8 sts* (54 sts)
Round 27: sc in each of next 54 sts
Round 28: *dec, sc in each of next 7 sts* (48 sts)
Round 29: *dec, sc in each of next 6 sts* (42 sts)
Round 30: *dec, sc in each of next 5 sts* (36 sts)
Round 31: *dec, sc in each of next 4 sts* (30 sts)
In the next round attach the arms (ensure arms are centered; make shift stitches if needed):
Round 32: sc in each of next 6 sts, 6 sc both through arm and body, sc in each of next 9 sts, 6 sc both through arm and body, sc in each of next 3 sts.
Change to green yarn.
Round 33 (working into the back loop): *dec, sc in each of next 3 sts* (24 sts)
Round 34 (working into the back loop): sc in each stitch to the end of the round. Stuff the body firmly.
HEAD
Continue with green yarn.
Round 1: *sc in next st, inc* (36 sts)
Round 2: *sc in each of next 2 sts, inc* (48 sts)
Round 3: *sc in each of next 7 sts, inc* (54 sts)
Round 4: *sc in each of next 8 sts, inc* (60 sts)
Rounds 5–15: sc in each of next 60 sts
Round 16: *dec, sc in each of next 8 sts* (54 sts)
Round 17: sc in each of next 54 sts
Round 18: *dec, sc in each of next 7 sts* (48 sts)
Round 19: *dec, sc in each of next 6 sts* (42 sts)
Round 20: *dec, sc in each of next 5 sts* (36 sts)
Round 21: *dec, sc in each of next 4 sts* (30 sts)
Round 22: *dec, sc in each of next 3 sts* (24 sts). Stuff the head firmly.
Round 23: *dec, sc in each of next 2 sts* (18 sts)
Round 24: *dec, sc in next st* (12 sts)
Round 25: *dec* repeat 6 times. Bind off and weave in ends.
EYE (make 2)
Work with white yarn and 2.5 mm hook.
Round 1: 6 sc into Magic Ring
Round 2: inc 6 times (12 sts)
Round 3: *sc in next st, inc* (18 sts)
Rounds 4–5: sc in each of next 18 sts
Round 6: *dec, sc in next st* (12 sts). Stuff the eye slightly.
Round 7: *dec* 6 times. Bind off and weave in ends.
EYELID (make 2)
Use green yarn and 3 mm hook.
Round 1: 6 sc into Magic Ring
Round 2: inc 6 times (12 sts)
Round 3: *sc in next st, inc* (18 sts)
Rounds 4–5: sc in each of next 18 sts. Bind off.
BAG
Use yellow yarn and 3 mm hook.
Round 1: 6 sc in a magic circle.
Round 2: inc 6 times (12 sts)
Round 3: *sc in next st, inc* (18 sts)
Round 4: *sc in each of next 2 sts, inc* (24 sts)
Rounds 5–10 (working in the back loop): hdc in each of next 24 sts
Work two rounds in sc. Bind off and weave in ends.
STRAP
Chain 55 stitches, then slip stitch in each stitch to the end of the row. Adjust strap length as desired. Sew handle to the purse and weave in ends.
FLOWER
Use white yarn and 2.5 mm hook.
Into a magic ring work: *chain 3, 2 dc, chain 3, slip stitch* — repeat 4 more times to make 5 petals. Bind off leaving a long tail for sewing.
CROWN
Use yellow yarn and 3 mm hook.
Round 1: chain 18, join for crocheting in rounds and work 18 sc.
Rounds 2–7: sc in each stitch around. End the last round with a slip stitch.
Round 8: *chain 1, sc in next stitch, (1 dc, chain 2 and slip stitch) in the next stitch, slip stitch in the next stitch* — repeat around. Bind off leaving a long tail for sewing.
ASSEMBLY
All elements are crocheted separately — now sew them together using a blunt sewing/yarn needle.
Sew the legs to the body, positioning them evenly. Attach eyelids to the eyes, then place eyes on the head (use pins to mark placement) and sew them in place. Sew black beads or safety eyes onto the centers.
Embroider the mouth with yellow yarn; add a smile or eyelashes if desired. Sew the crown to the head. Attach the bag and strap; sew the flower onto the bag or crown as decoration. Weave in all ends.
ALTERNATIVE OUTFIT
You can leave the Frog Princess in a swimsuit top or make a swim dress:
Join yarn to the 16th round of the top. Working into the front loop: *sc in next stitch, 5 dc in next stitch* — repeat around. Bind off and hide ends.
Enjoy your Crochet Frog Princess — a sweet, handmade companion or gift!