Apps we think you'll love
Helpful apps for your crafts, hobbies & everyday life


Make a Beautiful Crochet Spider: Full Pattern, Assembly & Tips
Crocheting a charming stuffed spider is a rewarding project that adds personality to your amigurumi collection. This pattern produces a finished spider approximately 20 centimeters wide and weighing about 65.2 grams when assembled. The project uses simple single crochet shaping, color changes, and optional wire supports for the legs — a great way to practice consistent tension and finishing techniques. Experiment with different yarn colors and add googly eyes for extra character.
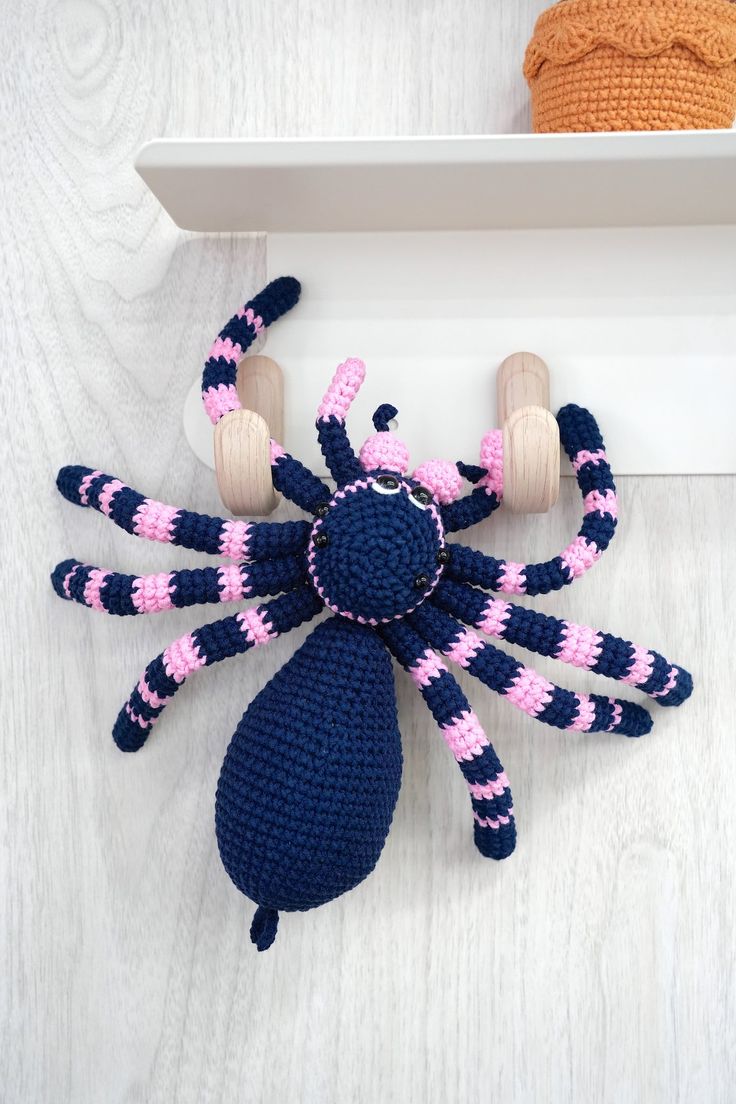
Caption: Finished crocheted spider with pink and blue accents — a soft, hand-crafted toy ready for display.
Materials Needed:
- Yarn – Loopara 5ply combed cotton (Pink 19, Blue 46 and White 60)
- Hook – 3.0mm
- Scissors
- Stitch Marker
- Tweezers
- Yarn Needle
- Fiber Fill
- Eyes
- Molding strips
- Position beads
- Saliva pliers
How to Crochet the Head (Make 1)
- R1: Magic ring, ch 1, 5 sc in ring, sl
- R2: ch 1, 5 sc inc, sl
- R3: ch 1, (sc, sc inc) 5 times, sl
- R4: ch 1, (sc, sc inc, sc) 5 times, sl
- R5: ch 1, (3 sc, sc inc) 5 times, sl
- R6: ch 1, (2 sc, sc inc, 2 sc) 5 times, sl
- R7: ch 1, (5 sc, sc inc) 5 times, change to pink, sl
- R8: ch 1, 35 sc, change to main color, sl
- R9: ch 1, (3 sc, sc inc, 3 sc) 5 times, sl
- R10-11: ch 1, 40 sc, sl
- R12: ch 1, (6 sc, sc2tog) 5 times, sl
- R13: ch 1, (5 sc, sc2tog) 5 times, sl
- R14: ch 1, (4 sc, sc2tog) 5 times, sl
- R15: ch 1, (3 sc, sc2tog) 5 times, sl
- R16: ch 1, (2 sc, sc2tog) 5 times, sl
How to Crochet the Abdomen (Make 1)
- R1: Magic ring, ch 1, 6 sc in ring, sl
- R2: ch 1, 6 sc inc, sl
- R3: ch 1, (sc, sc inc) 6 times, sl
- R4: ch 1, (sc, sc inc, sc) 6 times, sl
- R5: ch 1, (3 sc, sc inc) 6 times, sl
- R6: ch 1, (2 sc, sc inc, 2 sc) 6 times, sl
- R7: ch 1, (17 sc, sc inc) 2 times, sl
- R8: ch 1, (18 sc, sc inc) 2 times, sl
- R9: ch 1, 40 sc, sl
- R10: ch 1, (9 sc, sc inc) 4 times, sl
- R11: ch 1, 44 sc, sl
- R12: ch 1, (5 sc, sc inc, 5 sc) 4 times, sl
- R13-14: ch 1, 48 sc, sl
- R15: ch 1, (10 sc, sc2tog) 4 times, sl
- R16-17: ch 1, 44 sc, sl
- R18: ch 1, (9 sc, sc2tog) 4 times, sl
- R19: ch 1, 40 sc, sl
- R20: ch 1, (8 sc, sc2tog) 4 times, sl
- R21: ch 1, (7 sc, sc2tog) 4 times, sl
- R22: ch 1, (6 sc, sc2tog) 4 times, sl
- R23: ch 1, 28 sc, sl
- R24: ch 1, (5 sc, sc2tog) 4 times, sl
- R25: ch 1, (sc2tog, 10 sc) 2 times, sl
- R26: ch 1, 22 sc, sl
- R27: ch 1, (sc2tog, 9 sc) 2 times, sl
- R28: ch 1, 20 sc, sl
- R29: ch 1, (2 sc, sc2tog) 5 times, sl
- R30: ch 1, (sc, sc2tog) 5 times, sl
How to Crochet the Legs (Make 8)
- R1: Magic ring, 6 sc, sl
- R2: Ch 1, (2 sc, sc inc) 2 times, sl
- R3-R6: Ch 1, 8 sc, change to pink, sl
- R7: Ch 1, 8 sc, change to main color, sl
- R8-R10: Ch 1, 8 sc, change to pink, sl
- R11-R12: Ch 1, 8 sc, change to main color, sl
- R13-R15: Ch 1, 8 sc, change to pink, sl
- R16-R18: Ch 1, 8 sc, change to main color, sl
- R19-R22: Ch 1, 8 sc, change to pink, sl
- R23-R24: Ch 1, 8 sc, change to main color, sl
- R25-R29: Ch 1, 8 sc, sl
How to Crochet the Chelicarae (Make 2)
- R1: ch 1, 5 sc, sl
- R2: ch 1, 5 sc inc, sl
- R3-4: ch 1, 10 sc, sl
How to Crochet the Fangs (Make 2)
- Ch 4, sew onto chelicarae
How to Crochet the Pedipalps (Make 2)
- R1-R6: ch 1, 6 sc, sl
- R7-R11: ch 1, 6 sc, sl,change color
How to Crochet the Spinnerets (Make 2)
- With black yarn: ch 6, 5 sl in 2nd ch from hook
Crochet Spider Assembly
- Prepare all parts. The main body should weigh approximately 65.2 grams and be about 20 centimeters wide.
- Begin by stuffing both the head and body sections with fiberfill. Make sure to stuff firmly for good shape.
- Close up the head opening. Sew the body and head together. After joining, secure and trim threads near the seam.
- Insert the fangs into the chelicerae and secure them to the head. Then begin sewing. Repeat the same process for attaching the second fang.
- Begin attaching the pedipalps. Insert wire support, then find the correct position on the head and secure firmly.
- Next, attach the legs. Insert wire support, then find the correct position on the head and secure firmly.
- After completing one leg attachment, repeat the process for the remaining legs.
- Start attaching the spinnerets. Secure them to the body with stitches.
- Begin assembling the eyes. Sew the white parts of the eyes.
- Finally, use a small amount of glue to secure the eye pupils to the head, adjust the leg positions, and your spider assembly is complete!
Crocheting Tips:
- Maintain consistent tension throughout to ensure all pieces are the same size.
- Pull each round tight when fastening off to enhance shape definition and details.
- Use cross single crochet when possible — it creates smaller holes than regular single crochet.
- For color changes, switch colors in the unfinished stitch of the previous round for cleaner transitions and more natural color blending.
Assembly Tips:
- When attaching the legs, ensure symmetry — both sides should be evenly matched.
- When joining the head and body, align them carefully along the center line to avoid crooked stitching.
- When sewing the head, first secure a few stitches on both sides to position it correctly, then complete the remaining stitches.
- Don't rush to close the head entirely during assembly — leave an opening to pull through threads when sewing joints and attaching parts.
- Leave extra length when wrapping wire with tape — this provides more stability in the finished piece.
No comments
Write a comment