

Make This Adorable Crocheted Goldfish — Full Red & White Pattern & Tips
Crocheting a charming red-and-white goldfish is a delightful project for makers of all skill levels. This step-by-step pattern uses 5-ply combed cotton yarn and small hooks to create a compact, detailed amigurumi goldfish with a flowing tail, dorsal and ventral fins, a beaded mouth detail, and gold-thread embroidery for scale texture. Read through the materials and each section of the pattern before starting, and follow the crochet tips at the end for smoother color changes and an elegant finish.
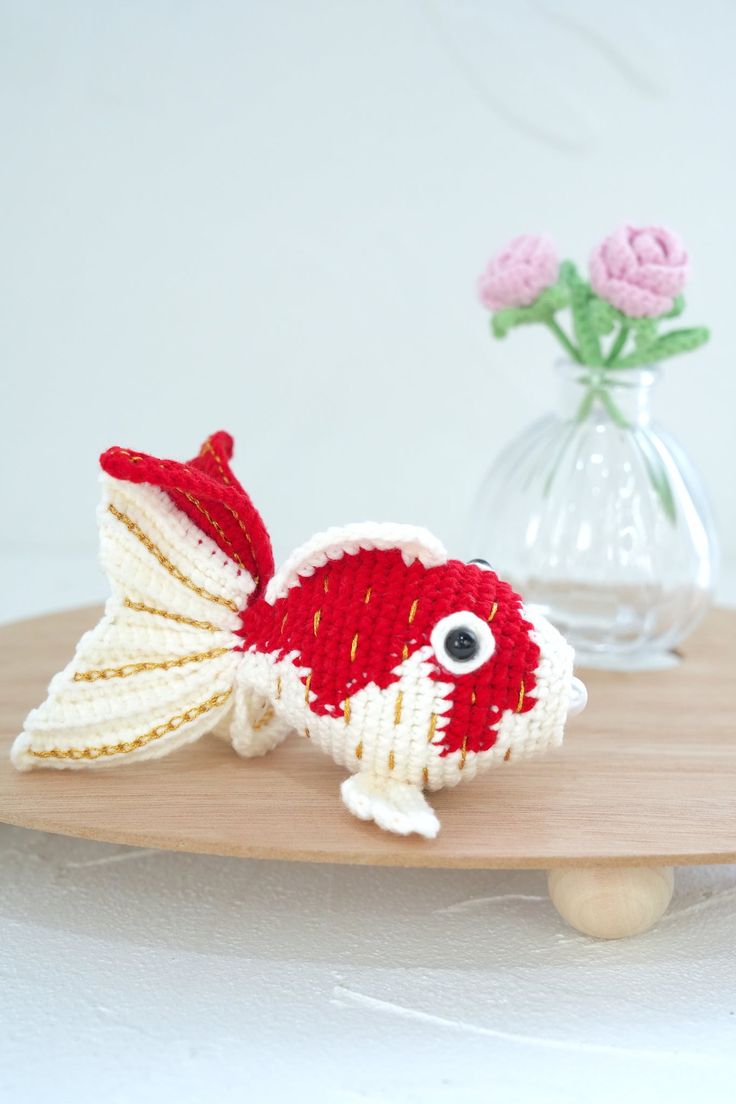
Finished crocheted goldfish in red and white cotton yarn, embroidered with gold thread and finished with a pearl bead.
Materials Needed:
- Yarn – Loopara 5ply combed cotton (Red 24 and White 61)
- Hook – 2.8mm
- Scissors
- Tweezers
- Yarn Needle
- Glue stick
- Stitch marker
- Fiberfill
- Gold thread
- Eyes
- Pearl
How to Crochet the Main Body (Make 1)
- R1: With white yarn, ch 18, join to form ring, sl
- R2: Ch, 18 sc, sl
- R3: Ch, 2 sc, sc inc, 2 sc, (change to red) sc inc, 2 sc, (change to white) sc inc, 2 sc, (change to red) sc inc, 2 sc, (change to white) sc inc, 2 sc, sc inc, sl
- R4: Ch, 6 sc, (change to red) 5 sc, (change to white) 2 sc, (change to red) 5 sc, (change to white) 6 sc, sl
- r5: Ch, 3 sc, sc inc, (change to red) (3 sc, sc inc) 4 times, (change to white) 3 sc, sc inc, sl
- R6: Ch, sc inc, 4 sc, (change to red) (sc inc, 4 sc) 4 times, (change to white) sc inc, 4 sc, sl
- R7: Ch, 5 sc, sc inc, (change to red) (5 sc, sc inc) 4 times, (change to white) 5 sc, sc inc, sl
- R8: Ch, 12 sc, (change to red) 18 sc, (change to white) 12 sc, sl
- R9: Ch, 14 sc, (change to red) 14 sc, (change to white) 14 sc, sl
- R10: Ch, 13 sc, (change to red) 16 sc, (change to white) 13 sc, sl
- R11-12: Ch, 11 sc, (change to red) 20 sc, (change to white) 11 sc, sl
- R13: Ch, 10 sc, (change to red) 22 sc, (change to white) 10 sc, sl
- R14: Ch, 8 sc, (change to red) 26 sc, (change to white) 8 sc, sl
- R15: Ch, 5 sc, sc2tog, (change to red) (5 sc, sc2tog) 4 times, (change to white) 5 sc, sc2tog, sl
- R16: Ch, 4 sc, sc2tog, 2 sc, (change to red) 2 sc, sc2tog, (4 sc, sc2tog) twice, 4 sc, (change to white) sc2tog, 4 sc, sc2tog, sl
- R17: Ch, 9 sc, (change to red) 14 sc, (change to white) 7 sc, sl
- R18: Ch, (3 sc, sc2tog) twice, (change to red) (3 sc, sc2tog) twice, 2 sc, (change to white) sc, sc2tog, 3 sc, sc2tog, sl
- R19: Ch, 7 sc, (change to red) 12 sc, (change to white) 5 sc, sl
- R20: Ch, (2 sc, sc2tog) twice, 2 sc, (change to red) sc2tog, 2 sc, sc2tog, 2 sc, (change to white) sc2tog, 2 sc, sc2tog, sl
- R21: Ch, 8 sc, (change to red) 6 sc, (change to white) 4 sc, sl
- R22: Ch, (sc, sc2tog) 3 times, (change to red) sc, sc2tog, sc, (change to white) sc2tog, sc, sc2tog, sl
How to Crochet the Tail (Make 1)
- R1: With white yarn. Ch 15, 14 sc in 2nd ch from hook, sl in same st
- R2: Ch, turn, BLO, 12 sc, sc2tog
- R3: Ch, turn, BLO, sc2tog, 11 sc, sl in next st
- R4: Ch, turn, BLO, 10 sc, sc2tog
- R5: Ch, turn, BLO, sc2tog, 9 sc, sl in same st
- R6: Ch, turn, BLO, 8 sc, sc2tog
- R7: Ch, turn, BLO, sc2tog, 7 sc, sl in next st
- R8: Ch, turn, BLO, 6 sc, sc2tog
- R9: Ch, turn, BLO, 7 sc, sl in same st
- R10: Ch, turn, BLO, 7 sc
- R11: Ch, turn, BLO, sc inc, 6 sc, sl in next st
- R12: Ch, turn, BLO, 7 sc, sc inc
- R13: Ch, turn, BLO, sc inc, 8 sc, sl in same st
- R14: Ch, turn, BLO, 9 sc, sc inc
- R15: Ch, turn, BLO, sc inc, 10 sc, sl in same st
- R16: Change to red yarn. Ch, turn, BLO, 11 sc, sc inc
- R17: Ch, turn, BLO, sc inc, 12sc, sl in same st
- R18: Ch, turn, BLO,13 sc, sc inc
- R19: Ch, turn, BLO, sc inc, 14sc, sl in next st
- R20: sl in next st, Ch 17, 16 sc in 2nd ch from hook
- R21: Ch, turn, BLO, 14 sc, sc2tog
- R22: Ch, turn, BLO, sc2tog,13 sc,sl in next st
- R23: Change to white yarn. Ch, turn, BLO, 12 sc, sc2tog
- R24: Ch, turn, BLO, sc2tog, 11 sc, sl in same st
- R25: Ch, turn, BLO, 10 sc, sc2tog
- R26: Ch, turn, BLO, sc2tog,9 sc,sl in next st
- R27: Ch, turn, BLO, 8 sc, sc2tog
- R28: Ch, turn, BLO, sc2tog, 7 sc, sl in same st
- R29: Ch, turn, BLO, 6 sc, sc2tog
- R30: Ch, turn, BLO, 7 sc,sl in next st
- R31: Ch, turn, BLO, 6 sc, sc inc
- R32: Ch, turn, BLO, sc inc, 7sc, sl in same st
- R33: Ch, turn, BLO, 8 sc, sc inc
- R34: Ch, turn, BLO, sc inc, 9sc, sl in next st
- R35: Ch, turn, BLO, 10 sc, sc inc
- R36: Ch, turn, BLO, sc inc, 11sc, sl in same st
- R37: Ch, turn, BLO, 12 sc, sc inc
- R38: Ch, turn, BLO, 14 sc, sl. Leave long tail, fold and sew opening closed.
How to Crochet the Ventral Fins (Make 2)
- With white yarn, start at row 9, with 6 stitches between fins
- R1: Ch 8, 7 sc in 2nd ch from hook, sl in same st
- R2: Ch, turn, BLO, 5 sc, sc2tog
- R3: Ch, turn, BLO, sc2tog, 4 sc, sl in same st
- R4: Ch, turn, BLO, 3 sc, sc2tog
- R5: Ch, turn, BLO, sc2tog, 2 sc, sl in same st, fasten off, weave in ends
How to Crochet the Dorsal Fin (Make 1)
- R1: With red yarn(11th row from the mouth), (ch 2, hdc) 4 hdc, sc, sl, fasten off
- R2: With white yran( 9th row from the mouth), (ch 5, tr), tr, 4 dc, 3 hdc, sc, sl, fasten off
How to Crochet the Mouth (Make 1)
- R1: Ch, 18 sc, sl
- R2: Ch, 18 sc, sl
- R3: Ch, (sc, sc2tog) 6 times, sl
- R4: Ch, (sc, sc2tog) 4 times, sl, fasten off
- Stuff mouth and attach pearl bead inside
How to Crochet the Eyes (Make 2)
- With white yarn. Magic ring, ch, 6 sc, sl, fasten off
- Attach the eyes with a glue stick
How to Crochet the Texture
- Thread the gold thread at the tail. Use a sewing needle to embroider the body texture.
Finishing and Assembly: Sew tail and fins in place, stuff the body with fiberfill as you close openings, attach the eyes, and secure the pearl bead inside the mouth. Embroider gold-thread texture along the tail and body as described.
Crochet Tips:
- Make your color changes in the unfinished stitch of the previous round for smoother transitions.
- Keep your tension consistent throughout to maintain the goldfish's elegant shape.
- Remember to pull each stitch snug when changing colors to avoid any gaps in your work.
- When working the chain in round 20, keep it relaxed to create that lovely fanned effect in the tail fin.
- When working the final white section, maintain the same tension throughout to match the beginning section.