


Make a Cute Amigurumi Stardew Valley Chicken — Easy Crochet Pattern
This quick amigurumi pattern shows how to crochet a charming Stardew Valley–style chicken using bulky yarn and basic stitches. It’s a great project for beginners who know single crochet and increases — personalize the size by adding rounds, and swap safety eyes for embroidered eyes to make it child-safe.
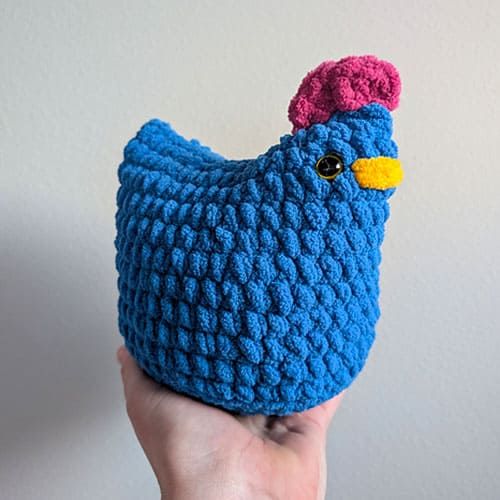
Supplies:
- 6mm hook
- Eyes 12mm (you can use larger for a more «anime» look)
- Tapestry needle
- Locking stitch markers
- Bernat Blanket Yarn (main color and contrasting color for comb)
- Polyfil stuffing
Notes: The pattern below uses amigurumi conventions (magic loop, continuous rounds). Place eyes after stuffing but before fully closing the body. Safety eyes are not suitable for children under 3 — embroider the eyes instead if making for a young child.
Body
Begin with a magic loop. Work 7 sc into the loop. Mark the beginning of the round with a locking stitch marker.
Round 2: Inc in every stitch (14)
Round 3: *sc, inc* around
Round 4: *2 sc, inc* around
Round 5: *3 sc, inc* around
Round 6: *4 sc, inc* around
If you want the chicken to be larger, continue the increase pattern (5 sc, inc; 6 sc, inc; etc.) until you reach the desired circumference.
Round 7: *In back loop only, sc* (optional — gives additional shape/definition to the base)
Round 8: *sc*
Repeat Round 8 for 9 additional rounds (or add more rounds for a larger body).
Fasten off, leaving a tail long enough to sew. Using a darning needle, stitch the opening closed by pulling one loop from one side and one from the opposite side. Sew up about halfway, stuff with polyfil, then place eyes two rows down and three to four stitches apart. (If using safety eyes, ensure they are secured properly.)
Embroider beak: Between the eyes, embroider two short horizontal stitches to form the beak. Tie off and hide the tail yarn on the inside.
Finish stitching the back seam. Pull the final seam tightly so the tail tilts up slightly and hide the yarn tail inside the body.
Comb
With contrasting color, insert hook where you want the comb placement on the head and ch 1.
Row: 3 dc in first stitch (on the white of the head). Then 2 (or 3) dc in the next stitch. Ch 1 and slip stitch into the head to attach the back of the comb. Fasten off, knot, and hide tails.
Finishing tips: Adjust the number of rounds or the hook size to change the finished size. Embroider additional details (feet, wings, or blush) as desired. Happy crocheting!