


Make the Regina Shrug: Easy Cocoon-Style Crochet Shrug Pattern with Pretty Trim
The Crochet Regina Shrug is a versatile, cocoon-style piece that's perfect for layering on cool evenings. This easy rectangular construction seamed at the corners creates a relaxed silhouette and simple sleeves — a great project for crocheters who want an elegant, lacy shrug with a decorative collar and clean sleeve trim.
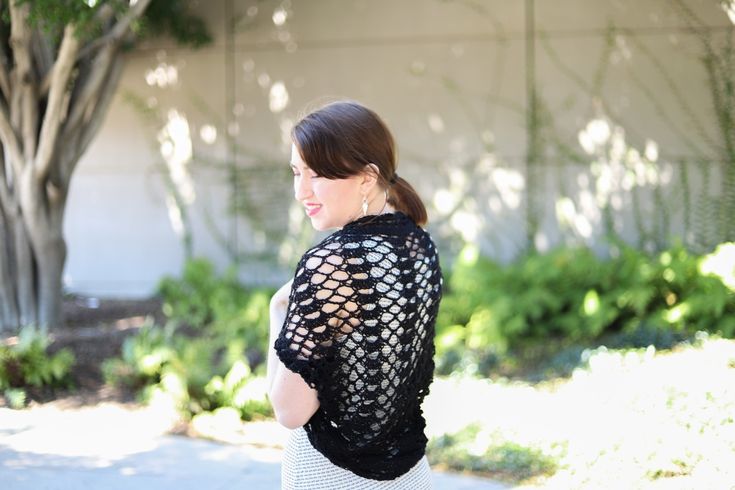
Regina Shrug in black cotton yarn, showing the lacy shell stitch body and finished collar trim.
Materials:
- 3–5 skeins of DROPS Safran cotton yarn in Black (16) (or any 4-ply weight yarn)
- Approximately 525–875 yards
- 6.00 mm crochet hook
Gauge:
1 shell to the next shell x 4 rows = 5 in x 2 in
Abbreviations
- CH — Chain
- SK — Skip
- SC — Single Crochet
- DC — Double Crochet
The general base of this cocoon shrug is a simple rectangle. The corners are brought together and seamed to create the sleeve openings.
Shrug Base
Foundation
XS–M: Chain 96 (+1)
L–1XL: Chain 120 (+1)
Row 1: SC into the 2nd CH from the hook, *CH 5, SK 3 CH, 1 SC into next CH*; repeat from * to * until you come to the last 2 CH. End with CH 2, SK 1 CH, 1 DC into last CH. CH 1 and turn.
Row 2: 1 SC in first stitch, SK CH 2 space, *7 DC into next CH 5 space, 1 SC into next CH 5 space, CH 5, 1 SC into the next CH 5 space*; repeat from * to * until you come to the last CH 5 space. End with CH 2, 1 DC in last stitch. CH 1 and turn.
Row 3: 1 SC in first stitch, *CH 5, 1 SC into the 2nd DC, CH 5, 1 SC into the 6th DC, CH 5, 1 SC into next CH 5 space*; repeat from * to * and end with CH 2, 1 DC into last SC, CH 1 and turn.
XS–M: Repeat Rows 2–3 until you have 39 rows (should end on a CH 5 sequence row).
L–1XL: Repeat Rows 2–3 until you have 49 rows (should end on a CH 5 sequence row).
Sewing Up the Cocoon
To form the cocoon from the rectangle, fold all four corners toward the middle so there are two points on each long side. These points will form the sleeve openings. Sew from the inside of the rectangle toward the outside, seaming the corners where they meet in the middle. Leave about 5–7 inches unseamed at the tip of each point to create armholes for the sleeves.
Shrug Base Trim (Collar)
Adding a collar trim gives the shrug a finished look.
Row 1: Starting at any point on the collar, work 4 SC into each CH 5 space around the collar. Slip stitch into the first SC of the round.
Rows 2–3: 1 SC into each SC around. Slip stitch into the first SC of the round.
Row 4: CH 3 (counts as DC), 1 DC into the next SC, SK 1 SC, CH 1, *1 DC into the next 2 SC, SK 1 SC, CH 1*; repeat to the end. Slip stitch into the top of the first CH 3.
Row 5: Slip stitch into the first CH 1 space, CH 5 (counts as 1 DC, CH 2), 1 DC in next CH 1 space, *CH 3, 1 DC into the next CH 1 space*; repeat to the last two stitches. CH 3, slip stitch into the 3rd stitch of the beginning CH 5.
Row 6: 1 SC, *5 DC into next CH 3 space, 1 SC into the next CH 3 space*; repeat all the way around. Slip stitch into the first SC of the round.
Shrug Sleeve Trim
Work 3 rounds of SC evenly around each armhole to tidy the edges.
Row 1–3: Work SC stitches evenly all around the armhole. Slip stitch into the first SC stitch.
That is all there is to it — your Regina Shrug is complete! Wear it open as a lightweight layering piece or add a brooch at the front for a different look.