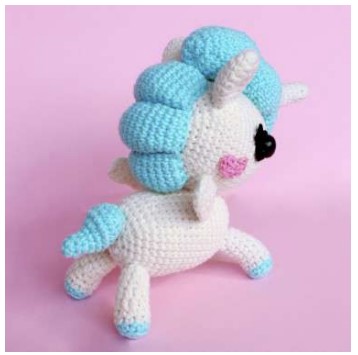
Crochet Unicorn Amigurumi
Discover the enchanting world of crochet with this adorable Amigurumi Unicorn pattern. Immerse yourself in the art of creating whimsical creatures as you embark on a magical journey. With just a hook and some colorful yarn, you can bring this mythical creature to life, stitch by stitch. This delightful project is perfect for both beginners and experienced crocheters alike. From the intricate details of the unicorn's flowing mane to its charming little horn, every stitch is an opportunity to add a touch of magic to your creation. So, grab your crochet hook, select your favorite yarn colors, and let your creativity run wild. With this Amigurumi Unicorn pattern, you have the power to create something truly magical. Get ready to embark on a crochet adventure like no other and bring a little piece of enchantment into your world.

Materials
For crocheting the body and head, I used Yarnart Jeans milky yarn (55% cotton, 45% acrylic, 160 m, 50 g), for the mane, mint-colored yarn from the Jeans Shiny series. Hook 2.5 mm.
For hearts I took Sati Alpina yarn, for eyes – Xenai Aplina.
The whole toy is crocheted in a spiral.
Abbreviations
AR – Amigurumi Magic ring
MR – Amigurumi Magic ring
3in1 – crochet 3 columns in one loop
sc: Single Crochet
inc: Increase
dec: Decrease
tr: Triple Crochet/ Treble Crochet
st: Stitch
dc: Double Crochet
hdc: Half Double Crochet
sl-st or Slst: Slip Stitch
ch: Chain
tch: Turnin chain crochet
..in: make increase into same stitch as many as the number which is given in front of “inc” abbreviation (exp; 3inc, 4inc..).
FLO: Crochet into front loops only
BLO: Crochet into back loops only
Head:
1) 6sc in Amigurumi Ring (6)
2) (inc)х6 (12)
3) (inc, sc)х6 (18)
4) 18sc
5) (inc, 2sc)х6 (24)
6) (inc, 3sc)х6 (30)
7) 30sc
8) (inc, 4sc)х6 (36)
9) (inc, 5sc)х6 (42)
10) (inc, 13sc)х3 (45)
11-20) 45sc (10 rows)
21) (dec, 13sc)х3 (42)
22) (dec, 5sc)х6 (36)
23) (dec, 4sc)х6 (30)
24) (dec, 3sc)х6 (24)
25) (dec, 2sc)х6 (18)
Stuff tightly with filler.
26) (dec, sc)х6 (12)
27) (dec)х6 (6)
Cut the yarn, pull off the hole, hide the yarn.
Body:
1) 6sc in Amigurumi Ring (6)
2) (inc)х6 (12)
3) (inc, sc)х6 (18)
4) (inc, 2sc)х6 (24)
5) (inc, 3sc)х6 (30)
6) (inc, 9sc)х3 (33)
7-19) 33sc (13 rows)
20) (dec, 9sc)х3 (30)
21) (dec, 3sc)х6 (24)
22) (dec, 2sc)х6 (18)
Stuff tightly with filler.
23) (dec, sc)х6 (12)
24) (dec)х6 (6)
Cut the yarn, pull off the hole, hide the yarn.
Legs (4 pcs):
1) 5sc in Amigurumi Ring (5)
2) (inc)х5 (10)
3) BLO 10sc
Change color to milky:
4-5) 10sc (2 rows)
6-7) 3sc, 4hdc, 3sc (2 rows of 10)
8-10) 10sc (3 rows)
At the end of slst. Stuff the part with filler. Cut the yarn, leave a long end for sewing. crochet 3 more of the same details.
Give your hands a shape (a slight fold in those places where hdc).
Wings (2 pcs):
1) 6sc in Amigurumi Ring (6)
2) (inc)х6 (12)
3) (inc, 3sc)х3 (15)
4) (inc, 4sc)х3 (18)
5) fold the circle in half, wind the hook immediately for both halves:
sc, 1 ch, 4 dc in 1 st, skip 1 st and work slst, 3 sc in 1 st, slst, 3 sc in 1 st, slst.
Do not stuff the part, leave a long end for stitching. crochet one more of the same detail.
Mane:
1st Part:
1) 4sc in Amigurumi Ring (4)
2) (inc, sc)х2 (6)
3) (inc, 2sc)х2 (8)
4) (inc, 3sc)х2 (10)
5) (inc, 4sc)х2 (12)
6-7) 12sc (2 rows)
8) (inc, 2sc)х4 (16)
9) (inc, 3sc)х4 (20)
10) (inc, 4sc)х4 (24)
10-13) 24sc (4 rows)
14) (dec, 2sc)х6 (18)
15) 18sc (18)
16) (dec, 4sc)х3 (15)
17) (inc, 4sc)х3 (18)
18) (inc, 2sc)х6 (24)
19) (inc, 7sc)х3 (27)
20-21) 27sc (2 rows)
22) (dec, 7sc)х3 (24)
23-24) 24sc (2 rows)
25) (dec, 2sc)х6 (18)
26) 18sc (18)
Fill the part with filler NOT tightly so that it compresses easily (about half).
27) (dec, sc)х6 (12)
28) (dec)х6 (6)
Cut the yarn, pull off the hole, leave a long end for sewing.
2nd Part:
1) 6sc in Amigurumi Ring (6)
2) (inc, 2sc)х2 (8)
3) (inc, 3sc)х2 (10)
4) (inc, 4sc)х2 (12)
5) 12sc
6) (inc, 5sc)х2 (14)
7) 14sc
8) (inc, 6sc)х2 (16)
9) 16sc
10) (inc, 7sc)х2 (18)
11-13) 18sc (3 rows)
14) (dec, 7sc)х2 (16)
15) (dec, 6sc)х2 (14)
16) 14sc
17) (dec, 5sc)х2 (12)
18) stuff the part not very tightly, fold the edge, connect 5 sc, winding the hook for both parts of the part (if it is inconvenient, you can simply sew the edge with a needle).
Cut the yarn, leave a long end for sewing.
3rd Part:
1) 6sc in Amigurumi Ring (6)
2) (inc, 2sc)х2 (8)
3) (inc, 3sc)х2 (10)
4) 10sc
5) (inc, 4sc)х2 (12)
6) 12sc
7) (inc, 5sc)х2 (14)
8) 14sc
9) (inc, 6sc)х2 (16)
10-13) 16sc (4 rows)
14) (dec, 6sc)х2 (14)
15) (dec, 5sc)х2 (12)
16) 12sc
17) stuff the part not very tightly, fold the edge, connect 5 sc, winding the hook for both parts of the part (if it is inconvenient, you can simply sew the edge with a needle).
Cut the yarn, leave a long end for sewing.
4th Part:
1) 4sc in Amigurumi Ring (4)
2) (inc, sc)х2 (6)
3) (inc, 2sc)х2 (8)
4) (inc, 3sc)х2 (10)
5-6) 10sc (2 rows)
7) (inc, 4sc)х2 (12)
8-9) 12sc (2 rows)
10) (inc, 5sc)х2 (14)
11-12) 14sc (2 rows)
13) (dec, 5sc)х2 (12)
14) stuff the part not very tightly, fold the edge, connect 5 sc, winding the hook for both parts of the part (if it is inconvenient, you can simply sew the edge with a needle).
Cut the yarn, leave a long end for sewing.
Ears (2 pcs):
1) 6 sc in Amigurumi Ring (6)
2) (inc, 2 sc)х2 (8)
3) (inc, 3 sc)х2 (10)
4) (inc, 4 sc)х2 (12)
5) (inc, 5 sc)х2 (14)
6) (inc, 6 sc)х2 (16)
7) (inc, 7 sc)х2 (18)
8) (dec, sc)х6 (12)
9) (dec, 2 sc)х3 (9)
At the end of slst.
Do not stuff the part, leave a long end for stitching. crochet one more of the same detail.
Horn:
1) 4sc in Amigurumi Ring (4)
2) (inc, sc)х2 (6)
3) 6sc
4) (inc, 2sc)х2 (8)
5) 8sc
6) (inc, 3sc)х2 (10)
7) 10sc
At the end of slst. Stuff the part with filler. Cut the yarn, leave a long end for sewing.
Tail:
1) 4sc in Amigurumi Ring (4)
2) (inc, sc)х2 (6)
3) 6sc
4) (inc, 2sc)х2 (8)
5) (inc, 3sc)х2 (10)
6) 3sc, (inc)х4, 3sc (14)
7) 4sc, (inc)х6, 4sc (20)
8) (dec, 2sc)х5 (15)
9) (dec, sc)х5 (10)
10) (dec)х5 (5)
At the end of slst. Stuff the part with filler. Cut the yarn, pull off the hole, leave a long end for sewing.
Eyes (2pcs):
For the eyes, use half-beads / screw eyes or crochet from black yarn twice as thin as the main one.
1) 6sc in Amigurumi Ring (6)
2) (inc)х6 (12)
3) (inc, sc)х6 (18)
4) 4 ch, from the second loop 3 slst, slst in a circle, 3 ch, 2 slst, slst in a circle.
Cut the yarn, leave a long end for sewing.
Eyelashes for 2 parts in reverse order (first 3 ch, then 4 ch).
I additionally glued on top of the half-bead.
Hearts:
Use yarn thinner than the main one, my yarn is 2 times thinner than the main one, but you can not 2 times, but just thinner.
Make an amigurumi ring: 2 ch, 2 dc, 2 hdc, sc, 2 ch, sc, 2 hdc, 2 dc, 2 ch, slst into a ring.
Tighten the ring – you get a heart.
Assembly:
– First decorate the head with a mane, pin it with pins, and then sew on the details.
– Connect the head to the body.
– After that, pin the legs with pins so that the pear stands on its own. Sew legs, tail, wings.
Please invite me to join all crochet. I would like to crochet the unicorn for this month.
Thank you