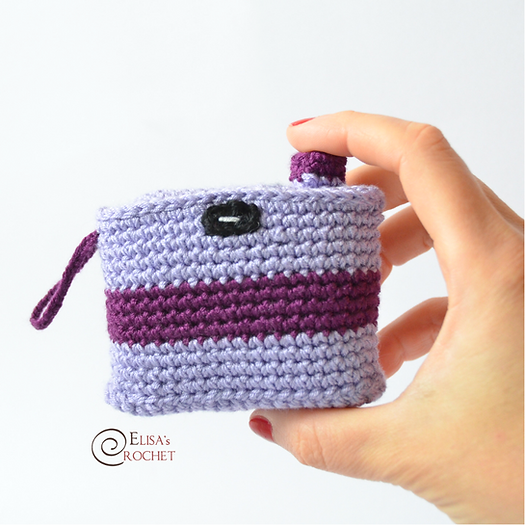
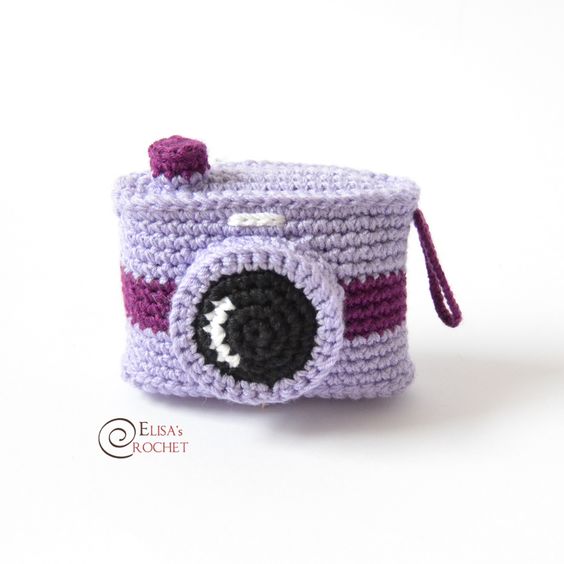
Crochet Photo Camera Free Pattern
Capture memories in a unique and creative way with a handmade crochet camera! This charming piece combines the art of crochet with the functionality of a camera, making it a delightful addition to any photography enthusiast's collection. The intricate details and colorful yarns used in crafting this camera add a touch of whimsy and personality, setting it apart from traditional cameras. Whether displayed as a decorative item or used as a prop for photography shoots, this crochet camera is sure to spark joy and admiration. This crochet camera is not only a fun and quirky accessory, but also a testament to the beauty of handmade crafts and the art of crochet. Add a touch of whimsy to your space or surprise a photography enthusiast with this unique and delightful crochet camera!
SKILL LEVEL: Beginner
YARN: Medium Weight Cotton Yarn (Lace 4) in Lilac, Purple, Black and White
OTHER MATERIALS: Polyester Fiber Filling
HOOK SIZES: E/3,50 mm
STITCHES USED and ABBREVIATIONS: magic ring (mr), chain (ch), slip stitch (sl st), single crochet (sc), back loop only (BLO), decrease (dec), increase (inc), fasten off (F/O).
INSTRUCTIONS: work in rows (join with a sl st and ch1 at the end of each row) otherwise instructed.
BODY CAMERA (lilac and purple yarn)
1) start working with lilac yarn, 17 ch, 2 sc in the 2nd ch from the hook, 14 sc, 4 sc in the last ch, keep working on the other side of the foundation chain, 14 sc, 1 inc in the last st (36)
2) *1 inc, 16 sc, 1 inc*, repeat ** twice (40)
3) *1 inc, 18 sc, 1 inc*, repeat ** twice (44); do not ch1
4) 40 sl st (40); ch1 and turn
5) now work in the opposite direction, 44 sc (44)
6-9) sc even (44)
10) switch to purple yarn, 44 sc (44)
11-13) sc even (44)
14) switch back to lilac yarn, sc even (44)
15-18) sc even (44); F/O and hide the yarn.
Stuff the body of the camera.
Create the top part of the camera:
1) start working with lilac yarn, 17 ch, 2 sc in the 2nd ch from the hook, 14 sc, 4 sc in the last ch, keep working on the other side of the foundation chain, 14 sc, 1 inc in the last st (36)
2) *1 inc, 16 sc, 1 inc*, repeat ** twice (40)
3) *1 inc, 18 sc, 1 inc*, repeat ** twice (44); F/O and leave a long tail to sew the top of the camera to the body.
Keep stuffing firmly as you sew the two pieces together.
LENS (black, purple and white yarn)
1) start working with black yarn, 6 sc in a mr (6)
2) inc around (12)
3) *1 sc, 1 inc*, repeat ** three times, 1 sc, 1 sc with black yarn and 1 sc with white yarn in the next st, keep working with white yarn, 1 sc, 1 inc, 1 sc, 1 sc with white and 1 sc with black in the next st (18) 4) working with black yarn only, *2 sc, 1 inc*, repeat ** around (24)
5) switch to lilac yarn, *3 sc, 1 inc*, repeat ** around (30); do not ch 1
6) 30 sl st (30); ch1 and turn
7) now work in the opposite direction, 30 sc (30)
8) sc even (30); F/O and leave a long tail of yarn to sew the lens to the body of the camera. Stuff as you sew it.
SHUTTER RELEASE BUTTON (purple and lilac yarn)
1) start working with purple yarn, 8 sc in a mr (8)
2) working in BLO, sc even (8)
3) working in both loops now, switch to lilac yarn, sc even (8); F/O and leave a long tail of yarn to attach the button to the top part of the camera. Stuff it as you sew it.
Embroider a line above the lens using white yarn, using the chain stitch technique.
Embroider a rectangle with black yarn on the back of the camera, using the chain stitch technique.
Fill the space inside the black rectangle, embroidering a short white line.
WRIST STRAP (purple yarn)
1) work 35 ch very tightly (35); F/O and leave a long tail of yarn to sew the wrist strap on the side of the camera.