Crochet Puppy Dog Hat
Create a charming hat for your little one with a crochet pattern featuring an adorable puppy dog design. This fun and whimsical hat will keep your child warm and stylish during the colder months. The hat can be customized with different colors to match your child's personality or favorite colors. The crochet puppy dog hat is a perfect accessory for any child who loves animals and wants to stand out with a unique and handmade piece. With this crochet pattern, you can easily follow along and create a one-of-a-kind hat that will surely be a conversation starter. The puppy dog design adds a playful touch to the hat, making it a fun and creative project to work on. Whether you're an experienced crocheter or just starting out, this pattern is suitable for all skill levels and will result in a cute and cozy hat that your child will love to wear. Get ready to crochet a puppy dog hat that will bring joy and warmth to your little one's wardrobe!
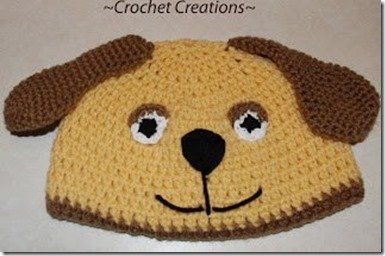
Hat for a 4 year old child, or use a smaller hook for a smaller size.
Supplies: J hook G hook Red Heart Yellow, brown, white, black yarn
Abbreviations: ch=chain sl st=slip stitch sc=single crochet dc=double crochet 2sctog=2 single crochet together decrease
Instructions:
J hook
ch 5- slip stitch to form a ring,
rnd 1. ch 3, 11 dc in ring, join with sl st. on top of ch 3. -12 sts.
rnd 2. ch 2, dc in same st. as joining, 2dc in each st. around. join with sl st on top of chain 2. -24 sts.
rnd 3. ch 2 counts as the first stitch, *2dc in next st., dc in the next stitch, repeat from *around, join with sl st. -36 sts.
rnd 4. ch 2, dc in the next st., 2dc in the next st., *dc in the next two stitches, 2dc in the next stitch, repeat from *around, join with sl st. -48 sts.
rnd 5. *ch 2, dc in each st across, join sl st., *repeat. continue until the hat reaches 7 inches, sl st. fasten off. (if this is a smaller size the length will be shorter, look above for sizes and what hook to use.)
Edge of the hat, sl st with brown yarn, and double crochet in each stitch around. sl st, fasten off.
Ears: G hook Brown yarn Make 2 ch 2
rnd 1. 6 sc in the 2nd chain from the hook, sl st -6sc
rnd 2. 2sc in each stitch around, sl st, -12sc
rnd 3. *1sc in the next stitch, 2sc in the next stitch, *repeat from *around, sl st. -18sc
rnd 4. *sc in the next 2 stitches, 2sc in the next stitch, *repeat from *around, sl st. -24sc
rnd 5-11. sc in each stitch around, dont need to slip stitch, just do continual rounds. use a marker to keep track of your rounds. -24sc
rnd 12. * sc in the next 3 stitches, 2sctog decrease, *repeat from *around. rnd 13. *sc in the next 2 stitches, 2sctog decrease, *repeat from *around. rnd 14-26. *sc in each stitch around, *repeat from * around. the last round, sl st, fasten off. Attach the Ears to the top side of the hat, about 2 1/2 inches apart.
Eyes: G hook Make 2 black,white, and brown yarn With Black yarn,
ch 2 do 5 sc in the 2nd chain from the hook, sl st. Using White yarn, work 2sc in each stitch around, sl st. (10 sc) On top of the the eye, sl st with brown yarn, on the side, work 2sc in the next 4 stitches across. sl st fasten off. weave in the ends. Attach the eyes about 2 inches apart in the center to top part of the hat
Another Option for eyes, Is use buttons, But on one eye, you can make a circle, G hook, white yarn
rnd 1. chain 3, join with sl st. to create a ring rnd 2. 10 sc into the ring, sl st. join rnd 3. *2sc in the next st, *Repeat to finish around (20 st.) rnd 4. *1 sc in the next st, 2sc in the next st. *Repeat, sl st. rnd 5. *1 sc in the next 2 stitches, 2sc in the next st, *Repeat, sl st. Fasten off. Place a button in the center of the circle for one eye, and you a button for the other eye.
Nose: black yarn Using a yarn needle, Create an upside down Triangle with the yarn and fill in the triangle with yarn over and over until its fill with black yarn. The top of the nose is about 1 inch in size, 1 inch on the sides, place below the nose in the center. About 1/2 inch from the eyes.
Mouth: black yarn Using a yarn needle make a 1 inch line under the center of the nose, then make two lines on both sides from the straight line to finish the mouth. fasten off.