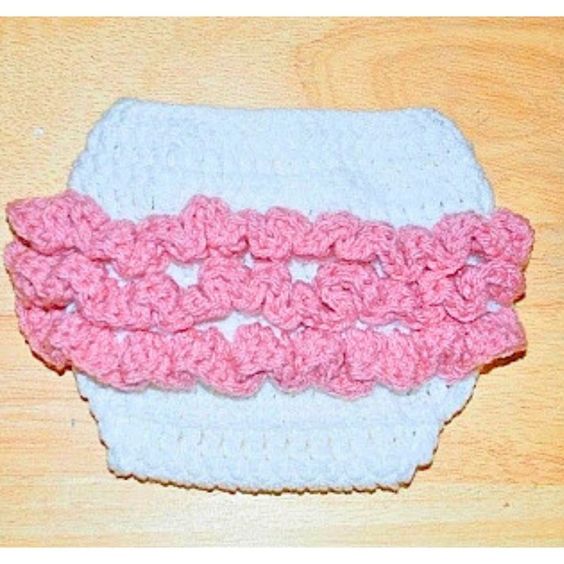
Crochet a Ruffle Diaper Cover
Are you ready to embark on a delightful crochet adventure? Let's dive into the world of ruffled diaper covers and create a stunning piece that will make any baby look like a little fashionista! With just a few simple crochet stitches and some colorful yarn, you'll be able to craft a diaper cover that is both practical and adorable. Are you ready to let your creativity soar? Get your crochet hooks ready because we're about to embark on a journey to create a one-of-a-kind ruffle diaper cover that will make your little one the star of the show! With a few simple crochet techniques and a splash of imagination, you'll be able to design a diaper cover that is as unique as your baby.
- H hook
- Medium worsted pink and white yarn
- 1 inch Button
Abbreviations:
dc=double crochet
sl st=slip stitch
sc=single crochet
ch=chain
CH 47, H hook
Row 1. sc in 2nd ch from hook and each stitch across. Turn ‑46 sc
- ch 2, dc in each stitch across. Turn ‑46 dc
- Ch 1, sc in each stitch across. Turn ‑46 sc
- Slip Stitch into the next 12 stitches, ch 2, dc in the next 24
stitches, leave the remaining 11 stitches unworked. Turn
- Ch 1, sc in each stitch across. Turn
- Ch 2, dc in each back loop stitch across. Turn
- Ch 1, sc in each stitch across. Turn
- Ch 2, dc2tog decrease in the back loop, dc in the next 20 back loop stitches, dc2tog decrease. Turn
- Ch 1, sc in each stitch across. Turn
- Ch 2, dc2tog decrease in the back loop, dc in the next 18 back loop stitches, dc2tog decrease. Turn
- Ch1, sc in each stitch across. Turn
- Ch 2, dc2tog decrease in the back loop, dc in the next 16 back loop stitches, dc2tog decrease. Turn
- Ch 1, sc2tog decrease, sc in the next 14 stitches, sc2tog decrease. Turn
- Ch 2, dc2tog decrease in the back loop, dc in the next 12 back loop stitches, dc2tog decrease. Turn
- Ch 1, sc2tog decrease, sc in the next 10 stitches, sc2tog decrease. Turn
- Ch 2, dc in each stitch across, Turn
- Ch 1, sc in each stitch across, Turn
- Ch 2, dc in each stitch across, Turn
- Ch 1, sc in each stitch across, Turn
- Ch 2, dc in each stitch across, Turn
- Ch 1, sc in each stitch across, Turn
- Ch 2, dc in each stitch across, Turn
- Ch 1, sc in each stitch across, Turn
- Ch 2, dc in each stitch across, Turn
- Ch 1, sc in each stitch across, Turn
- Ch 2, dc in each stitch across, Turn, Fasten off.
- Slip stitch With Red yarn, sc evenly around the entire diaper cover, and Fasten off.
Baby’s Waist is about 13–14 inches around.
Button: Make sure you have the back loops side facing outward and sew your button on the back loops side of the diaper cover. (the back loops will be for the ruffles.)
Sew on a button to the middle of the front flap. Secure the Diaper Cover by placing the sides in the center and inserting the button in between the Dc of the side flaps.
Ruffles:
Pink Yarn, H hook
First Ruffle. Start with Row 6 Back loops, Slip Stitch in the first back loop of the previous row 6, ch 2, work 2 dc in the first back loop, work 3 dc in the next back loop, and Repeat for each back loop row across, (I did 3 Rows of Ruffles), sl st. Fasten off.