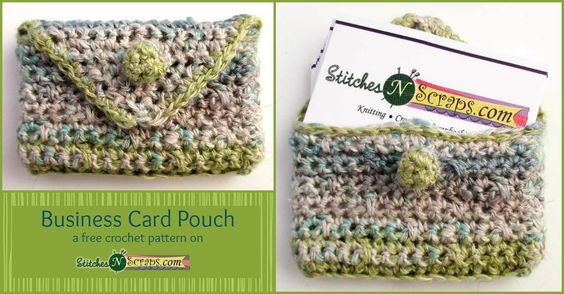
Crochet Business Card Pouch
Looking for a unique and eye-catching way to carry your business cards? Look no further than our exquisite Crochet Business Card Pouch! Handcrafted with love and attention to detail, this pouch is not only functional but also adds a touch of elegance to your professional image. Made from high-quality yarn, the crochet design showcases intricate patterns and textures that are sure to impress anyone who lays eyes on it. Whether you're attending a networking event, meeting with clients, or simply want to add a touch of sophistication to your everyday routine, our Crochet Business Card Pouch is the perfect choice. It's a conversation starter that showcases your unique style and attention to detail. So why settle for a plain and ordinary card holder when you can make a lasting impression with our beautifully crafted crochet pouch?
Materials:
- 50-60 yds DK weight yarn (Shown in Bella Lino from Classic Elite Yarns)
- Size G (4mm) hook or size needed to meet gauge
- Yarn or Tapestry needle
- Optional: 5/8″ or 15mm button (if you don’t want to crochet one).
Difficulty:
Easy – mostly single crochet and double crochet, some decreases, one round of working in back loops only. The optional button is a little more difficult just because it’s small.
Size:
3.75″ x 2.25″
Gauge:
18 sc x 20 rows = 4 inches
Abbreviations used:
- ch = chain
- sc = single crochet
- sc2tog = single crochet 2 stitches together
- dc = double crochet
- spike = spike double crochet (see Special Stitch)
- st(s) = stitch(es)
- sl st = slip stitch
- sp(s) = space(s)
- WS = wrong side
- RS = right side
Special Stitch:
Spike double crochet (spike): Dc in skipped stitch below next ch sp.
Instructions:
Note: Join rounds where indicated by making a slip stitch into the first stitch of the round.
Pouch
Rnd 1: Ch 18, 3 sc in 2nd ch from hook, sc in next 15 chs, 3 sc in last ch. Working across opposite side of chain, sc in next 15 chains, join (36 sc)
Note: Your work should now be about 3.75 inches wide. If it is not, try using a different hook size or yarn. A little bit bigger is ok, but if it’s too small the business cards won’t fit.
Rnd 2 (RS): Ch 1, turn, working in back loops only, sc in each st around, join
Rnd 3: Ch 1, turn, sc in first st, (ch 1, sk next st, sc in next 5 sts) 5 times, ch 1, sk next st, sc in last 4 sts, join.
Rnd 4: Ch 1, turn, sc in first 4 sts, (spike, sc in next 5 sts) 5 times, spike, sc in last st.
Rnd 5: Ch 1, turn, sc in first 4 st, (ch 1, sk next st, sc in next 5 sts) 5 times, ch 1, sk next st, sc in last st, join.
Rnd 6: Ch 1, turn, sc in first st, (spike, sc in next 5 sts) 5 times, spike, sc in last 4 sts.
Rnds 7-14: Repeat Rnds 3-6 twice
Note: Your pouch should now measure 2.5″ tall. If it does not, continue repeating rnds 3-6 until it does, ending on an even numbered (RS) round.
Flap:
Row 1: Turn, sl st in first 2 sts, ch 1, sc2tog, sc in next 14 sts, sc2tog, leaving remaining 18 sts unworked. (16 sts, not counting sl sts)
Rows 2-3: Ch 1, turn, sc in each st across (16 sts)
Row 4: Ch 1, turn, sc2tog, sc in each st across to last 2 sts, sc2tog (14 sts)
Row 5: Repeat Row 2 (14 sts)
Row 6: Repeat Row 4 (12 sts)
Row 7: Ch 1, turn, sc2tog, sc in next 2 sts, sc2tog, ch 2 (buttonhole), sc2tog, sc in next 2 sts, sc2tog (8 sts, 1 ch sp)
Row 8: Ch 1, turn, sc2tog, sc in next 2 sts, 2 sc in ch sp, sc in next 2 sts, sc2tog (8 sts)
Rows 9-10: Repeat Row 4. (4 sts on row 10)
Row 11: Ch 1, turn, sc2tog twice. (2 sts)
Edging rnd:
- Ch 1, turn, sc2tog, working in sides of rows, work 14 sc evenly spaced along side of flap. (15 sc)
- Working around front of pouch, sl st in each unworked st from Rnd 14 of pouch (18 sl sts)
- Working in sides of rows, work 14 sc evenly spaced along side of flap, join, fasten off.
Button (optional):
Rnd 1: Work 6 sc inside a magic circle, pull circle closed, join. (6 sc)
Rnd 2: Ch 1, turn, 2 sc in each st around, join. (12 sc)
Rnd 3: Ch 1, turn, sc2tog 6 times, join. (6 sc)
Fasten off, leaving a 10 inch tail.
Stuff button lightly (I used some cut up pieces of the same yarn as stuffing).
Sew in starting tail. With ending tail, sew last round of button closed tightly. Do not cut ending tail.
Finishing:
Sew button into place on front of pouch. If you made the crocheted button, you can use the remaining tail to sew it on.
Weave in any remaining tails.