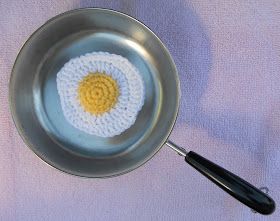
Crochet a Fried Egg
Embark on a creative journey and crochet your very own fried egg masterpiece! With just a few simple stitches and some colorful yarn, you can bring this breakfast favorite to life in a unique and charming way. Start by selecting the perfect shades of white and yellow yarn to mimic the egg whites and yolk. Then, using your crochet hook, begin by crafting a circular base for the egg white. Gradually add stitches to create the textured edges that give the egg its distinct appearance. Once the egg white is complete, move on to the yolk. Crochet a smaller circular shape using bright yellow yarn and attach it to the center of the egg white. Add some finishing touches, such as a few black stitches to represent the pepper specks on the yolk, and voila! You have successfully crocheted a delightful fried egg that will surely impress your friends and family. The end result will be a delightful crocheted fried egg that can be used as a decorative piece, a playful addition to a child's play kitchen, or even a unique gift for a breakfast enthusiast. Let your imagination run wild and enjoy the process of bringing this breakfast staple to life through the art of crochet.
MATERIALS:
Small amounts worsted weight yarn in yellow and white
Size G (4.5 mm) crochet hook
Small amount fiberfill or alternative stuffing
Tapestry needle
NOTES:
1.Read pattern through before beginning.
2.Yarn used is Red Heart Super Saver.
3.Beginning chains don’t count as the first st.
4.Pull all slip stitches tight until they neaqrly disappear.
5.Remember this is just a toy, so if your stitch count is slightly off don’t sweat the small stuff.
YOLK BOTTOM:
Round 1: With yellow, ch 3, 9 hdc in third ch from hook. Join with a slip stich in top of 1st hdc. (9 hdc).
Round 2: Ch 1, 2 hdc in each st. Join with a slip stich in top of 1st hdc. (18 hdc)
Fasten off and weave in ends.
YOLK TOP:
Round 1: With yellow, ch 2, 6 sc in second ch from hook. Join with a slip stitch in top of 1st sc. (6 sc).
Round 2: Ch 1, 2 sc in same st as join. 2 sc in each sc around. Join with a slip stitch in top of 1st sc. (12 sc).
Round 3: Ch 1, sc in same st as join. *2 sc in next st, sc in next st. Repeat from * around. Join with a slip stitch in top of 1st sc. (18 sc).
Round 4: Ch 1, sc in each st around. Join with a slip stich in top of 1st sc. (18 sts)
WHITE:
Round 1: With wrong sides of yolk pieces together, working through both pieces attach white with a dc, dc in same st. 2 dc, in each st around. When there are only about 4 sts remaining to join, put in a small amount of fiberfil. Join with slip stitch in top of 1st dc. (36 dc)
Bottom of egg should be flat and the top slightly domed.
Round 2: This round should have some randomness to it. This is the way I worked one of them. Ch 1, sc in same st as join. *hdc, 2 hdc, dc, dc, 2 hdc, sc, sc, hdc, dc, dc, 2 hdc, sc, hdc, hdc, 2 dc, dc, dc, 2 dc, dc, 2 hdc, dc, dc. 2 dc, dc, dc, 2 dc, hdc, hdc, 2 hdc, 5 sc. Join with slip stitch in 1st st.
Fasten off.
Weave in ends.