Crochet Merino Slippers
Craft a cozy pair of Merino wool slippers using the art of crocheting. These handmade slippers are not only stylish but also incredibly warm and comfortable. The soft Merino wool yarn will keep your feet toasty during the colder months, making them the perfect accessory for lounging around the house or even running quick errands. Create your own unique pair of crocheted Merino slippers by choosing from a variety of colors and patterns. Whether you prefer a classic solid color or a fun striped design, the possibilities are endless when it comes to customizing your cozy footwear. Treat yourself to a pair of these luxurious slippers or make them as a thoughtful gift for a loved one. Handmade with care and attention to detail, these crocheted Merino slippers are sure to become a favorite in your wardrobe.
CROCHET COSY MERINO SLIPPERS DIRECTIONS
So let me now get started and tell you what you will need in order to crochet these amazing CROCHET COSY MERINO SLIPPERS.
These CROCHET COSY MERINO SLIPPERS are very fun and quick to make.
The pattern uses only basic crochet stitches — half double crochets stitches.
These easy-to-fit slippers are a crocheter's dream, made with the pretty stitch pattern with half double crochet stitches, are worked in rounds and rows.
It’s crocheted with only half double crochet stitches.
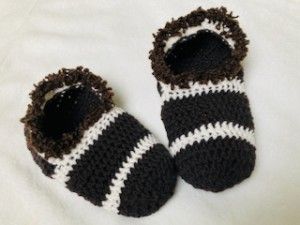
The slippers are crocheted with cosy merino yarn and with fun yarn Samuel.
Colors:
A = dark brown color
B = white color
C = brown color
LANG YARN:
LANG YARNS, Merino 70 – 100% virgin wool, merino extrafine, super-wash, 70m/50g – 2 skeins
This yarn is so soft, affordable, and really easy to care for.
For this medium size you will need 2 skeins of LANG YARN.
Scissors and tapestry needle
Crochet hook: 5.0 mm
Difficulty Level: Level 1 – Easy, for beginners
US crochet terms:
SlSt – slip stitch
CH/s – chain/s
SC — single crochet
HDS — half double crochet
SK — skip
T — turn
ST/s — stitch(es)
REP — repeat
YO – yarn over
PATTERN NOTES
1) Before you start take a measurement of length of your leg from big toe to heel and a leg circumference (please see the final measurement of the slippers below).
2) This pattern is for Medium Woman size, but you can easily adapt to a smaller size or bigger size.
There are 3 parts:
1) from big toe to leg
2) from leg to heel
3) border
Make the first part of slipper (working in rounds) bigger or smaller just by reducing or increasing the number of stitches in rounds.
Make the second part of slipper (working in rows) bigger or smaller just by reducing or increasing the number of rows.
Make the third part of slipper shorter or longer just by reducing or increasing the number of rows.
3) A ch1 at beg of the round DOESN'T count as a stitch throughout.
4) The Slipper measures: 24.5 cm / 9.8 inch (length), 24 cm / 9.5 inch (width), 13 cm / 5.5 inch (front part length) and 11.5 cm / 4.8 inch 5 inch (back part length).
*Measurements are taken from the garment lying flat, before the yarn has stretched out/dropped.
5) The Slipper is worked in one piece, in joined rounds and then in rows, back and forth, from tip to heel.
COSY MERINO SLIPPERS
THE WRITTEN PATTERN
PART 1
work in closed rounds
colour A
ch1 at the beginning of round don't count as a stitch.
make a magic ring
R1: ch1, 6hdc in magic ring, sl st in first ch to close round (6hdc)
R2: ch1, 2hdc in each st around, sl st in first ch to close round (12hdc)
R3: ch1, 2hdc in each st around, sl st in first ch to close round (24hdc)
R4: ch1, *2hdc in fist st, 1hdc in next 2st* repeat from * to * till end of round, sl st in first ch to close round (32 hdc)
R5: ch1, 1hdc in each st around till end of round, sl st in first ch to close round (32 hdc)
R6: ch1, 1hdc in each st around till end of round, sl st in first ch to close round (32 hdc)
Color B
R7-R8: ch1, 1hdc in each st around till end of round, sl st in first ch to close round (32 hdc)
Color A
R9-R13: ch1, 1hdc in each st around till end of round, sl st in first ch to close round (32 hdc)
Color B
R14-R15: ch1, 1hdc in each st around till end of round, sl st in first ch to close round (32 hdc)
PART 2
Work in rows, turn your work when your finish row
ch1 at the beginning of round don't count as a stitch.
Color A
R16: ch1, 1hdc in next 22 st, skip last 10 st, turn (22hdc)
R17-R26: ch1, 1hdc in each st in row till end of row, turn (22hdc)
For Medium Woman size I made 11 rows.
LET'S MAKE HEEL
Join sides
Fold your work in half and bring both ends together. Join the sides slip to slip by slip stitches.
Now that your slipper is assembled you will hide all loose tails in the wrong side of your work and turn it right side facing you and let's make a border.
PART 3
BORDER:
Lay the SLIPPER out in front of you. Place SLIPPER with right side up, right side facing you.
With yarn color B and hook you will now make a border around the PART 2, making sure the right side up.
Remember not to make your stitches too tight and not too loose.
Start at the beginning of row R16
R1: ch1, working in ends of rows R16-R26 make 15 slip stitches evenly, you reach the heel, then work in ends of rows R26-R16, make again 15 slip stitches evenly.
You make 30 slip stitches in total. Join row with sl st in 1st skipped hdc. Turn your work.
R2: ch1, 1hdc in next 29 slip stitches, then join next 2st together and then 1hdc in next 8 hdc (the stitches in row R15 which we skipped), join row with sl st in 1st ch
Color C
R3: ch1, 1hdc in each st around till end of row, sl st in 1st ch.
Now you will hide all loose tails in the wrong side of your work and turn it right side facing you and you are all done my friends.
You just created a beautiful COSY SLIPPERS!