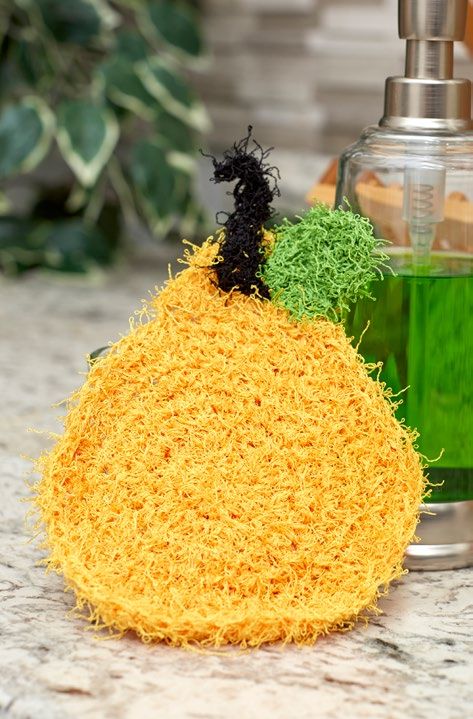
Crochet Pear Scrubby
Imagine creating your very own handmade pear-shaped scrubby using the art of crochet. This unique project allows you to combine your love for crafting with the practicality of a household item. By following a simple pattern and using soft, durable yarn, you can create a scrubby that is not only functional but also aesthetically pleasing. The pear shape adds a fun twist to a traditional household item, making it a great conversation starter in your kitchen or bathroom. Whether you are a seasoned crocheter or a beginner looking for a fun project, making a crochet pear scrubby is a rewarding and enjoyable experience. Plus, once you have mastered the technique, you can easily create more scrubby fruits like apples, oranges, or even strawberries to add a playful touch to your cleaning supplies.
Skill Level: Easy
Materials:
RED HEART Scrubby: 1 ball each 241 Duckie A, 620 Lime B, and 12 Black C Note: Only small quantities of B and C are needed for this project.
Susan Bates Crochet Hook: 5.5mm [US I-9] Yarn needle
Stitch marker (optional)
Gauge/Tension: Gauge is not critical for this project.
Scrubby measures 5″ wide x 6½” long (12.5 x 16.5 cm), excluding stem.
Notes
Bottom of pear is worked in continuous rounds. Place marker for beginning of round and move marker up as each round is completed.
Special Stitch
sc2tog = [Insert hook in next stitch, yarn over and pull up a loop] twice, yarn over and draw through all 3 loops on hook.
SCRUBBY
PEAR
Bottom
With A, ch 2.
Round 1: Work 6 sc in 2nd ch from hook—6 sc. Do not join. Place marker for beginning of round and move marker up as each round is completed.
Round 2: Work 2 sc in each st around—12 sc.
Round 3: *Sc in next st, 2 sc in next st; repeat from * around—18 sc.
Round 4: *Sc in next 2 sts, 2 sc in next st; repeat from * around—24 sc.
Round 5: *Sc in next 3 sts, 2 sc in next st; repeat from * around—30 sc.
Round 6: *Sc in next 4 sts, 2 sc in next st; repeat from * around—36 sc.
Round 7: *Sc in next 5 sts, 2 sc in next st; repeat from * around—42 sc.
Round 8: *Sc in next 6 sts, 2 sc in next st; repeat from * around—48 sc. Do not fasten off; remove marker. Continue working in turned rows.
Top
Row 1 (right side): Sc in next 7 sts; leave remaining sts unworked, turn—7 sc.
Row 2: Ch 1, sc in each st across, sc in first unworked st; leave remaining sts unworked, turn—8 sc.
Row 3: Ch 1, sc2tog, sc in next 4 sts, sc2tog, turn—6 sc.
Row 4: Ch 1, sc2tog, sc in next 2 sts, sc2tog, turn—4 sc.
Row 5: Ch 1, [sc2tog] 2 times—2 sc.
Fasten off.
Leaf
With B, ch 7.
Row 1: Sc in 2nd ch from hook, hdc in next ch, dc in next 2 ch, hdc in next ch, sc in last ch, turn—6 sts.
Row 2: Ch 1, sc in first st, hdc in next st, dc in next 2 sts, hdc in next st, sc in next st. Fasten off, leaving a long tail for sewing.
Stem
With C, ch 9.
Row 1: Sc in 2nd ch from hook and in each ch across–8 sc. Fasten off, leaving a long tail for sewing.
FINISHING
Referring to photograph as a guide, sew stem and leaf to top of pear.
Weave in all ends.
ABBREVIATIONS
A, B, C = Color A, Color B, Color C, etc.;
ch = chain(s);
dc = double crochet;
hdc = half double crochet;
sc = single crochet;
st(s) = stitch(es);
[ ] = work directions in brackets the number of times specified;
* = repeat whatever follows the * as indicated.