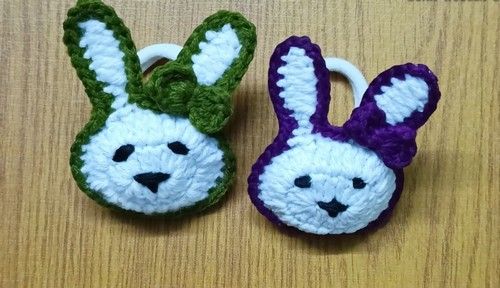
Crochet Adorable Rabbit Hair Tie
Looking to add a cute touch to your hairstyle? The Crochet Adorable Rabbit Hair Tie is just what you need! This delightful hair accessory combines style and charm in one fluffy package. With its soft crochet design and adorable rabbit ears, it's sure to make your ponytail or bun stand out from the crowd. Whether you're heading to a casual hangout or a special event, this hair tie will add a touch of whimsy to your look. So hop on over and give your hairdo an extra dose of sweetness with this lovely accessory!
Making the Center Part of the Rabbit (Head)
Create a slip knot.
Chain 6.
In the third chain from the hook, make 2 double crochets (DC).
In the next two chains, make 1 DC in each.
In the last chain, make 6 DC.
Continue on the other side of the chain: make 1 DC in the next chain, then 1 DC in the next chain.
In the last chain (where you started with 2 DC), make 4 DC.
Slip stitch into the second chain of the initial two chains to close the round.
Round 2:
Chain 2.
In the next double crochet, make 2 DC.
In the next stitch, make 2 DC.
In the next two stitches, make 1 DC in each.
In the next six double crochets, make 2 DC in each (total of 12 DC).
In the next two double crochets, make 1 DC in each.
In the next four double crochets, make 2 DC in each.
Slip stitch into the second chain of the initial two chains to close the round.
Slip stitch into the next two chains.
Making the Ears
First Ear:
Chain 9.
In the third chain from the hook, make 1 half double crochet (HDC).
In the next four chains, make 1 DC in each.
In the next chain, make 1 HDC.
In the last chain, make 1 single crochet (SC).
Slip stitch into the next chain on the main body.
Slip stitch into the next two chains on the main body.
Second Ear:
Chain 9.
Repeat the same process as the first ear: 1 HDC in the third chain, 1 DC in the next four chains, 1 HDC in the next chain, and 1 SC in the last chain.
Slip stitch into the next chain on the main body.
Chain 1 and cut the yarn, leaving a tail.
Hide the extra yarn by weaving it into the back.
Creating the Back Pattern
Make another identical pattern following the steps for «Part 1: Making the Center Part of the Rabbit (Head)» and «Part 2: Making the Ears».
Adding Eyes and Nose
Using black yarn and a needle, create the eyes and nose on one of the rabbit patterns.
Eyes: Make two small stitches in the corners of the first round. You can double the yarn for a bolder look.
Nose: Start from the middle, bring the needle up, then down, and create a small triangle shape by stitching from the sides.
Tie a knot and cut the yarn.
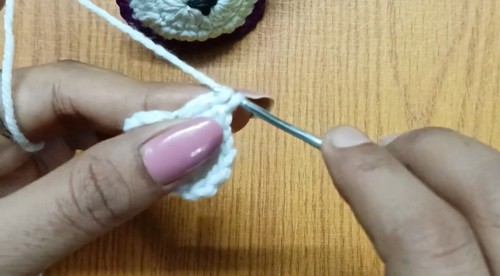
Attaching the Two Patterns
Take both rabbit patterns. Using green yarn, attach them together with single crochet stitches.
Start from any point, insert the hook through both patterns, and attach the yarn with a slip knot.
Make a chain.
Continue making single crochet stitches around the edge, going through both patterns.
Leave a gap to fill with cotton.
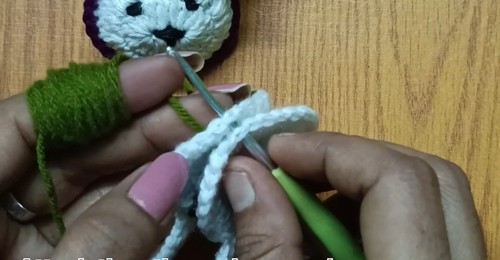
Filling with Cotton
Once you've stitched most of the way around, fill the rabbit with cotton.
Continue stitching with single crochet to close the opening.
Slip stitch into the first single crochet, chain 1, and cut the yarn.
Hide the extra yarn with a needle.
Making the Bow
Using green yarn, create a magic ring.
Chain 2.
Make 3 DC in the magic ring.
Chain 2.
Slip stitch into the magic ring.
Chain 2.
Make 3 DC in the magic ring.
Chain 2.
Slip stitch into the magic ring.
Chain 1 and cut the yarn, leaving a long tail for stitching.
Pull the magic ring yarn tight to form the bow.
Wrap the long tail around the center of the bow a few times to define its shape.
Tie a knot and cut the magic ring yarn.
Attaching the Bow
Thread the long tail of the bow onto a needle.
Stitch the bow onto one of the rabbit's ears, in the middle.
Secure it by stitching through the ear and the bow.
Tie a knot and cut the extra yarn.
Attaching the Hair Rubber
Using white yarn and a needle, attach the hair rubber to the back of the rabbit.
Double the yarn for extra strength.
Place the hair rubber in the center of the back.
Stitch the hair rubber securely to the rabbit by going through the rubber and the rabbit's body multiple times.
Tie a knot and cut the yarn.
(Optional) Use a lighter to melt the ends of the yarn for a cleaner finish.