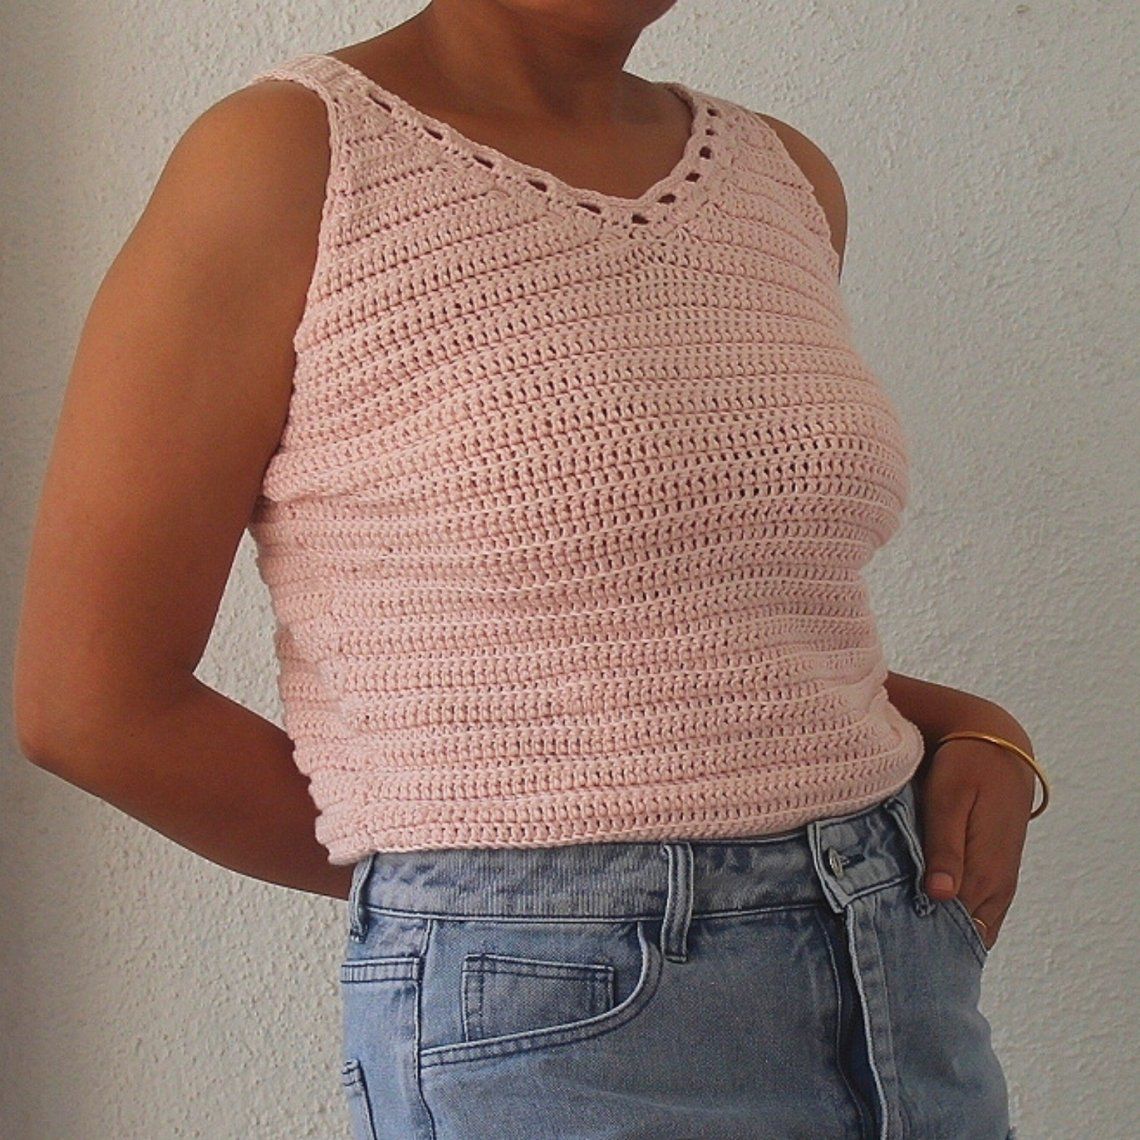
Crochet Lily Vest Top
The Crochet Lily Vest Top is a delightful addition to any wardrobe for those who enjoy comfortable and stylish summer fashion. This charming piece features intricate crochet detailing that adds a touch of elegance to your look. Whether you're off to a casual brunch or a beach day with friends, the Crochet Lily Vest Top is the perfect choice to keep you feeling cool and looking chic. The lightweight and breathable fabric make it an ideal option for warmer days, and the flattering fit is sure to make you feel fabulous. Embrace your bohemian spirit with this lovely vest top that effortlessly combines fashion and comfort.
MATERIALS –
- Double knitting, Category- 3 Light Weight Yarn. Here, 50% cotton yarn is used
- – Vardhman cotone yarn with yardage 250 metre/100g.
- Shade (peach) – 200-200-250-300-300-350-400-450 g,
- Hook- 4mm (G)
- Scissors
- Markers to mark important stitches
- Yarn needle to weave in the ends
- Measuring tape
SYMBOLS FOR READING THE PATTERN INSTRUCTIONS
- SL ST= Slip stitch
- ST= Stitch
- YO= Yarn over
- CH= Chain stitch
- SP= Space
- SC= Single crochet in stitch
- DC= Double crochet in stitch
- REP **[]**= Repeat instructions between ** to **
- DC in BLO = YO and insert hook under the back loop of the next stitch, YO and pull through a loop. There are 3 loops on hook. YO and pull yarn through first 2 loops. There are 2 loops on hook. YO and pull the yarn through both of loops.
- DC2TOG BLO =**YO, insert hook in next stitch, YO and pull up loop, YO, draw through 2 loops**. Work **to** 2 times. You have 3 loops on hook, YO and draw through all loops on hook. One DC decreased.
- DC3TOG BLO =**YO, insert hook in next stitch, YO and pull up loop, YO, draw through 2 loops**. Work **to** 3 times. You have 4 loops on hook, YO and draw through all loops on hook. Tow DC decreased.
Size color coding: (S – M – L – XL – 2XL – 3XL – 4XL– 5XL)
STEP BY STEP INSTRUCTIONS FOR BACK PANEL
Back panel
Row 1– CH (64 – 70 –78 – 86 – 98 – 108 – 120 – 128).
Method 1– Pull up a loop, extend it to about the height of a DC. Turn the hook twice, work a DC in the first CH ST. Continue working DC in each CH ST in the remaining (63 – 69 –77 – 85 – 97 – 107 – 119 – 127) CH stitches.
Method 2- Alternately, add another 2 CH ST to existing chain, DC in 4th CH ST. Here, first 3 CH counts as first DC. Continue working DC in each CH ST in the remaining (62 – 68 –76 – 84 – 96 – 106 – 118 – 126) CH stitches. Total DC at the end of 1st row- (64 – 70 –78 – 86 – 98 – 108 – 120 – 128).
Row 2 to Row 8 – Turn.From this row onwards, work in BLO. Work DC in each ST BLO in all the stitches (64 – 70 –78 – 86 – 98 – 108 – 120 – 128). Total DC at the end of 1st row- (64 – 70 –78 – 86 – 98 – 108 – 120 – 128). Now the panel measures about 9cm or 31/2”.
DC Increase – Increase 2 DC in each Increase Row, by making 2 DC in 1 DC BLO at both ends of the piece.
**[ Row 9 (Increase Row)-Turn. 2 DC in the 1st ST BLO, 1 DC in each ST BLO till the end of row except the last ST, 2 DC in the last ST BLO.
No Increase Rows- Turn. Work1 DC in each ST BLO till the end of the row for the next (4 – 4 –4 – 4 – 5 – 5 – 5 – 5) rows.]**
Repeat the pattern ** to ** (3 – 3 –3 – 3 – 4 – 4 – 4 – 4) times MORE.
P.S. – Make sure to place a marker on each increase row to assist with counting total increases.
Total DC at the end of all increases = (72 – 78 –86 – 94 – 108 – 118 – 130 – 138).
Now the panel measures about (28 – 28 –28 – 28 – 38 – 38 – 38 – 38) cm.
When all the increase and non-increase rows are done, add 2 more non-increase rows.
Two non-increase rows – Turn. Work1 DC in each ST BLO till the end of the row. Total DC at the end of ROW (30 – 30 –30 – 30 – 40 – 40 – 40 – 40) = (72 – 78 –86 – 94 – 108 – 118 – 130 – 138).
Edging over the back panel –
R1- Turn, Slip Stitch over first (8-8-8-10-12-12-15-15) stitches. HDC BLO in next, (56 – 62 –70 – 74 – 84 – 94 – 100 – 108) stitches, do not work in the remaining (8-8-8-10-12-12-15-15) stitches.
Total HDC at the end of row- (56 – 62 –70 – 74 – 84 – 94 – 100 – 108)
R2 – Turn, HDC in first 3 stitches, **CH 3, skip 3 ST, HDC in the next 3 ST**. Repeat instructions from ** to ** till last (2-2-4-2-0-4-4-0) stitches remain, 1 HDC in each of the remaining stitches.
R3 – Turn, 1 SC in each of the first (2-2-4-2-3-4-4-3) stitches, **3 SC in the CH 3 SP, 1 SC in each of the next 3 ST**. Repeat ** to ** till the end of the row. Cut the yarn. Weave in the ends.
STEP BY STEP INSTRUCTIONS FOR FRONT PANEL
Front panel
Row 1– CH (64 – 70 –78 – 86 – 98 – 108 – 120 – 128).
Method 1– SC in first ST, SC in front loop of the SC just made; this will count as the first DC. Continue working DC in each CH ST in the remaining (63 – 69 –77 – 85 – 97 – 107 – 119 – 127) CH stitches.
Method 2- Alternately, add CH 2, DC in 4th CH ST. Here, first 3 CH counts as first DC. Continue working DC in each CH ST in the remaining (62 – 68 –76 – 84 – 96 – 106 – 118 – 126) CH stitches.
Total DC at the end of 1st row- (64 – 70 –78 – 86 – 98 – 108 – 120 – 128).
Row 2 to Row 8 – From this row onwards, work in BLO. Work DC in each ST BLO in all the stitches (64 – 70 –78 – 86 – 98 – 108 – 120 – 128). Total DC at the end of 1st row- (64 – 70 –78 – 86 – 98 – 108 – 120 – 128). Now the panel measures about 9cm or 31/2”.
DC Increase – Increase 2 DC in each Increase Row, by making 2 DC in 1 DC BLO at both ends of the piece.
**[ Row 9 (Increase Row) – 2 DC in the 1st ST BLO, 1 DC in each ST BLO till the end of the row except the last ST, 2 DC in the last ST BLO.
No Increase Rows- Work1 DC in each ST BLO till the end of the row for the next (4 – 4 –4 – 4 – 5 – 5 – 5 – 5) rows.]**
Repeat the pattern ** to ** (3 – 3 –3 – 3 – 4 – 4 – 4 – 4) times MORE.
P.S. – Make sure to place a marker on each increase row to assist with counting total increases.
Total DC at the end of all increases = (72 – 78 –86 – 94 – 108 – 118 – 130 – 138).
Now the panel measures about (28 – 28 –28 – 28 – 38 – 38 – 38 – 38) cm.
When all the increase and non-increase rows are done, add 2 more non-increase rows.
Two non-increase rows – Work1 DC in each ST BLO till the end of the row. Total DC at the end of ROW (30 – 30 –30 – 30 – 40 – 40 – 40 – 40) = (72 – 78 –86 – 94 – 108 – 118 – 130 – 138).
Turn, Slip Stitch over first (8-8-8-10-12-12-15-15) stitches. DC BLO in next, (56 – 62 –70 – 74 – 84 – 94 – 100 – 108) stitches, do not work in the remaining (8-8-8-10-12-12-15-15) stitches.
Total DC at the end of row- (56 – 62 –70 – 74 – 84 – 94 – 100 – 108)
Henceforth, work separately for Left side and Right side of the front panel, in order to achieve V-shape neckline.
Separate the front panel into two parts – Left front piece and right front piece, by placing a marker to separate (28 – 31 –35 – 37 – 42 – 47 – 50 – 54) stitches on the left side and same number of stitches on the right side.
STEP BY STEP INSTRUCTIONS FOR LEFT SIDE OF FRONT PANEL
**[Row 1 – Turn, DC BLO in first ST, DC2TOG BLO in next 2 ST, DC BLO in each ST till the end of row except last 4 stitches remain, DC3TOG BLO in next 3 ST, DC BLO in last ST. 3 DC decreased.
Row 2 – Turn, DC BLO in first ST, DC3TOG BLO in next 3 ST, DC BLO in each ST till the end of row except last 3 stitches remain, DC2TOG BLO in next 2 ST, DC BLO in last ST. 3 DC decreased.]**
Repeat Row 1 and Row 2 until only 5 stitches remain on the last row.
Last row – Turn, DC3TOG BLO in first 3 ST, DC2TOG BLO in last 2 ST. Total DC at end of row (2-2-2-2-2-2-2-2). Cut the yarn and weave in the ends.
STEP BY STEP INSTRUCTIONS FOR RIGHT SIDE OF FRONT PANEL
**[Row 1 – Turn, DC BLO in first ST, DC3TOG BLO in next 3 ST, DC BLO in each ST till the end of row except last 3 stitches remain, DC2TOG BLO in next 2 ST, DC BLO in last ST. 3 DC decreased.
Row 2 – Turn, DC BLO in first ST, DC2TOG BLO in next 2 ST, DC BLO in each ST till the end of row except last 4 stitches remain, DC3TOG BLO in next 3 ST, DC BLO in last ST. 3 DC decreased.]**
Repeat Row 1 and Row 2 until only 5 stitches remain on the last row.
Last row – Turn, DC2TOG BLO in first 2 ST, DC3TOG BLO in last 3 ST. Total DC at end of row (2-2-2-2-2-2-2-2). Cut the yarn and weave in the ends.
HOW TO ASSEMBLE THE PANELS
Lay the panels side by side such that wrong side faces outward. With yarn needle, join both the panels with whip ST method– **Insert hook through side loop of corner ST on first panel and then through side loop of the corner ST on the second panel.** Continue in the pattern until entire side is stitched together. Repeat the same on the other side.
Make sure that the stripes on both panels match each other while stitching them together or else it will create uneven design from the joining line of both panels.
EDGING OVER NECKLINE (BEFORE ADDING STRAPS)
Join yarn on the left side of the front panel to begin edging on the neckline.
Row 1 – CH3, Work 3 HDC in the next slant DC, 3 HDC in each slant DC, till 1 stitch remains before the midfront. DC2TOG in the 2 stitches midfront. Continue working 3 HDC in each slant DC till end of the neckline.
Row 2 – Turn, CH 5, skip 3 ST, **1 HDC in each of next 3 ST, CH 3, skip 3 ST**. Repeat ** to ** till only one stitch remains. 1 HDC in the lasr stitch.
Row 3 – Turn, SC in the first ST, **1 SC in each of the 3 CH 1 SC in each of the 3 HDC stitches, stitches**. Repeat ** to ** till the end of the row. 1 SC in the last HDC. Cut the yarn and weave in the ends.
STRAPS
Wear the tube structure of the top and place markers at the front and back places where the straps should be. These are usually the stitches over the bra straps.
Start working for straps from the front panel and attach to the back panel.
Since I wanted broader straps, I worked over the 3 stitches on the last row worked on front panel and also over the adjacent stitches of neckline edging.
Left side piece – Attach yarn at CH 3, 1 DC in next 2 stitches, 2 DC over slant HDC, 1 DC over CH SP, 1 DC over slant SC. Total DC on row 1 of straps – 7.
**Turn, 1 DC in each of 7 stitches**. Repeat ** to ** until desired length of the straps is achieved. I worked a total of 8 rows for my measurements.
Attach the straps to the back panel with slip stitches OR stitch them to the back panel with yarn needle.
Cut the yarn and weave in the ends.
Right side piece – Attach yarn over slant SC, CH 3, 1 DC over CH SP, 2 DC over slant HDC, 1 DC in last 3 stitches. Total DC on row 1 of straps – 7.
**Turn, 1 DC in each of 7 stitches**. Repeat ** to ** until desired length of the straps is achieved. I worked a total of 8 rows for my measurements.
Attach the straps to the back panel with slip stitches OR stitch them to the back panel with yarn needle.
Cut the yarn and weave in the ends.
FINISHING EDGING ON ENTIRE NECKLINE
Work a finishing edging of slip stitch in each stitch over entire neckline on the front side and 3 slip stitch over each slant DC on the back side of the neckline. Cut the yarn and weave in the ends.
EDGING ON THE BOTTOM OF THE TOP
Work a finishing edging of slip stitch in each stitch over entire bottom of the top.
Cut the yarn and weave in the ends.
Your top is now complete. Enjoy and have fun flaunting!