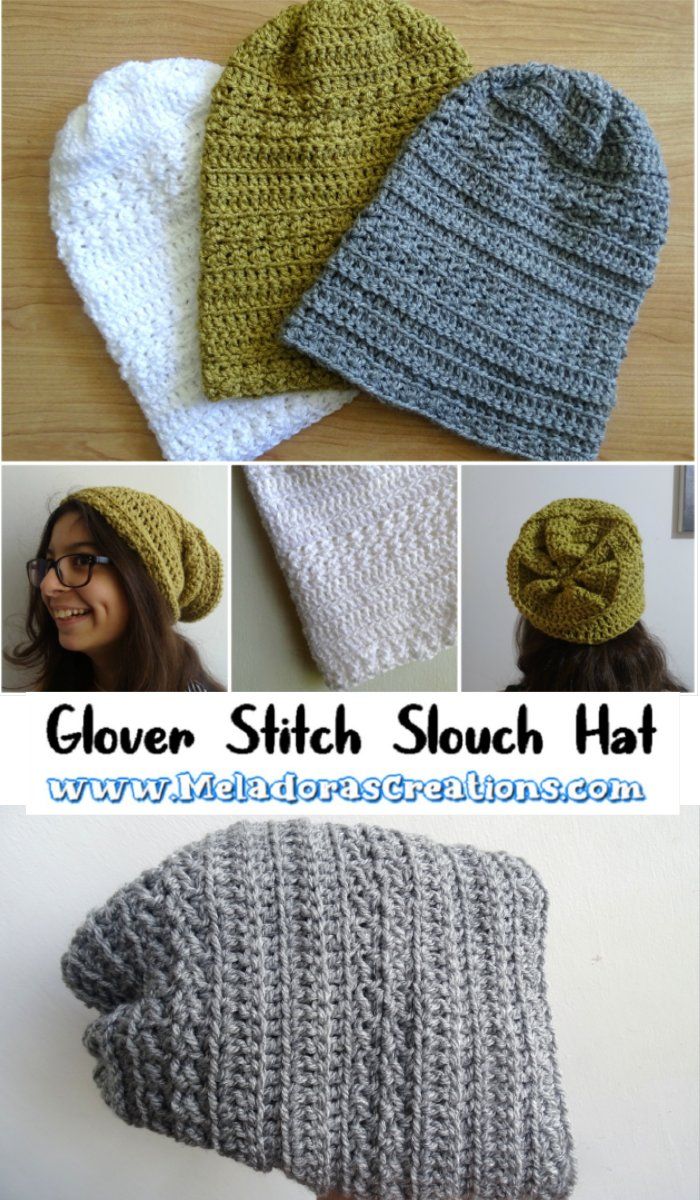
Crochet Glover Stitch Slouch Hat
The Crochet Glover Stitch Slouch Hat is not just your ordinary hat – it's a stylish and cozy accessory that will make you stand out in the crowd! With its unique texture and stitch pattern, this hat is perfect for adding a touch of charm to your winter wardrobe. The Glover Stitch technique creates a beautiful ribbed look that adds depth and visual interest to the design. Whether you are heading out for a casual stroll in the park or bundling up for a chilly day, this hat is sure to keep you warm and fashionable. Plus, the slouchy fit adds a laid-back vibe to your outfit, making it versatile for various occasions. So, grab your yarn and hook, and get ready to crochet your way to a trendy and comfy accessory that will become your go-to piece this season!
For this project you will need:
- HOOK: 5 mm hook or size H hook for the US
- YARN: a skein of worsted weight yarn, 4 ply US, 10 ply AU
- a tapestry needle
- 100 grams / 3.5. oz
- 240 meters / 262 yards
ABBREVIATIONS
- ch = Chain
- sl st = Slip Stitch
- st = Stitch
- sk = Skip
- beg = beginning
- YO = Yarn Over
- SC = Single Crochet
- DC = Double Crochet
- SCFS = Single Crochet foundation stitch
- FLO \ BLO = Front loop only \ back loop only
- Repeat what’s in between | for # amount of times.
- Repeat what’s in between * for rest of round.
Special Stitch
GS – Special Stitch: Glover stitch
Row 1 Creating a GS
insert your hook in stitch, YO and pull up a loop. YO and insert your hook into the NEXT st. YO and pull through all 4 loops. CH 1 to end st.
Row 2 of working in a Glover Stitch
Insert your hook into the FLO of the next stitch, pull up a loop (2 loops on hook ) YO and insert your hook under both loops of the next stitch and pull up a loop ( 4 loops on hook ) YO and pull through all 4 loops and ch 1.
At the very end of the row always remember to chain 2 because one of these chains will count as your first stitch of the row.
Starting from row 2 this pattern is done in ROWs and not Rounds so you will be turning your work every row. It’s important to the look of the stitches so I recommend that you do not try to do this hat in rounds or else it will look different.
Row 1
SCFS 60. Then create a ring by slip stitching to the beginning st. Ch 2
It won’t be perfectly even here, but that is okay, we’ll be fixing this later.
Row 2
The ch 2 in this project won’t count as a stitch but will mark the beginning of a row.
DC in the BLO in the next st and in all 60 sts.
To End: Skipping the beginning ch 2 and Sl st in the beginning DC. Ch 2 and TURN
Row 3
Starting in the first st after you ch 2 because remember that nothing is worked into the ch 2 space besides the beginning ch 2.
DC in the FLO in the next st and in all 60 sts.
To End: Skipping the beginning ch 2 and Sl st in the beginning DC. Ch 2 and TURN
Rows 4 & 5
repeat rows 2 and 3
Row 6
This will be our 1st of 4 Glover Stitch rows.
Creating a GS
GS in all stitches around using the BLO. The Glover Stitch is done using 2 stitches so you should have 30 Glover stitches at the end of your row.
To End: sl st in the 1st st of your beginning GS and NOT in the beginning ch 2. CH 2 and TURN
Row 7
Working in a Glover Stitch
GS in all stitches around. You should have 30 Glover stitches at the end of your row.
To End: sl st in the 1st st of your beginning GS and NOT in the beginning ch 2. CH 2 and TURN
Rows 8 & 9
Repeat rows 6 & 7 only there is no FLO or BLO just crochet the GS as normal.
Row 10
DC in the FLO in the next st and in all 60 sts.
To End: Skipping the beginning ch 2 and Sl st in the beginning DC. Ch 2 and TURN
Row 11
DC in the BLO in the next st and in all 60 sts.
To End: Skipping the beginning ch 2 and Sl st in the beginning DC. Ch 2 and TURN
Rows 12 & 13
repeat rows 10 and 11
Row 14
GS in all stitches around using the FLO. The Glover Stitch is done using 2 stitches so you should have 30 Glover stitches at the end of your row.
To End: sl st in the 1st st of your beginning GS and NOT in the beginning ch 2. CH 2 and TURN
Row 15
GS in all stitches around. You should have 30 Glover stitches at the end of your row.
To End: sl st in the 1st st of your beginning GS and NOT in the beginning ch 2. CH 2 and TURN
Rows 16 & 17
Repeat rows 14 & 15 only there is no FLO or BLO just crochet the GS as normal.
Row 18
DC in the BLO in the next st and in all 60 sts.
To End: Skipping the beginning ch 2 and Sl st in the beginning DC. Ch 2 and TURN
Row 19
DC in the FLO in the next st and in all 60 sts.
To End: Skipping the beginning ch 2 and Sl st in the beginning DC. Ch 2 and TURN
Rows 20 & 21
Repeat rows 18 & 19 after row 19 only ch 1
Your hat should measure around 10 inches or 25 cms
Now we’re ready to close up the hat.
Closing the hat
Round 1
Using the 1st where you sl stitched and chained 1, sc in this same space. Then sc dec. repeat, * sc, sc dec*
Sl st in beginning sc.
You should end having 43 sts. Or there about.
Round 2
We’re not turning our work every round now so just ch 1 and continue.
Using the 1st where you sl stitched and chained 1, sc in this same space and sc the following stitch as well. Then sc dec. repeat, * sc in the next 2 sts, then sc dec*
You should end having 29 sts. Or there about.
Sl st in beginning sc. Leaving a LONG tail to use for sewing, ch 1 and cut your yarn.
Turn your hat inside out so that you have the wrong side facing you. Weave your tapestry needle in and out through a few of the stitches to gather a few, then pull your tail through. Continue to gather us all your stitches this way. Then pull your tail tight and it will pull the hole closed. Sew going through each side of the hole to ensure it won’t come loose.
Now Hide your tails and turn your hat back to the correct side facing you.
Grab your crochet hook again and create a slip knot again on your hook. Now on the rim of the hat. We’ll be working in the bottom stitches of our previous SCFS’s from the start.
Attach your yarn to the beginning st and ch 1. Grab your beginning tail and pull it through the bottom of your first attached st to even out that space. Do this with your hook or a needle.
This will even up your row for you. Then you want to do 2 rows of Glover sts for these 2 rows. Then sl st in beg GS and ch 1, cut yarn. Hide your tails.