

Crochet Shrek Amigurumi Doll — Step-by-Step Pattern & Finishing Tips
Bring the beloved ogre to life with this charming Crochet Shrek Amigurumi Doll pattern. This project uses textured chenille yarn and simple amigurumi techniques to create a cuddly, recognizable Shrek with his signature green skin and lovable ogre ears. Below you'll find the materials list, stitch abbreviations, the full body and ear pattern, plus finishing tips to help you assemble and personalize your doll.
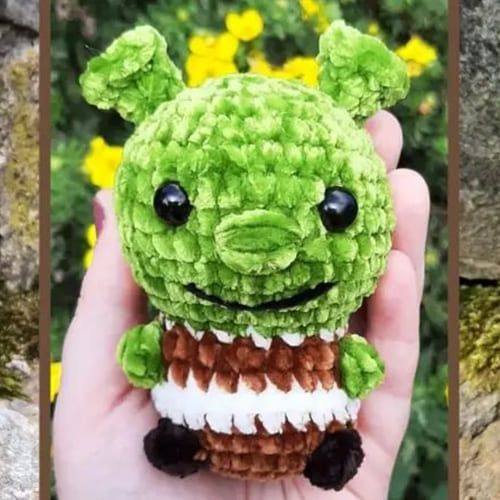
Before you begin: Use a stitch marker to mark the start of each round, stuff firmly but evenly as you work, and attach safety eyes before closing the head for best results. If you're changing yarn type or hook size, check your tension and adjust stuffing amount as needed.
Materials:
Yarns: 6 mm chenille yarn (green, milky white, brown and dark brown).
Hook: 4 mm.
Safety eyes: 10 mm.
Darning needle to sew ears.
Stuffing and scissors.
Abbreviations:
MR: Magic ring
Sc: Single crochet
Inc: Increase
Dec: Decrease
Ch: Chain
Slst: Slip stitch
FO: Fasten off
BOB: Bobble stitch
BODY
Start with brown yarn.
R1: 8sc in MR (8)
R2 8inc (16)
R3: (1 sc, inc)x8 (24)
R4: 8sc, (in dark brown: 1 BOB), 6sc, (in dark brown: 1 BOB), 8sc (24)
R5 24sc (24)
Change to milky white yarn.
R6-7: 24sc (24) (2 rounds)
Change to brown yarn
R8: 6sc, (in green: 1 BOB), 10sc, (in green: 1 BOB), 6sc (24)
R9: 24sc (24)
Change to milky white yarn.
R10 (1 sc, dec)x8 (16)
Change to green yarn.
R11: (1sc, inc)x8 (24)
R12 (1sc, inc) x12 (36)
R13-18: 36sc (36) (6 rows) (30)
R19 (4sc, dec)x6
Stuff body and place safety eyes between rounds 16 and 17, 6 stitches apart.
R20 (3sc, dec)x6 (24)
R21 (2sc, dec)x6 (18)
R22 (1sc, dec)x6 (12)
R23: 6dec (6)
EARS (x2)
R1: 5sc in MR (5)
R2 5sc (5)
R3 5inc (10)
FO and leave a long tail for sewing.
Sew R1 onto either side of his head.
DETAILS & FINISHING
With green yarn, sew his nose in the middle of his face. Get a piece of black yarn and embroider a mouth. Sew ears securely to the sides of the head. Weave in all ends and hide them inside the body. If using safety eyes, ensure they are firmly fastened and that the toy is appropriate for the intended recipient (consider embroidered eyes for toys for young children).
Optional tips: Add extra personality by adjusting mouth shape, embroidering eyebrows, or stitching small clothing details. Use consistent stuffing and check symmetry as you sew pieces together.