Apps we think you'll love
Helpful apps for your crafts, hobbies & everyday life


Make an Adorable Crochet Bunny Boy: Step-by-Step Amigurumi Pattern
Create a charming Crochet Bunny Boy amigurumi with this complete, step-by-step pattern. This project is perfect for a cozy afternoon of crafting and is suitable for crocheters with basic skills; more experienced makers will find the detailed rounds and assembly notes helpful for a neat finish. Follow the instructions below to stitch the head, body, limbs, clothing, and accessories, then assemble and embroider the face for a delightful finished toy.
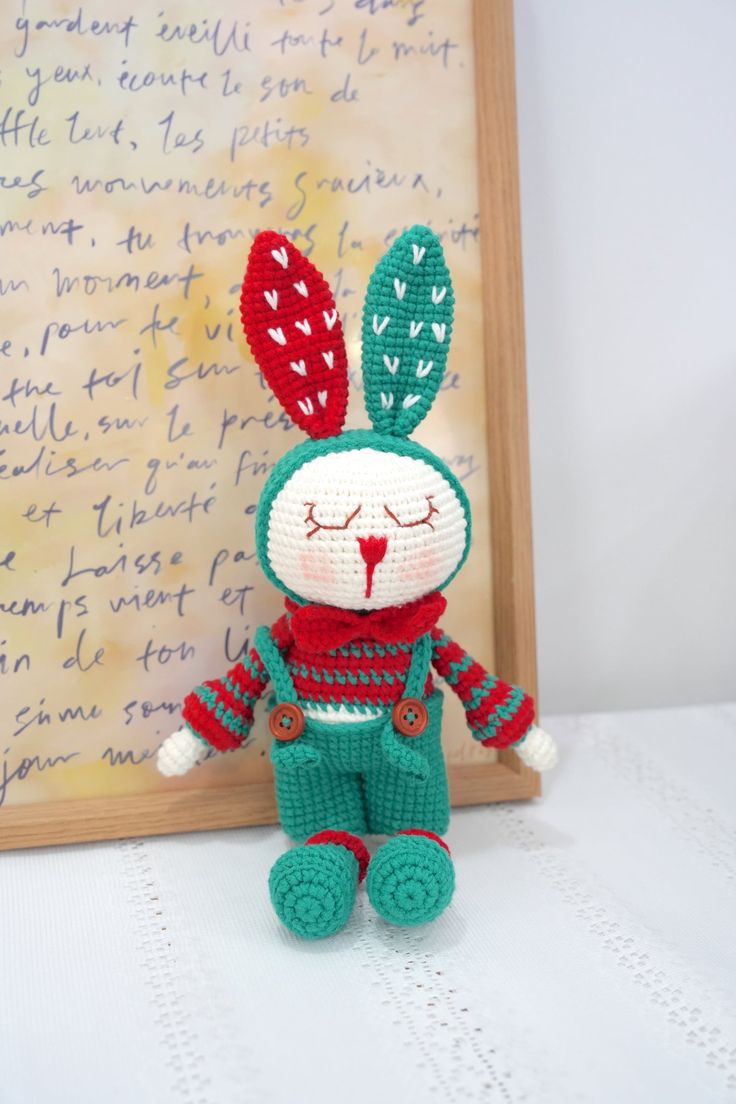
Materials Needed:
- Yarn – Loopara 5ply combed cotton (Green 14, Red 24, Brown 54, and White 61)
- Hook – 3.0mm
- Scissors
- Stitch Marker
- Tweezers
- Positioning Pin
- Yarn Needle
- Fiber Fill
- Button
How to Crochet the Head
- R1: Ch 1, 8 sc in magic ring, sl
- R2: Ch 1, 8 sc inc, sl
- R3: Ch 1, (sc, sc inc) 8 times, sl
- R4: Ch 1, (sc, sc inc, sc) 8 times, sl
- R5: Ch 1, (3 sc, sc inc) 8 times, sl
- R6: Ch 1, 40 sc, sl
- R7: Ch 1, (2 sc, sc inc, 2 sc) 8 times, sl
- R8-R11: Ch 1, 48 sc, sl
- R12: Ch 1, (7 sc, sc inc) 6 times, sl
- R13-R15: Ch 1, 54 sc, sl
- R16: Ch 1, (4 sc, sc inc, 4 sc) 6 times, sl
- R17: Ch 1, (4 sc, sc2tog, 4 sc) 6 times, sl
- R18: Ch 1, (7 sc, sc2tog) 6 times, sl
- R19: Ch 1, (3 sc, sc2tog, 3 sc) 6 times, sl
- R20: Ch 1, (5 sc, sc2tog) 6 times, sl
- R21: Ch 1, (2 sc, sc2tog, 2 sc) 6 times, sl
- R22: Ch 1, (3 sc, sc2tog) 6 times (add small amount of fiberfill), sl
- R23: Ch 1, (sc, sc2tog, sc) 6 times, sl
- R24: Ch 1, (sc, sc2tog) 6 times (stuff firmly), sl
- R25: 6 sc2tog, sl
How to Crochet the Hat
- R1: Ch 1, 6 sc in magic ring, sl
- R2: Ch 1, 6 sc inc, sl
- R3: Ch 1, (sc, sc inc) 6 times, sl
- R4: Ch 1, (sc, sc inc, sc) 6 times, sl
- R5: Ch 1, (3 sc, sc inc) 6 times, sl
- R6: Ch 1, (2 sc, sc inc, 2 sc) 6 times, sl
- R7: Ch 1, (2 sc, sc inc) 6 times, (5 sc, sc inc) 3 times, sl
- R8: Ch 1, (3 sc, sc inc) 6 times, (6 sc, sc inc) 3 times, sl
- R9-R19: Ch 1, 54 sc, sl
- R20: Ch 1, 10 sc, 44 sl (fasten off leaving long tail for sewing)
How to Crochet the Ears (Make 2 — One Green, One Red)
- R1: Ch 1, 6 sc in magic ring, sl
- R2: Ch 1, (sc, sc inc) 3 times, sl
- R3: Ch 1, (sc, sc inc, sc) 3 times, sl
- R4: Ch 1, 12 sc, sl
- R5: Ch 1, (2 sc, sc inc) 4 times, sl
- R6: Ch 1, (3 sc, sc inc) 4 times, sl
- R7-R13: Ch 1, 20 sc, sl
- R14: Ch 1, (4 sc, sc2tog, 4 sc) twice, sl
- R15-R16: Ch 1, 18 sc, sl
- R17: Ch 1, (7 sc, sc2tog) twice, sl
- R18-R19: Ch 1, 16 sc, sl
- R20: Ch 1, (3 sc, sc2tog, 3 sc) twice, sl
- R21-R22: Ch 1, 14 sc, sl (fasten off leaving long tail for sewing)
How to Crochet the Legs (Make 2)
- R1 (with green yarn): Magic ring, ch, 8 sc in ring, sl
- R2: Ch, 8 sc inc, sl
- R3: Ch, sc, sc inc, 4 sc, 4 sc inc, 4 sc, sc inc, sc, sl
- R4: Ch, BLO 22 sc, sl
- R5-R6: Ch, 22 sc, sl
- R7: Ch, 7 sc, 4 sc2tog, 7 sc, sl
- R8: Ch, 18 sc, sl
- R9: Ch, 5 sc, 4 sc2tog, 5 sc, sl
- R10: Ch, 6 sc, sc2tog, 6 sc, sl
- R11-R14: Ch, 13 sc (stuff with fiberfill), sl
- R15 (change to white yarn): Ch, BLO (sc, sc2tog) 4 times, sc, sl
- R16-R30: Ch, 9 sc, sl
- R31: Ch, flatten and work 5 sc (leave long tail for sewing)
- Shoe edging (with red): (Sc, ch) 13 times, sl
How to Crochet the Hands (Make 2)
- R1: Magic ring, ch, 6 sc in ring, sl
- R2: Ch, (sc, sc inc) 3 times, sl
- R3-R4: Ch, 9 sc, sl
- R5: ch, (sc, sc2tog) 3 times, sl
- R6 (change to green, work in back loops): Ch, 6 sc inc, sl
- R7: Ch, 12 sc inc, sl
- R8: Ch, 24 sc, sl
- R9: Ch, (4 sc, sc2tog) 4 times, sl
- R10: Ch, (2 sc, sc2tog) 5 times, sl
- R11: Ch, (sc, sc2tog) 5 times (stuff with fiberfill), sl
- R12-R20: Ch, 10 sc, sl
- R21: Ch, flatten and work 5 sc (leave long tail for sewing)
How to Crochet the Body
- R1: Magic ring, ch 1, 8 sc, sl
- R2: Ch 1, 8 sc inc, sl
- R3: Ch 1, (sc, sc inc) 8 times, sl
- R4: Ch 1, (sc, sc inc, sc) 8 times, sl
- R5: Ch 1, (3 sc, sc inc) 8 times, sl
- R6: Ch 1, (9 sc, sc inc) 4 times, sl
- R7-R9: Ch 1, 44 sc, change to green in last st, sl
- R10: Ch 1, (9 sc, sc2tog) 4 times, change to red in last st, sl
- R11-R12: Ch 1, 40 sc, change to green in last st, sl
- R13: Ch 1, (6 sc, sc2tog) 5 times, change to red in last st, sl
- R14-R15: Ch 1, 35 sc, change to green in last st, sl
- R16: Ch 1, (5 sc, sc2tog) 5 times, change to red in last st, sl
- R17-R18: Ch 1, 30 sc, change to green in last st, sl
- R19: Ch 1, (3 sc, sc2tog) 6 times, change to red in last st, sl
- R20: Ch 1, BLO 24 sc, sl
- Collar (worked between r19-20 in FLO with red): Ch 2, (3 dc) 9 times, ch 2, 6 sl, ch 2, (3 dc) 9 times, ch 2, sl
How to Crochet the Pants
- R1: Ch 22, sl, ch, 22 sc, sl
- R2-R6: Ch 1, 22 sc, sl
- Make 2 legs, don't fasten off second leg. Join legs.
How to Crochet the Pants Body
- R1: 44 sc, sl
- R2-R9: Ch 1, 44 sc, sl
How to Crochet the Straps
- Sl 4, ch 31,30 sc in 2nd ch from hook, sl 34, sl
- Ch 31, 30 sc in 2nd ch from hook, sl 6, sl
How to Crochet the Tail
- R1: Ch 1, 6 sc, sl
- R2: Ch 1, 6 sc inc, sl
- R3-R4: Ch 1, 12 sc, sl
- R5: Ch 1, 6 sc2tog (leave long tail for sewing), sl
How to Crochet the Bow
- R1: Ch 16, 15 sc in 2nd ch from hook
- R2-R5: Ch 1, 15 sc
- Take another piece of yarn, fold bow in half, wrap around center to secure, tie knot.
- Hide yarn tails on the back side, and weave in ends.
How to Embroider Ears and Assemble the Hat
- Using white yarn, embroider V shapes evenly on both ears.
- Take out the hat and head pieces. Sew the hat to the head along the edge in a complete circle.
How to Attach Ears and Create Face
- Attach ears between rounds 3 and 4 of the hat. Leave a space of 4 stitches between the two ears.
- Find the middle of the head. On Round 10 of the head, leave 4 stitches space in the center. Sew eye expressions on both sides of these 4 stitches.
How to Assemble Face and Body
- Embroider nose and mouth in the middle 2 stitches below the eyes. Continue embroidery into the next round down.
- Take out the body piece. Using the reserved yarn tail from the head, attach body. Pin pieces together to ensure proper alignment.
- After securing the body, prepare the bow. Hide and trim short yarn ends. Use a long yarn tail to secure the bow at the neck center.
- Attach hands to body sides, aligning with ears.
How to Assemble the Rest
- Attach legs between rounds 3 and 4 of body bottom. Check alignment — ears, hands, and legs should form straight line.
- Put pants on the figure. Attach the tail to the back. Secure the tail firmly. Weave in all loose ends.
- Finally, sew on buttons.
Crochet Tips:
- When joining rounds with slip stitches, try to keep them as invisible as possible by working them tightly.
- Make sure your magic ring is tight and secure at the beginning.
- Use stitch markers to track the beginning of rounds.
- Count carefully to ensure you have the correct stitches.
Assembly Tips:
- When attaching the hat to the head, pin it in several places first to prevent shifting.
- Before permanently attaching the ears, temporarily pin them in place and view them from multiple angles to ensure they're symmetrical and at the desired angle.
- When embroidering the nose and mouth, keep your stitches small and neat.
- When attaching buttons, use strong thread in a matching color and reinforce each button with several passes.
No comments
Write a comment