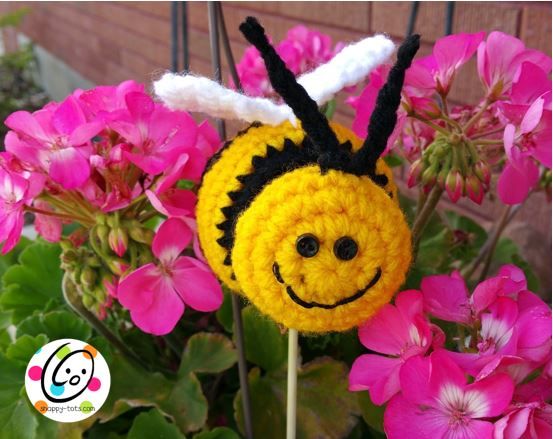
Crochet Stuffy Bee
Get ready to meet the cutest little crochet creation — the Stuffy Bee! This delightful handmade toy is buzzing with charm and is sure to bring a smile to anyone's face. Crafted with love and attention to detail, the Stuffy Bee is a perfect companion for children and adults alike. Its soft and huggable body is made from high-quality yarn, ensuring a cozy and comforting feel. With its vibrant yellow and black stripes, tiny wings, and adorable little antennae, this crochet bee is a true work of art. Whether you're a fan of insects or simply looking for a unique gift, the Stuffy Bee is a must-have addition to your collection.

Materials and Details
- Yarn: Worsted weight black, yellow and white
- Crochet Hook: H
- Miscellaneous: yarn needle, sewing needle, black thread, 2 small black buttons for eyes, stuffing, small dowel or thick wire for plant
- stake (optional)
- Gauge: not important for this project
Directions
This project starts with the head.
When switching colors between yellow and black, do not finish off the yarns until the end of the project.
1. With an H hook and yellow worsted weight yarn, start with a magic circle of 8 sc sts (or preferred method for starting a circle of 8 sc sts), sl st to join and pull closed. (8sts)
2. Ch 1, 2sc in each st to end of round, sl st to join. (16sts)
3. Ch 1, *sc, 2sc in next st*, repeat to end of round, sl st to join. (24sts)
4-5. Ch 1, sc in each st to end of round, sl st to join.
6. Ch 1, *sc, sc2tog*, repeat to end of round, sl st to join. (16sts)
7. Ch 1, *sc 2, sc2tog*, repeat to end of round, sl st to join. (12sts)
With a sewing needle and black thread, sew the buttons in place and stitch the mouth. See main photo for placement.
8. Do not finish off the yellow yarn. Change to black worsted weight yarn. Ch 1, 2sc in each st to end of round, sl st to join. (24sts)
9. Ch 1, *sc 3, 2sc in next st*, repeat to end of round, sl st to join. (30sts)
10. Do not finish off the black yarn. Change back to the yellow yarn. Ch 1, *sc 4, 2sc in next st*, repeat to end of round, sl st to join. (36sts)
11-12. Ch 1, sc in each st to end of round, sl st to join.
13. Change to black yarn. Ch 1, *sc 4, sc2tog*, repeat to end of round, sl st to join. (30sts)
14. Ch 1, sc in each st to end of round, sl st to join.
15. Change to yellow yarn. Ch 1, *sc 3, sc2tog*, repeat to end of round, sl st to join. (24sts)
16. Ch 1, sc in each st to end of round, sl st to join.
17. Ch 1, *sc 2, sc2tog*, repeat to end of round, sl st to join. Finish off yellow yarn. (18sts)
18. Finish off the yellow yarn. Change to black yarn. Ch 1, sc in each st to end of round, sl st to join.
19. Ch 1, *sc, sc2tog*, repeat to end of round, sl st to join. (12sts)
Stuff firmly.
20. Ch 1, *sc2tog*, repeat to end of round, sl st to join. (6sts) Finish off, leaving a tail for closing end.
With yarn needle and yarn tail, weave in and out of remaining sts. Pull closed and weave in ends.
Wings
1. With an H hook and white worsted weight yarn, ch 4, sc in 2nd ch from hook, sc 2. (3sts)
2. Ch 1, turn, 2sc in first st, sc, 2sc in last st. (5sts)
3. Ch 1, turn, 2sc in first st, sc 3, 2sc in last st. (7sts)
4. Ch 1, turn, 2sc in first st, sc 5, 2sc in last st. (9sts)
5. Ch 1, turn, sc2tog, sc 5, sc2tog. (7sts)
6. Ch 1, turn, sc2tog, sc 3, sc2tog. (5sts)
7. Ch 1, turn, sc2tog, sc, sc2tog. (3sts)
8. Ch 1, turn, sc in each st to end of row.
9-14. Repeat steps 2-7.
15. Ch 1, turn, sc 2, sl st. Finish off and weave in ends.
With a yarn needle and white yarn, sew center of wings to center back of bee.
Antenna
With an H hook and black worsted weight yarn, ch 18. Finish off and tie a knot in each end. Pull antenna through a stitch on top of head. Tie a knot.
Finish Options
Choose one of the options below:
Plant Stake (left): Insert stake in belly of bee, closer to the neck.
Hanger (middle): Attach a piece of yarn, jute or ribbon to the wings. Thanks to Hatch-ed With Love for
this sample.
Stuffie (right): Your bee is complete.