Crochet Peppermint Pinwheel Doily
Discover the enchanting artistry of the Crochet Peppermint Pinwheel Doily, a delightful creation that will add a touch of elegance to any space. This intricate doily features a mesmerizing pinwheel pattern, reminiscent of the sweet peppermint candies that bring joy during the holiday season. Crafted with love and attention to detail, this crochet masterpiece is a true testament to the skill and creativity of its maker. The pinwheel pattern, carefully crafted with precision, creates a mesmerizing visual effect that is both elegant and whimsical. Whether you choose to display it on a coffee table, dresser, or as a centerpiece, this doily will undoubtedly become a cherished heirloom that will be passed down through generations, a testament to the timeless beauty of crochet artistry.

Size: About 10” across
Skill Level: Intermediate- for those who are familiar with working with size 10 thread and steel hooks, and who have a thorough understanding of the basics of crochet
Materials for One Doily:
Size 10 Cotton Crochet Thread:100 yards Each Red and White(called colors ‘A’ and ‘B’ in pattern; pictures show doilies worked in reverse colors)
Size 7 (1.65 mm) steel crochet hook
Special Stitches:
For 2 dc cluster: Yo, insert hook in st or ch sp indicated, yo, pull lp through, yo, pull through 2 lps on hook, yo, insert hook in same st or ch sp, yo, pull lp through, yo, pull through 2 lps on hook, yo, pull through all 3 lps on hook
For 3 dc cluster: Yo, insert hook in st or ch sp indicated, yo, pull lp through, yo, pull through 2 lps on hook, (yo, insert hook in same st or ch sp, yo, pull through, yo, pull through 2 lps on hook) 2 times, yo, pull through all 4 lps on hook
For Vst: (dc, ch 2, dc) in st or ch sp indicated
For Small Shell: (2 dc, ch 2, 2 dc) in st or ch sp indicated
For Large Shell: (3 dc, ch 2, 3 dc) in st or ch sp indicated
Pattern Notes:
Work into ch-2 sps of Vsts unless otherwise noted
Skip all stitches listed within { }
This design incorporates Eyelet Foundation spaces in Rnd 8. If you are not familiar with working in Eyelet Sps, you can learn more about it here:
Eyelet Foundation
Doily
Rnd 1: With Color A, ch 6, sl st in first ch to form ring, ch 2, 2 dc cluster (see Special Stitches) in ring, ch 3, (3 dc cluster—see Special Stitches—in ring, ch 3) 5 times, join with sl st in top of 2-dc cluster. Fasten off.(6 ch-3 sps made)
Rnd 2: Join Color B with sc in first ch-3 sp, 3 sc in same ch-3 sp as joining, 4 sc in each remaining ch-3 sp around, join with sl st in first sc. (24 sc made)
Rnd 3: Ch 1, sc in first st, ch 20, skip next st, (sc in next st, ch 20, skip next st) around, join with sl st in first sc. (12 ch-20 sps made)
Rnd 4: Sl st in each of first 3 chs of first ch-20, (ch 3, 11 dc, ch 2, 12 dc) in first ch-20 sp, (12 dc, ch 2, 12 dc) in each ch-20 sp around, join with sl st in top of ch-3. Fasten off.
Rnd 5: Join Color A with sl st in first st, ch 3, dc in each dc around with (2 dc, ch 2, 2 dc) in each ch-2 sp, join with sl st in top of ch-3. Fasten off.
Rnd 6: Join Color B with sl st in first st, ch 3, dc in each dc around with (2 dc, ch 2, 2 dc) in each ch-2 sp, join with sl st in top of ch-3. Fasten off.
Rnd 7: Join Color A with sc in first ch-2 sp, (ch 3, sc) in same sp as joining, sc in each dc around with (sc, ch 3, sc) in each ch-2 sp, join with sl st in first sc.
IMPORTANT NOTE:You will notice that the 12 ‘points’ of the Pinwheel have a natural tendency to twist. In the following round, you will twist each point and work into the ch-3 sp at the center top of the point. The wrong side of the stitches on the previous 2 rounds will be facing you as you work Rnd 8. Make sure that you twist each point in the same direction! Also be sure to twist the first point into the proper position before joining.
Rnd 8: Sl st to center of first ch-3 sp, (ch 1, sc) in first ch-3 sp, (ch 3, dc in 3rd ch from hook) 4 times, *sc in next ch-3 sp, (ch 3, dc in 3rd ch from hook) 4 times; repeat from * around, join with sl st in first sc. (12 sc, 48 eyelet sps made)
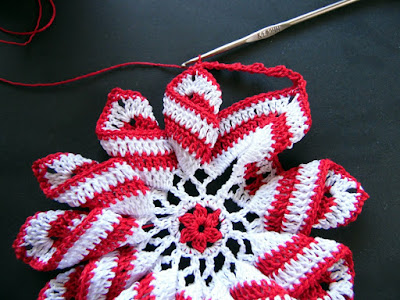
Working the Eyelet spaces of Rnd 8. Notice that I picked up the wrong hook when I took this photo; this is a size 5, but I actually used a size 7 to make the doily. You will twist the first point into position before joining at the end of Rnd 8.
Rnd 9: Sl st into first eyelet sp, (ch 5, dc) in first eyelet sp (beginning Vst made), Vst (see Special Stitches) in each eyelet sp around, join with sl st in 3rd ch of ch-5. Fasten off.(48 Vsts made)
Rnd 10: Join Color B with sc in ch sp of first Vst, ch 2, small shell(see Special Stitches) in next Vst, ch 2, *sc in next Vst, ch 2, small shell in next Vst, ch 2; repeat from * around, join with sl st in fist sc. Fasten off.
Rnd 11: Join Color A with sl st in ch-2 sp of first small shell, (ch 3, 2 dc, ch 2, 3 dc) in same sp (beginning large shell made), ch 3, *large shell(see Special Stitches) in ch-2 sp of next small shell, ch 3; repeat from * around, join with sl st in top of first ch-3. Fasten off.
Rnd 12: Join Color B with sc in first ch-3 sp, ch 1, (tr, ch 1) 9 times in ch-2 sp of next large shell, *sc in next ch-3 sp, ch 1, (tr, ch 1) 9 times in ch-2 sp of next large shell; repeat from * around, join with sl st in first sc. Fasten off. (24 scallops made)
Rnd 13: Join Color A with sc in first ch-1 sp of first scallop, (ch 3, sc in next ch-1 sp) 9 times, *sc in next ch-1 sp (the first ch-1 sp on the next scallop), (ch 3, sc in next ch-1 sp) 9 times; repeat from * around, join with sl st in first sc. Fasten off.