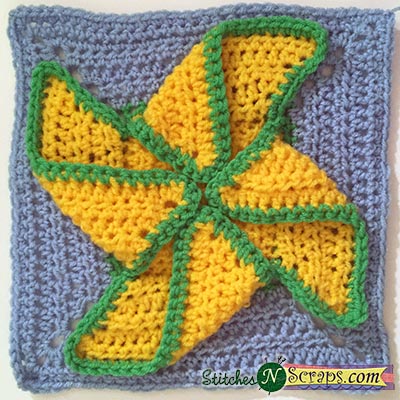
Crochet Pinwheel Square
The Crochet Pinwheel Square is a delightful pattern that adds a touch of whimsy to any project. With its intricate design and eye-catching colors, this square is sure to be a showstopper. The pinwheel motif is created by alternating stitches and colors, resulting in a stunning geometric pattern that is both visually appealing and fun to crochet. Whether you're creating a blanket, a pillow, or even a garment, this square adds a touch of elegance and charm. The pinwheel design is created by strategically placing stitches and changing colors, resulting in a visually stunning pattern that is sure to impress.

Materials:
- Anne Geddes Baby Yarn:
- 35-40 yds Bumble (A)
- 10-15 yds Grass (B)
- 40-45 yds Bluebell ©
- Size G / 6 (4.25 mm) hook
- Yarn or tapestry needle
Difficulty:
Intermediate – Mostly worked in the round, working in front or back loops only, working in sides of rows for edging. Because of the front and back loops, I’m calling it intermediate…but this would be a great project for an advanced beginner as well.
Size:
8″ square.
Gauge:
15 sc x 18 rows = 4″ square.
Abbreviations used:
- ch = chain
- sc = single crochet
- hdc = half double crochet
- sl st = slip stitch
- st(s) = stitch(es)
- sp(s) = space(s)
- sk = skip
- rnd = round
- RS = right side
- WS = wrong side
Notes:
- The magic circle technique is recommended for the first round and for the button, however an alternative is provided.
- If you make sure your starting tail is hanging at the back (wrong side) of the work, you can use that as a marker to know which is the wrong side.
- In place of the button, you can use any small button or flower pattern you like – just be sure to secure it fully around the edges and be careful not to use anything that can be grabbed / torn off and cause a choking hazard.
- When finishing, pay attention to how your stitching will look on the reverse side of the fabric. It’s important the pieces be sewn securely, but try to make it look neat on the back side as well.
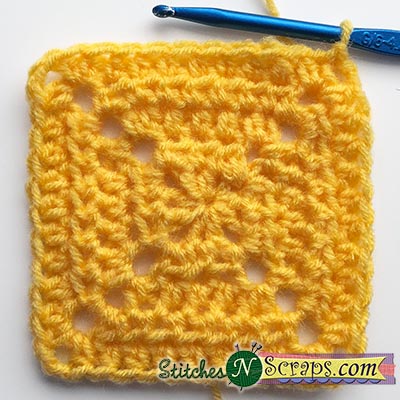
Pinwheel:
Center:
Leave a 8-10 inch starting tail for sewing later.
Rnd 1 (RS): With A, inside a magic circle, work ch 1, (2 hdc, ch 2) 4 times, pull circle closed, join with sl st to first hdc. (8 hdc, 4 ch sps).
OR
Alternate Rnd 1 (RS): With A, ch 2. In 2nd ch from hook, work ch 1, (2 hdc, ch 2) 4 times, join with sl st to first hdc. (8 hdc, 4 ch 2 sps)
Rnd 2: Turn, sl st in first ch sp, ch 1, hdc in same ch sp, *hdc in each st across to next ch sp, (hdc, ch 2, hdc) in next ch sp, repeat from * twice more, hdc in each st across to next (starting) ch sp, (hdc, ch 2) in ch sp, join with sl st to first hdc. (16 hdc)
Rnds 3-5: Repeat rnd 2. Do not fasten off. (40 hdc in rnd 5)
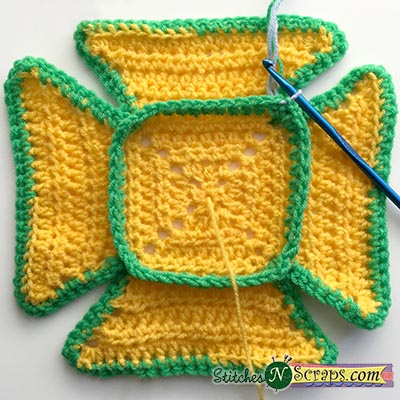
Blades:
Now each side of the square is worked independently, in rows, to form the blades of the pinwheel.
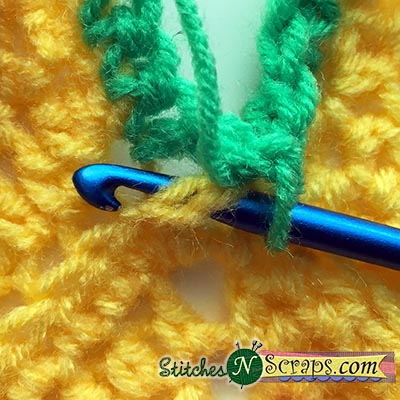
Row 6: Turn, sl st in first ch sp, working in back loops only for the remainder of the row, sl st in first hdc, *ch 1, 2 hdc in same st, hdc in next 8 sts, 2 hdc in next st. (12 hdc)
Row 7: Working in both loops, ch 1, turn, 2 hdc in first st, hdc in each st across to last st, 2 hdc in last st. (14 hdc)
Rows 8- 9: Repeat Row 7 (18 hdc at end of row 9)
Row 10: Ch 1, turn, 3 hdc in first st, hdc in each st across to last st, 3 hdc in last st, fasten off. (22 hdc)
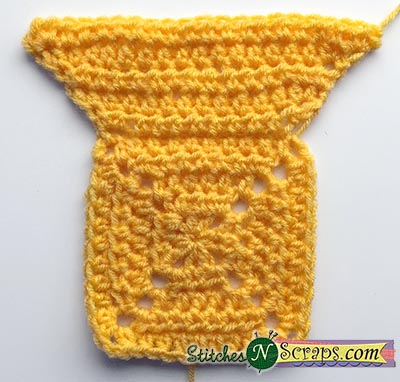
Other 3 blades: With wrong side facing, join A with sl st in back loop only of the first st on the next side of the square. Working in back loops only for this row, repeat from the * on row 6, all the way through row 10. Do this 2 more times, so all 4 sides of the square are done.
This is a good time to sew in all yellow tails, except for the starting tail.
Edging:
With RS facing, join B with sl st in the base of the first hdc of row 6, on any blade.
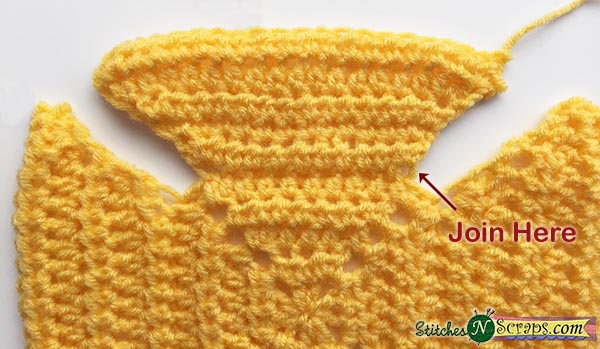
Ch 1, work 8 sc evenly spaced along side of blade.
* Working in front loops only, 3 sc in first st at top of blade (corner st), sc in next 9 sts,
Now working in both loops, sc in next 11 sts, 3 sc in next st
Work 8 sc evenly spaced along side of blade, **
Ch 1, work 8 sc evenly spaced along side of next blade.
Repeat from * 3 more times, ending at ** on the last repeat. ch 1, join with sl st to first sc of edging. Do not fasten off.
Background:
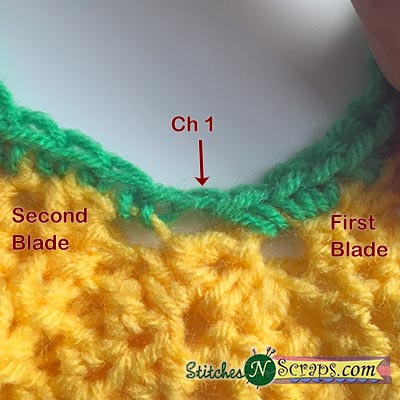
Rnd 6 (WS): Turn, sl st in ch sp from row 5 of pinwheel, ch 1, hdc in same sp, * working in front loops only (unused loops from row 6 of blades), hdc in each st across to next ch sp, (hdc, ch 2, hdc) in next sp, repeat from * twice more, hdc in front loop of each st across to next ch sp, hdc in next ch sp, ch 3, join with sl st to back loop only of first hdc of round, changing to C. Fasten off B. (48 hdc)
Rnd 7: Working in front loop only: Turn, sl st in first ch sp, ch 1, hdc in same sp, *hdc in each st across to next sp, (hdc, ch 2, hdc) in next sp, repeat from * twice more, hdc in each st across to next sp, (hdc, ch 2) in next sp, join with sl st to first hdc. (56 hdc)
Rnds 8-9: Working on both loops, repeat rnd 7. (72 hdc at end of rnd 9)
Rnd 10: Turn, sl st in first ch sp, ch 1, 2 hdc in same sp, *hdc in each st across to next sp, (2 hdc, ch 2, 2 hdc) in next sp, repeat from * twice more, hdc in in each st across to next sp, (2 hdc, ch 2) in next sp, join with sl st to first hdc. (88 hdc)
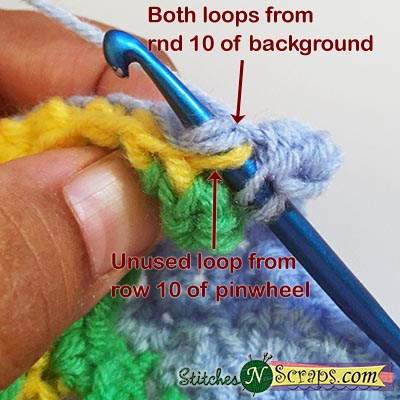
Rnd 11 (joining): Turn, sl st in first ch sp, ch 1, 2 hdc in same sp, *working through unused loop from row 10 of pinwheel blade and both loops from row 10 of background, hdc in next 10 sts, now working only into background, hdc in next 12 sts, ** (2 hdc, ch 2, 2 hdc) in next sp, repeat from * 3 more times, ending at ** on last repeat, (2 hdc, ch 2) in next sp, join with sl st to first hdc. (104 hdc)
Rnd 12 – 13: Turn, sl st in first sp, ch 1, sc in same sp, *sc in each st across to next sp, (sc, ch 2, sc) in next sp, repeat from * twice more, sc in each st across to next sp, (sc, ch 2) in next sp, join with sl st to first sc. Fasten off at end of Rnd 13. (120 sts at end of Rnd 13).
Button:
With B, make a magic circle, ch 3, 11 dc inside the magic loop, join with sl st to top of starting ch, fasten off and close magic circle.
OR ch 4, work 11 dc in 4th ch, join with sl st to form a circle, fasten off.
Finishing:
Fold loose corners of pinwheel in to the center and sew them in place using the starting tail. If they don’t quite reach the very middle it’s ok. The blades should not overlap each other.
Sew button into the center of the square so that it covers the folded in corners. Be sure to sew all around the edge of the button so it can’t be grabbed and torn off by little hands or mouths. If you make sure the blades are very secure, you can then sew the button to just the blades, not all the way through – that way the green (B) stitches won’t show on the back of the square.
Sew in any remaining tails