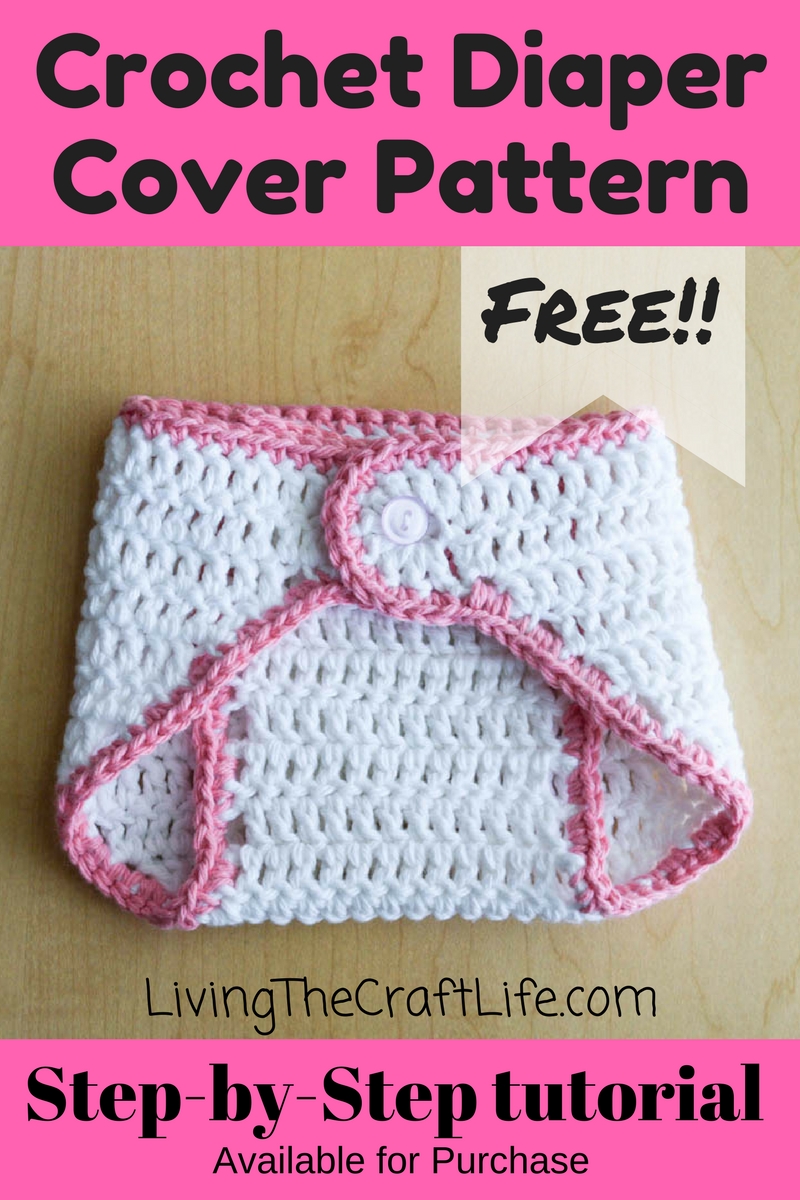
Crochet Newborn Diaper Cover
Create a charming diaper cover for newborns using the art of crochet. Crafted with soft yarn and delicate stitches, this handmade accessory will keep your little one cozy and stylish. Whether you choose a classic design or opt for a more modern twist, the possibilities are endless when it comes to customizing a crochet newborn diaper cover. From choosing the perfect color to adding embellishments like buttons or bows, you can personalize this essential baby item to suit your taste and preferences. Whether you are a seasoned crocheter or a beginner looking for a new project, making a newborn diaper cover is a rewarding and enjoyable experience that will result in a beautiful and functional accessory for the little one in your life.
Materials:
Worsted Weight Yarn (I use either 100% cotton yarn like Lily Sugar N Cream, or Caron Simply Soft Yarn)
Size H crochet hook
1/2-5/8" button
yarn needle
Pattern notes:
This pattern is worked in rows from the front to the back. Button holes are written into the pattern, as is the edging. It is all worked with one piece of yarn!
When I say «dc in same ch», I mean the chain you normally skip because the starting chain counts as a stitch. You know, the one you skip in order to not accidently increase the number of stitches in the row.
Gauge:
7 dc sts + 4 rows = 2" square
Pattern:
Chain 15
Row 1: Dc in 3rd ch from hk. 1 dc in each st across. Turn. (14 dc)
Rows 2-9: Ch 3 (counts as DC), 1 dc in each st across. Turn. (14 dc)
Rows 10-13: Ch 3 (counts as DC), 2 Dc in the first dc, then 1 dc in each st across, 3 dc in last st. Turn. (row 13: 30 sts)
Row 14-18: Ch 3 (counts as DC), 1 Dc in the first dc, then 1 dc in each st across, 2 dc in last st. Turn. (40 sts)
Row 19: Ch 7, sl st in 5th ch from hook to form loop, dc in the first dc, then 1 dc in each st across, 2 dc in last, ch 5, sl st with first ch of ch-5 to form loop. Turn.
Row 20: Ch 3 (counts as DC) and sl st to the bottom of the previous row. 8 dc in the ch-5 loop, then dc in each dc from the previous row, then 8 dc in the ch-5 loop. Sl st to the bottom edge of the previous row.
Trim: Fasten off and change colors, or continue with the same color. 3 dc in the sides of each dc at an angle. At the straight edges alternate between 2 and 3 sc in the sides of each dc (2sc, 3sc, 2sc, 3sc… etc). Turn the corner with 3 sc, 1 sc in the bottom of each stitch of the foundation ch, sc 3 to turn the corner, and alternate between 2 and 3 sc in the sides of each dc along the straight edge, then 3 sc in the side of each dc along the angled edge. When you get to the button hole, do 2 sc in each of the dc that are in the 5-ch loop. Then 1 sc in each dc across the top, and when you get to the last button hole, do 2 sc in each of the dc that are in the 5-ch loop. Sl st in last ch and fasten off.
Attach a button to the center of the front, I put it at the bottom of the first row of dc.