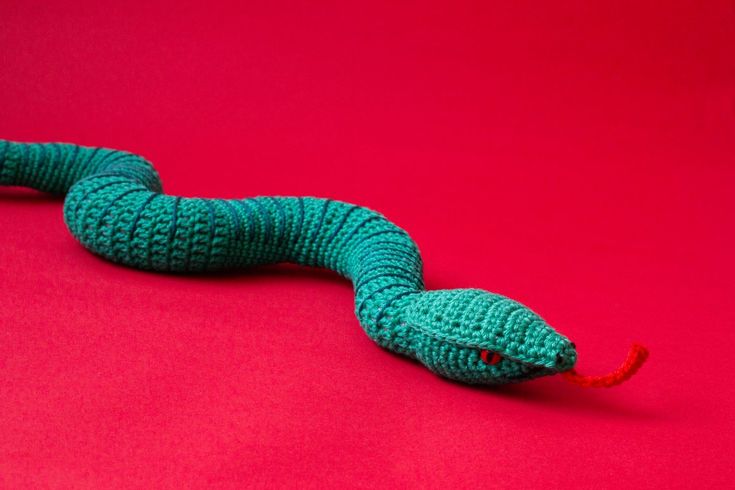
Crochet Adorable Snake
If you're looking to add a touch of charm to your crafting projects, consider crocheting an adorable snake! With its slithery shape and vibrant colors, a crochet snake can be a fun and unique addition to your collection. Whether you're a seasoned crocheter or just starting out, this playful project is sure to bring a smile to your face. Get creative with different yarn textures and patterns, and before you know it, you'll have a cuddly companion that's as cute as can be. So grab your crochet hook and let your imagination run wild as you stitch up your very own lovable snake friend!
About the pattern
Terminology
This pattern is written in American terminology.
Size
The snake will be approx. 40 cm (15.5”) long if using the indicated hook and yarn. If you want it to be larger or smaller, you can use a different yarn weight and adjust the hook size accordingly.
Construction
The head and body are crocheted in one piece. The nose and top layer of the head and the tongue are sewn on. The mouth, nostrils and markings are embroidered.
Techniques
This pattern will require techniques such as sc invisible decreases and invisible finishes.
Tips and tricks
- You crochet in seamless spirals.
- Crochet as tightly as you comfortably can. This will ensure your amigurumi will have the right scale and no filling will show through any gaps. If you tend to crochet quite loosely, try using a smaller-sized hook.
- For safety reasons, please don’t use safety eyes if young children will play with this amigurumi.
- Have fun! In my opinion, crocheting shouldn’t be just about the result, but mainly about enjoying the process.
Materials and Tools
Cotton yarn in 4-Ply/Fingering or DK/light worsted weight in one main color, and
an accent color of choice, as well as red [I used Scheepjes Catona in Silver Green (402) for the video and Jade (514) for the photo tutorial, Dark Teal (401) as accent color and Poppy Rose (390)]
2.5mm crochet hook / Size B-1 or C-2, depending on how tightly you crochet
Black embroidery floss
7mm safety eyes
Nail polish in eye color of choice and clear top coat (optional)
Fiberfill
Stitch marker
Yarn needle
Large-eyed sewing needle
Sewing pins
Scissors
Abbreviations
R(s) = row(s)
Rnd(s) = round(s)
St(s) = stitch(es)
Ch(s) = chain(s)
sk = skip
Sl st = slip stitch
Sc = single crochet
Inc = sc increase: 2 sc in same st
Dec = single crochet invisible decrease
Hdc = half double crochet
Dc = double crochet
tog = together
[…] = series of stitches to be repeated
(…) = stitch count of a completed round
*… = number of repetitions
img = image
Instructions
Crochet the tongue in red
Ch 13
R 1: 12 sc (starting in 2nd ch) (12)
Fasten off.
Crochet the Nose and Top Layer of the Head
This part is crocheted in rows, apart from round 17.
Ch 3 in main color
R 1: 2 sc (starting in 2nd ch from hook), ch, turn (2)
R 2: 2 inc, ch, turn (4)
R 3: 4 sc, ch, turn (4)
R 4: Sc, 2 inc, sc, ch, turn (6)
R 5: 6 sc, ch, turn (6)
R 6: 2 sc, 2 inc, 2 sc, ch, turn (8)
R 7: 8 sc, ch, turn (8)
R 8: 3 sc, 2 inc, 3 sc, ch, turn (10)
R 9 to 13 (5 rows): 10 sc, ch, turn (10)
R 14: Sc, sk, 6 sc, sk, sc, ch, turn (8)
R 15: 8 sc, ch, turn (8)
R 16: Sc, sk, 4 sc, sk, sc, ch, turn (6)
Now, crochet all around the work.
Rnd 17: Ch, turn, 6 sc in row 16, 16 sc in the side of rows 16 to 1, 2 sc in other side of base chains, 16 sc in the side of rows 1 to 16 (40)
Fasten off, leaving a 50cm (20”) long yarn end for sewing. Make an invisible finish.
Crochet the Head and Body
The head and body are crocheted in rounds.
Ch 3 in main color.
Rnd 1: Sc in 2nd ch, 4 sc in next ch, 3 sc in last chain (8)
Rnd 2: [3 sc, inc]*2 (10)
Rnd 3: [4 sc, inc]*2 (12)
Rnd 4: [5 sc, inc]*2 (14)
Rnd 5: 5 sc, inc, 6 sc, inc, sc (16)
Rnd 6: 6 sc, inc, 7 sc, inc, sc (18)
Rnd 7: 7 sc, inc, 8 sc, inc, sc (20)
Rnd 8: 7 sc, inc, 9 sc, inc, 2 sc (22)
Rnd 9: 8 sc, inc, 10 sc, inc, 2 sc (24)
Rnd 10: 9 sc, inc, 11 sc, inc, 2 sc (26)
Rnd 11: 9 sc, inc, 12 sc, inc, 3 sc (28)
Rnds 12 to 14 (3 rnds): 28 sc (28)
Rnd 15: [5 sc, dec]*4 (24)
Rnd 16: 2 sc, dec, [4 sc, dec]*3, 2 sc (20)
Rnd 17: [8 sc, dec]*2 (18)
Do NOT fasten off. Secure your stitch with a stitch marker.
Insert the Safety Eyes
Insert the safety eyes on each side of the head between rounds 7 and 8 with the pupils being vertical.
They should still be visible underneath the top layer of the head when you put it on but don’t worry if it partly covers the eyes. Filling the head with fiberfill will stretch the head and make it bigger.
Secure the safety eyes and generously fill the head with fiberfill.
Crochet the Body
From here, continue crocheting the body. Fill the body with fiberfill as you go.
Rnd 18 and 19 (2 rnds): 2 sc, 3 hdc, 6 dc, 3 hdc, 4 sc (18)
Rnd 20 to 22 (3 rounds): 3 sc, 3 hdc, 6 dc, 3 hdc, 3 sc (18)
Rnd 23: [5 sc, inc]*3 (21)
Rnd 24 to 32 (9 rnds): 21 sc (21)
Rnd 33: 16 sc, 4 hdc, dc (21)
Rnd 34 to 36 (3 rounds): 6 dc, 4 hdc, 6 sc, 4 hdc, dc (21)
Rnd 37 to 39 (3 rnds): 7 dc, 4 hdc, 6 sc, 4 hdc (21)
Rnd 40 to 42 (3 rnds): Hdc, 7 dc, 4 hdc, 6 sc, 3 hdc (21)
Rnd 43 to 45 (3 rnds): 2 hdc, 7 dc, 4 hdc, 6 sc, 2 hdc (21)
Rnd 46: 3 hdc, 7 dc, 4 hdc, 7 sc (21)
Rnd 47: [inc, 6 sc]*3 (24)
Rnd 48 to 52 (5 rnds): 24 sc (24)
Rnd 53: 12 sc, 4 hdc, 8 dc (24)
Rnd 54: 4 hdc, 8 sc, 4 hdc, 8 dc (24)
Rnd 55 to 57 (3 rnds): Dc, 4 hdc, 8 sc, 4 hdc, 7 dc (24)
Rnd 58 to 60 (3 rnds): 2 dc, 4 hdc, 8 sc, 4 hdc, 6 dc (24)
Rnd 61 to 63 (3 rnds): 3 dc, 4 hdc, 8 sc, 4 hdc, 5 dc (24)
Rnd 64: 4 dc, 4 hdc, 8 sc, 4 hdc, 4 dc (24)
Rnd 65: 4 dc, 4 hdc, 16 sc (24)
Rnd 66 to 70 (5 rnds): 24 sc (24)
Rnd 71: Dec, 22 sc (23)
Rnd 72: 11 sc, dec, 10 sc (22)
Rnd 73: Dec, 20 sc (21)
Rnd 74 to 76 (3 rnds): 3 sc, 4 hdc, 7 dc, 4 hdc, 3 sc (21)
Rnd 77 to 79 (3 rnds): 4 sc, 4 hdc, 7 dc, 4 hdc, 2 sc (21)
Rnd 80 to 82 (3 rnds): 5 sc, 4 hdc, 7 dc, 4 hdc, sc (21)
Rnd 83 to 85 (3 rnds): 6 sc, 4 hdc, 7 dc, 4 hdc (21)
Rnd 86 and 87 (2 rnds): 21 sc (21)
Rnd 88: Dec, 19 sc (20)
Rnd 89: 9 sc, dec, 9 sc (19)
Rnd 90: Dec, 17 sc (18)
Rnd 91: 16 sc, 2 hdc (18)
Rnd 92 to 94 (3 rnds): hdc, 6 dc, 3 hdc, 6 sc, 2 hdc (18)
Rnd 95 and 96 (2 rnds): 2 hdc, 6 dc, 3 hdc, 6 sc, hdc (18)
Rnd 97: 3 hdc, 6 dc, 3 hdc, 6 sc (18)
Rnd 98 to 102 (5 rnds): 18 sc (18)
Rnd 103: 2 sc, dec, [4 sc, dec]*2, 2 sc (15)
Rnd 104 and 105 (2 rnds): 15 sc (15)
Rnd 106: [3 sc, dec]*3 (12)
Rnd 107 and 108 (2 rnds): 12 sc (12)
Rnd 109: Sc, dec, [2 sc, dec]*2, sc (9)
Rnd 110 and 111 (2 rnds): 9 sc (9)
Rnd 112: [sc, dec]*3 (6)
Rnd 113: 6 sc (6)
Fasten off and close the round. Weave in the yarn end.
Embroider the Mouth
- Cut a 30 cm (12”) long piece of embroidery floss and thread it onto a large-eyed sewing needle.
- Make a horizontal stitch across round 1 of the head, pulling only half of the thread through. You will use the other half later.
- Repeat the same stitch.
- Insert the needle 3 rounds down and approximately 3 stitches to the side of the last stitch. Create a horizontal stitch spanning 3 rounds toward the eye.
- Repeat the same stitch.
- Wrap the embroidery floss twice around each of the three stitches.
- Insert the needle at the beginning of the first stitch and bring it to a gap between sc stitches on the head.
- Thread the other end of the floss onto the needle and repeat the same steps on
the other side. - Wrap the thread around the center front stitch again, then bring it to the same
spot on top of the head. - Tie the ends together, trim them and tuck them inside the head.
Attach the Tongue
- Thread one of the yarn ends of the tongue onto a yarn needle. Insert the needle just above the center front of the mouth, slightly off to one side.
Pull the yarn through to the top of the head. - Thread the other yarn end onto the needle and insert it just above the center front of the mouth, this time slightly off to the other side. Pull the yarn through to the top of the head.
- Tie the ends together, trim them, and tuck them under the top layer of the head in the next step.
Attach the Nose and Top Layer of the Head
1. Pin the top layer on top of the head. The pointy front should slightly fold down to cover the base of the tongue. The eyes should be positioned under the top layer.
2. Thread the long yarn end onto a yarn needle. Use the mattress stitch to sew this part to the head. It works as follows:
3. Pick up a loop on the head, as close to the edge of the top layer as possible and pull the yarn end through.
4. Then go through the closest sc stitch of the top layer, from the bottom up.
5. Go through the next sc stitch, from the top down.
6. Then pick up the next closest loop on the head and pull the yarn end through.
7. Now, go through the same sc stitch, this time from the bottom up.
8. Move on to the next stitch and work your way around in this way until you reach the eye.
9. Weave the yarn through the stitches above the eye, then continue sewing the part from the eye to the tongue.
10. When you reach the tongue, make a horizontal stitch the same width as the tongue and continue sewing along the other side of the head, skipping over the second eye just as you did with the first.
11. When you have sewn all around, weave in the yarn end and trim it.
Embroider the Markings
The markings are embroidered as stripes on the top half of the body. I embroidered one stripe every two rounds, but you can create your own pattern if you prefer.
- Thread a long piece of yarn (as long as you can comfortably manage) in the accent color onto a yarn needle. Insert the needle on the bottom side of the body, between stitches, where you want the markings to begin. Bring the needle up to the side of the body.
2. Insert the needle on the opposite side of the body, between the same rounds where you started the stitch. Then bring the needle two rounds forward to where the next stripe will begin.
3. Insert the needle back into the opposite side of the body, again between the same rounds where this stitch begins. Bring the needle two rounds forward to start the next stripe.
4. When you are close to running out of yarn, bring both yarn ends to the same spot on the bottom side of the body. Tie them together, trim them, and use your hook to tuck them inside the body.
5. Repeat this process until the top side of the body is fully embroidered.
Congratulations! Your snake is now complete!