Crochet The Pipistrelle Handbag
The Crochet The Pipistrelle Handbag is an adorable and versatile accessory that adds a touch of charm to any outfit! With its intricate crochet design and spacious interior, this handbag is perfect for carrying all your essentials in style. Whether you're heading out for a casual day of shopping or a fun night out with friends, this handbag is sure to be your new go-to accessory. Its unique shape and eye-catching details make it a fun and fashionable addition to your wardrobe. So, why not treat yourself to the Crochet The Pipistrelle Handbag and add a pop of personality to your look!
You will need –
- 4 50g balls of double knitting yarn. 4 50g balls should generally be enough to finish your bag, however if your yarn ball is a little shorter in length than usual, it may be wise to buy 6 50g balls, just to be on the safe side. You could also work this bag using chunky yarn. 2 or 3 balls should be sufficient.
- A 5mm (size H) crochet hook.
- A button. Large, chunky ones look great on these bags.
- A tapestry needle for sewing in the ends and attaching the button.
- Stitch markers
- Scissors
- A tape measure
The bag is made using two strands of double knitting yarn, on a 5mm, size H crochet hook. A single strand of chunky yarn could also be used, but as these can vary so much in their 'chunkiness' I find it safest and easiest to just use 2 strands of DK. In this way, interesting colourways can be created, by using two different coloured strands, if you wish. This pattern uses single crochet and double crochet stitches for the base, and half double crochet stitches for the walls and handle of the bag.
The entire bag is worked in rounds, so there are no seams to sew at the end. The only sewing required is to weave in the ends, and to attach the button that will fasten the bag.
To begin-
We start at the centre of the base of the bag. This is made in rounds — do not turn the work at the end of each round, keep going in the same direction. Wind the yarn around your finger to make a 'magic ring':
The 'Magic Ring'
To make a 'magic ring', loop the yarn around your first two fingers a few inches from the end of the yarn. Grasp the join of the loop (where the two strands of yarn overlap) between your thumb and forefinger. Insert your crochet hook into the loop from front to back. Draw up a loop and 1ch. This chain does not count as a stitch. Insert your hook into the loop again, and crochet as normal, over the hoop and the tail.
1st Round: 1ch, 10sc in ring, ss in first sc. 10 sts.
2nd Round: 1ch, 1sc in same place as ss, 2ch, 1dc in same place as sc, 2dc in next sc, *2sc in following sc, 1sc in next sc, 2sc in following sc,* 2dc in each of the next 2sc, repeat from * to *, ss in second ch. 18 sts.
3rd Round: 1ch, 1sc in same place as ss, 2ch, 1dc in same place as sc, *1dc in each of the next 2dc, 2dc in following dc, 2sc in next sc, 1sc in each of next 3sc, 2sc in following sc,* 2dc in next dc, repeat from *to *, ss in second ch. 26 sts.
4th Round: 1ch, 1sc in same place as ss, 2ch, 1dc in same place as sc, *1dc in each of the next 4dc, 2dc in following dc, 2sc in next sc, 1sc in each of the next 5sc, 2sc in following sc,* 2dc in next dc, repeat from * to *, ss in second ch. 34 sts.
5th Round: 1ch, 1sc in same place as ss, 2ch, 1dc in same place as sc, *1dc in each of the next 6dc, 2dc in following dc, 2sc in next sc, 1sc in each of the next 7sc, 2sc in following sc,* 2dc in next dc, repeat from * to *, ss in second ch. 42 sts.
6th Round: 1ch, 1sc in same place as ss, 2ch, 1dc in same place as sc, *1dc in each of the next 8dc, 2dc in following dc, 2sc in next sc, 1sc in each of the next 9sc, 2sc in following sc,* 2dc in next dc, repeat from * to *, ss in second ch. 50 sts.
7th Round: 1ch, 1sc in same place as ss, 2ch, 1dc in same place as sc, *1dc in each of the next 10dc, 2dc in following dc, 2sc in next sc, 1sc in each of the next 11sc, 2sc in following sc,* 2dc in next dc, repeat from * to *, ss in second ch. 58 sts.
8th Round: 1ch, 1sc in same place as ss, 2ch, 1dc in same place as sc, *1dc in each of the next 12dc, 2dc in following dc, 2sc in next sc, 1sc in each of the next 13sc, 2sc in following sc,* 2dc in next dc, repeat from * to *, ss in second ch. 66 sts.
9th Round: 1ch, 1sc in same place as ss, 2ch, 1dc in same place as sc, *1dc in each of the next 14dc, 2dc in following dc, 2sc in next sc, 1sc in each of the next 15sc, 2sc in following sc,* 2dc in next dc, repeat from * to *, ss in second ch. 74 sts.
This completes the base of the bag. Do not cast off the yarn, but continue straight onto the first round of the walls of the bag. To build up the walls of the bag, we will continue working in rounds, but this time we will turn the work at the end of each round.
After the ss in second ch at the end of the 9th Round, 2ch, turn the work.
10th Round: 1hdc in each of the 74 sts in the round. ss in first hdc, 2ch, turn the work.
11th Round: 1hdc in each of the 74 sts in the round. ss in first hdc, 2ch, turn the work.
Working in rounds in this way, with no increases, and turning the work at the end of each round, you should soon be able to see the walls of the bag being formed, with a very slight 'seam' running down one side (this is the place where you turn the work).
Continue working in rounds in this way until the height of the bag reaches 9 inches. This should be achieved by creating the walls with approximately 14 rounds of half double crochet stitch. It does not matter if it takes more or less, however, as long as the overall height (measuring the bag on a flat surface, and measuring from the place you began the centre of the base with the magic ring) is around 9 inches.
Now it is time to create the handles. Again, do not cast off the yarn, simply carry on working in rounds with the same yarn. However, you will need to put down the yarn, your hook etc for a little while as before we start crocheting them, we need to mark out where the handles will be.
Use your tape measure to measure the width at the top of your bag. Lay the bag flat on a flat surface with the front facing up and the 'seam' running down the back on the right hand side. The bag should fall into this position quite naturally. Measure across the widest point at the top of the bag. This measurement will usually be approximately 13 inches, but may vary according to what yarn you are using, how tight your stitches are etc. Use a stitch marker to mark the halfway point across your handbag. So, for instance, if you measure the width across the top of the bag (laying it flat on a flat surface to do so) as 12 inches, you will need to put a marker in the stitch that most closely coincides with the 6 inch point on your tape measure. This is simply to find out where the middle of the bag is.
Once you have placed a stitch marker at the middle point of the bag, count the stitches to either side of the marker. Count from the marker (not including the stitch the marker is in) to what in your judgement is the outer edge of the bag (where the bag curves around towards the back). This will usually be around 18 or 19 stitches, but may vary. Adjust the position of the marker if the stitches to either side of it are not equal – they need to be as equal as possible. If the number of stitches you counted to either side of the marker is an odd number, you will need to put another marker into the stitch next to it (this is important for when we make the flap later on) – one side will normally be very slightly longer than the other, so if you have an odd number, place the extra stitch marker to the side of it that is longer, to even things out a little.
Once your marker(s) is in place, count 8 stitches from each side of it and place a marker in the 8th stitch you counted. You will now have three (or four) markers on this side of the work. You can now take out the middle marker(s) as they were simply there to show where the middle was, and are not needed anymore. Look at the top of your bag. What you have just marked out is where the inside of the handles will be. Count how many stitches you have between the markers just to make sure it is an even number.
Once you are happy with the distance between your markers, you need to place corresponding markers at the top of the back of the bag, opposite those you have placed at the front. It is a good idea to count the stitches to either side again to check you have them in the right place, and that they match those at the front.
Handles:
Round 1: Take up your yarn and hook again, turn the work, 2ch, 1hdc in each stitch around until you come to the first stitch marker. 1hdc in the same stitch as the stitch marker (you can remove the marker now), 48ch, 1hdc in the next stitch with a stitch marker in, 1hdc in each stitch around until you come to the next stitch with a marker in it. 1hdc in the stitch with the marker in it, 48ch, 1hdc in the next stitch with a marker in it. 1hdc in each stitch around until you finish the round. ss to join.
Round 2: ch2, turn the work, 1hdc in each stitch until you reach the first chain of the handle. 48hdc in each stitch of the chain. Work the chain as though it was a foundation chain, ie by placing a stitch in each chain loop. 1hdc in each stitch around until you reach the second handle. 48hdc in each chain stitch. 1hdc in each stitch around. ss to join, ch2, turn the work.
Round 3: 1hdc in each stitch around. ss to join.
Round 4: ch2, turn the work, 1hdc in each stitch around. ss to join. Fasten off yarn.

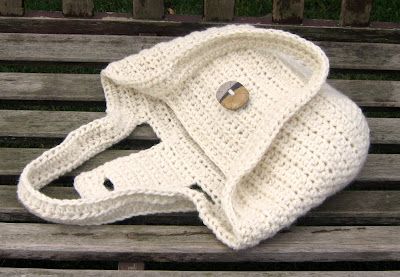
Button Flap:
This can be worked in a number of ways, according to your taste, and what size/style button you have chosen. It is very simple though, so don't worry! The button flap is crocheted onto the back wall of the bag, in the space created by the handles. Turn your bag over, so that you can see the seam going down the back, and lay it on a flat surface. I find it helps to have your button handy so you can check you are making the flap wide enough to accomodate it. Place stitch markers at equal distances from the inside of the handles, on the top row of stitches of the wall of your bag, wide enough apart so that the flap will be wide enough for your button. You can really make the flap as wide or as narrow as you like, but it does need to be at least as wide as your button. For my bags I tend to use large buttons, so a couple of stitches in from each side is sufficient. Once you are happy with where you have placed your markers, take up your yarn and hook again.
Row 1: fasten on yarn in the first stitch with a marker in it, 1ch, 1sc in each stitch until you reach the other marker, 1sc in the stitch with the marker, 1ch, turn.
Row 2: 1sc in each stitch, 1ch, turn.
Rows 3 onwards: Repeat Row 2 until you reach the point you want your button hole to be. This will vary according to what sort of button you have chosen. Again, I find it helps you have your button handy so you can check how it's looking as you go along.
Button hole: It is hard to give specific instructions here, as how you make the flap really depends on what sort of button you are using and what style you are going for, but at any rate you will need to create a button hole for your button to go through. When you have worked the flap to a length where you think the button would look good, work the button hole into the next row. Again, the width of the button hole depends on the width of your button. I find it's best to create a button hole that is a stitch or two narrower than your button. Create a button hole by placing 1sc in each stitch up to the point you want the button hole to start, ch however many stitches the button hole covers, and sc in each stitch till the end of the row. For example, if my flap is 10 stitches wide, I could create a wide button hole to accomodate a fairly large button by doing 2sc, 8ch and then 2sc in the last 2 stitches of the row. 1ch, turn, 2sc, 8sc into the chain space, 2sc in last 2sc of the row. This basic button hole pattern can be adjusted to make a button hole of any size.
After you have created the button hole, continue with your sc rows until the flap is the desired length. After you have made the button hole, you can also begin to decrease at each side of the flap, to create a more rounded shape, or even a point, or you could simply continue at the same width for the length of the flap. Once the flap has reached your desired length and shape, fasten off the yarn.
Finishing off:
Attach your yarn at the edge of the flap closest to the back wall of the bag, ensuring you are working on the right side of the flap. 1sc in each stitch around the flap. If you have made a flap with corners or points, do 3sc in the same stitch in the corners. Continue until you reach the end of the flap, fasten off your yarn.
Attaching the button:
Being careful to check you have the button in just the right place for it to fasten into the flap, and at equal distances from the sides of the bag, sew your button onto the front of the bag using a tapestry needle and the yarn you used to make the bag.
Weave in all ends. You're done!