Crochet Six Styles Baby Headbands
If you're looking to add some adorable flair to your little one's outfit, why not try crocheting six stylish baby headbands? These cute and versatile accessories can be customized to match any outfit or occasion, making them the perfect addition to your baby's wardrobe. With a variety of patterns and color combinations to choose from, you can let your creativity shine while creating these charming headbands. Whether you're a seasoned crocheter or just starting out, crafting these headbands is a fun and rewarding way to add a personal touch to your baby's style. So grab your yarn and hook, and get ready to make some sweet and stylish headbands for your precious bundle of joy!
Materials:
- Red Heart Soft Touch or similar light worsted weight yarn, you can find lots of great Red Heart yarns on their website!
- Size 5.0 mm (H-8) or 5.5 mm (I-9) crochet hook, my favorite hooks are Clover Amour!
- Yarn needle for weaving in ends
Abbreviations:
- ch = chain
- sl st = slip stitch
- sk = skip
- sc = single crochet
- hdc = half double crochet
- dc = double crochet
Directions are included for the following sizes:
- Newborn 13″
- 0 – 3 Months 14″
- 3 – 6 Months 15″
- 6 – 9 Months 16″
- 9 – 12 Months 17″
Gauge: 14 stitches = 4 inches
Special Instructions:
Be careful not to twist the starting chain when joining the ends together
Changes for sizes are found in the brackets and correspond with these measurements: (13″ / 14″ / 15″ / 16″ / 17″)
Headband Instructions
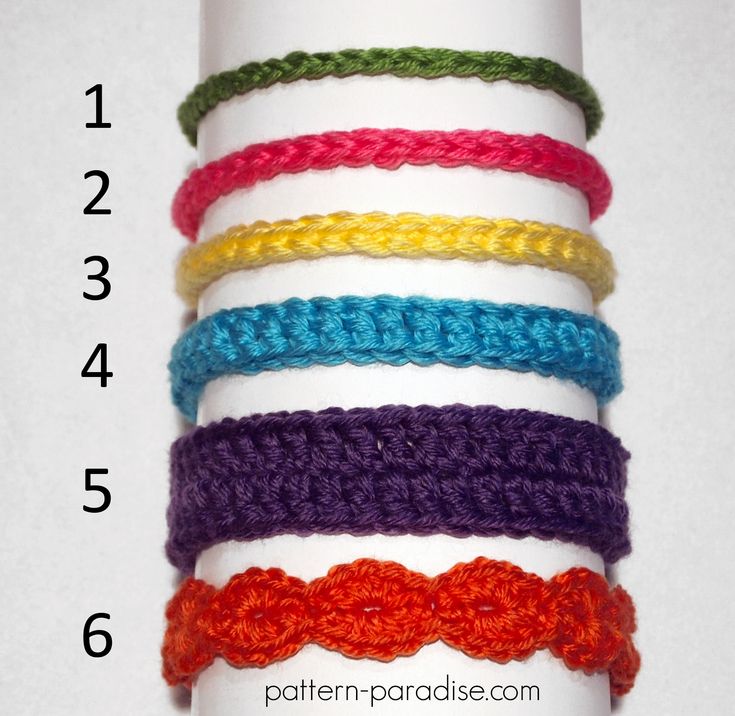
Style # 1 – Single Strand
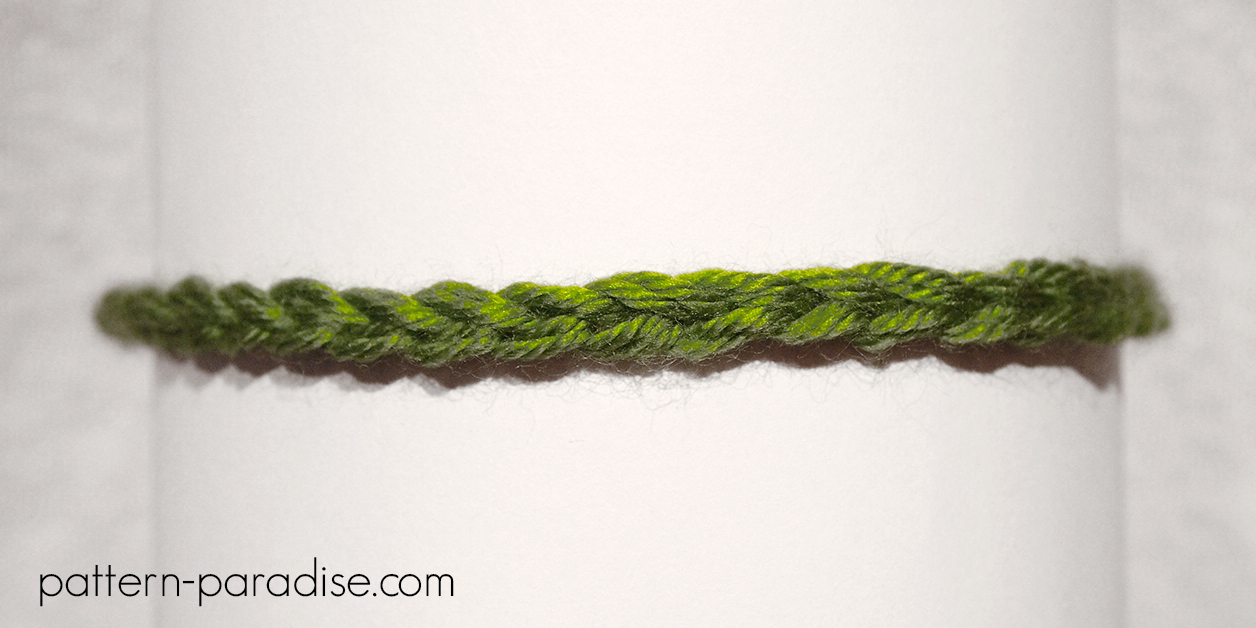
Using a 5.5mm (I-9) hook and two strands of yarn held together, chain (47 / 50 / 54 / 57 / 61), sl st in first chain to form a circle, fasten off and secure ends
Style # 2 – Narrow Band (SL ST)

Using a 5.5mm (I-9) hook and two strands of yarn held together, chain (46 / 49 / 53 / 56 / 60)
Round 1: slip stitch into the first chain made to form a circle, sl st in each chain back to start, make an invisible join; weave in ends
Style # 3 – Narrow Band (SC)

If you work the stitches into the “bump” on the back of the chain you will finish with identical looking loops on either side of the band.
Using a 5.5mm (I-9) hook and two strands of yarn held together, chain (46 / 49 / 53 / 56 / 60)
Round 1: slip stitch into the first chain made to form a circle, ch 1, sc in same stitch as ch 1 and in each stitch around, make an invisible join; weave in ends
Style # 4 – Medium Band (DC)
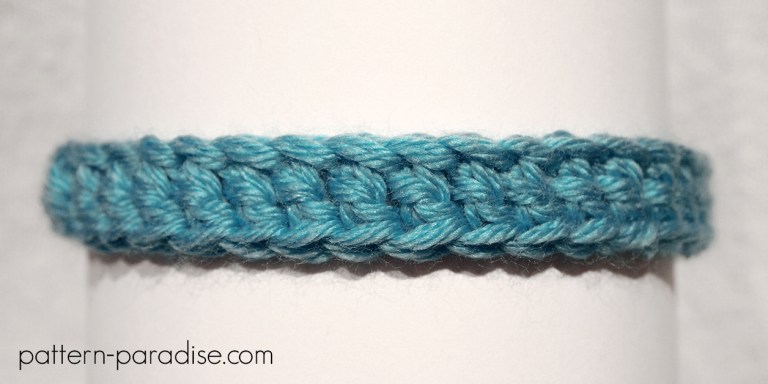
If you work the stitches into the “bump” on the back of the chain you will finish with identical looking loops on either side of the band.
Using a 5.5mm (I-9) hook and two strands of yarn held together, chain (46 / 49 / 53 / 56 / 60)
Round 1: slip stitch into the first chain made to form a circle, ch 2, dc in same stitch as ch 2 and in each stitch around, make an invisible join; weave in ends
Style # 5 – Wide Band (DC)
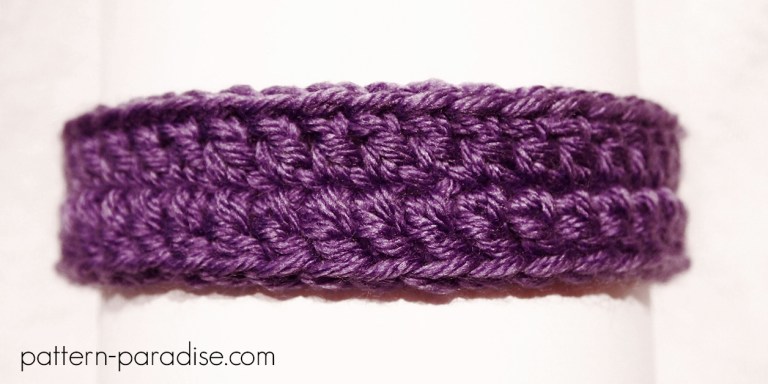
Using a 5.5mm (I-9) hook and two strands of yarn held together, chain (46 / 49 / 53 / 56 / 60)
Round 1: slip stitch into the first chain made to form a circle, ch 2, dc in the same stitch and in each stitch around, slip stitch in first dc of the round to join
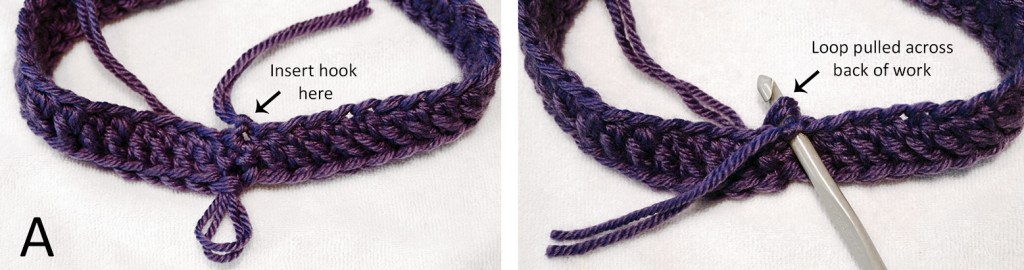
The next round is worked on the opposite side of the starting chain. Turn your work and pull your working loop out a bit so you can pass it across the back side of the band, insert your hook in the starting chain directly opposite of your join, hook the loop and pull it through; continue with the next round. (See Image A)
Round 2: ch 2, dc in the same stitch and in each stitch around, make an invisible join; weave in ends
Style # 6 – Shell Band
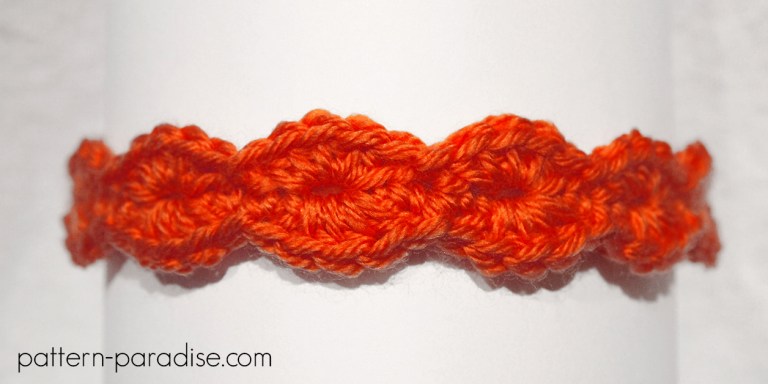
You can adjust the size of this headband by increasing or decreasing multiples of 4.
Using a 5.0mm (H-8) hook and one strand of yarn, chain (48 / 52 / 56 / 60 / 64)
Round 1: slip stitch into the first chain made to form a circle, ch 1, sc in the same stitch and in each stitch around, sl st in first sc of the round to join
Round 2: *sk 1, make 4 hdc in next, sk 1, sl st in next* repeat back to start, make the last slip stitch in the same space that you started
The next round is worked on the opposite side of the starting chain, but in the same stitches as Round 2. Turn your work and pull your working loop out a bit so you can pass it across the back side of the band, insert your hook in the starting chain directly opposite of your join, hook the loop and pull it through, ch 1 and continue with the next round. (See image A)
Round 3: *sk 1, make 4 hdc in next, sk 1, sl st 1* repeat back to start, make the last slip stitch in the same space that you started, fasten off and weave in ends