

Hazel the Blossom Fox: Adorable Crochet Amigurumi Pattern (Beginner-Friendly)
Hazel the Blossom Fox is a sweet, beginner-friendly amigurumi pattern featuring floral details that give this little fox a whimsical, handmade charm. The pattern below includes materials, abbreviations, step-by-step rounds for each part, and simple sewing instructions so you can assemble your own cuddly Hazel.
This project is suitable for crocheters who know basic stitches and want to practice shaping and color changes. Gather your hooks and yarn, and follow the rounds to make your own Hazel.
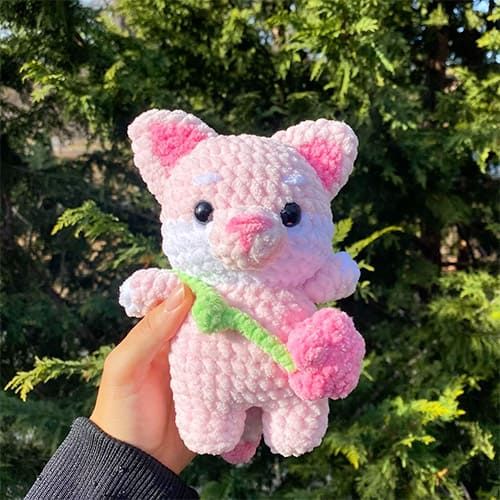
Materials
- Hook: 5mm (for the fox) and 3.5mm (for the leaves)
- Pink chenille size 4 medium
- Peach chenille size 4 medium
- White chenille size 4 medium
- Green velvet size 3 light
- 12 mm safety eyes
- Stuffing
- Tapestry needle
- Stitch markers
- Scissors
Abbreviations
R: round
st: stitch
mr: magic ring
ch: chain
sc: single crochet
hdc: half double crochet
dc: double crochet
inc: increase
dec: decrease
FO: fasten off
cc: change colour
Head
Use pink yarn:
R1. 8 sc in a MR (8)
R2. 8 inc (16)
R3. (sc,inc)x8 (24)
R4. (3sc,inc)x6 (30)
R5. (2sc,inc,2sc)x6 (36)
R6-9. 36 sc (36) – 4 rounds
R10. cc to white and make 9 sc, 3 inc, 12 sc, 3 inc, 9 sc (42)
R11. (5sc,dec)x6 (36)
R12. (4sc,dec)x6 (30)
R13. (3sc,dec)x6 (24)
R14. (4sc,dec)x4 (20)
Cut yarn, FO with invisible join.
Insert safety eyes on R9-10, 4 visible sts apart.
Add fiber fill, stuff a lot to get a rounded face and pay attention to filling the cheeks.
Body
Use pink yarn:
R1. 5 sc in a MR (5)
R2. 5 inc (10)
R3. BLO 10 sc (10)
R4. 10 sc (10)
Cut yarn and FO with an invisible join.
Make another leg but this time don’t cut yarn and ch 2 (pic 3).
R5. Insert the hook in any of the first leg sts (pic 3) and make 10 sc, 2 sc in the 2 ch, 10 sc, 2 sc in the 2 ch (24) (pic 4).
R6. 2sc, inc, (5sc,inc)x3, 3 sc (28)
R7-12. 28 sc (28) – 6 rounds.
R13. (5sc,dec)x4 (24)
Start stuffing as you go; when you stuff the feet remember to keep them flat.
R14. (4sc,dec)x4 (20)
Finish stuffing.
Cut yarn leaving a long tail for sewing.
Arms (X2)
Start with white yarn:
R1. 4 sc in a MR (4)
R2. 4 inc (8)
Cc to pink yarn.
R3-5. 8 sc (8) – 3 rounds
R6. Fold the arm and close it making 3 sc (3)
Don’t stuff the arm.
Cut yarn leaving a long tail (pic 5).
Ears (X2)
Start pink yarn:
R1. 5 sc in a MR (5)
R2. sc, 4 inc (9)
R3. sc, cc to peach inc, cc to pink sc, inc, 4sc, inc (12)
R4. sc, cc to peach 3 sc, cc to pink 8 sc (12)
R5. sc, cc to peach sc, inc, sc, cc to pink sc, inc, 5 sc, inc (15)
Cut yarn leaving a long tail for sewing.
Snout
Use pink yarn:
R1. 5 sc in a MR (5)
R2. 5 inc (10)
R3. sc, inc, 8 sc (11)
Cut yarn leaving a long tail for sewing.
Tail
Start with peach yarn:
R1. 7 sc in a MR (7)
R2. 7 sc (7)
R3. dec, sc, 3 inc, sc (9)
R4. 9 sc (9)
R5. dec, sc, 5 inc, sc (13)
Cc to pink.
R6. 13 sc (13)
R7. dec, 2 sc, 5 inc, 2 sc, dec (16)
R8. 16 sc (16)
R9. (2sc,dec)x4 (12)
R10. (sc,dec)x4 (8)
FO and leave a long tail for sewing, add stuffing.
Leafs
Use a 3.5mm hook and green yarn: slip knot, ch9, starting from the 2nd ch from the hook make sc, hdc, dc, hdc, sc.
(ch12, starting from the 2nd ch from the hook make sc, hdc, dc, hdc, sc) x3
Flower bag
Use peach yarn, make 2:
R1. 6 sc in a MR (6)
R2. (slst, ch2, dc, hdc) in the same st x5 (5 petals)
FO and leave one of the flowers with a long tail for sewing.
Sewing
Sew the head to the body.
Sew ears between R3-7.
Sew arms between R13-14.
Sew snout between R9-11.
Sew the tail on R7-8.
Sew the 2 flowers together and add a bit of stuffing, then complete the bag by adding the leafs string.
Sew the details: nose and eyebrows (R7-8, 2sts wide, just up the eyes).
Finishing tips: use small, even stitches when sewing pieces together to keep seams neat. Adjust stuffing amount to achieve the desired firmness—more stuffing for a rounder face and firmer body, less for a softer toy. Secure all yarn ends inside the toy and hide tails with a tapestry needle.