

Make This Adorable Crochet Puppy Amigurumi — Full Step-by-Step Pattern
Creating a crochet puppy amigurumi is more than a craft project — it's bringing a cuddly friend to life stitch by stitch. This pattern yields a cute light-brown-and-white puppy with a snout, ears, tail and optional bow and collar. The project is suitable for beginners who know basic crochet stitches and for more experienced crocheters who want a quick, satisfying make. Gather your yarn and hook and follow the step-by-step instructions below.
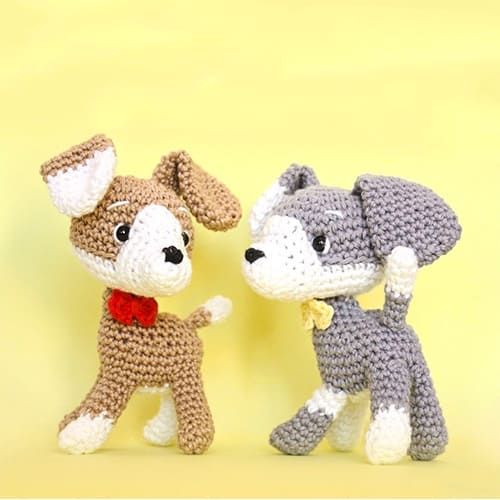
Supplies
– A bit of yarn from 5 different balls of yarn (all the same weight). This pattern mainly uses light brown and white.
– Small amounts of black and white yarn for eye embroidery, and a bit of red yarn for the bow.
– 2 safety eyes (or use embroidered eyes as described below)
– Soft stuffing
– I hook (adapt your hook size to your yarn weight)
– Row marker
– Thread cutter
– Yarn needle
Abbreviations
R: Row
MR: Magic Ring
st: stitch
ch: chain
sc: single crochet
hdc: half double crochet
dc: double crochet
slst: slip stitch
dec: decrease
inc: increase
BLO: Back Loop Only
PM: Place Marker
Eyes
You can use safety eyes or embroider the eyes. For embroidery: with black yarn, make a small circle in a MR by crocheting 1 sc and 1 slst, tighten and sew onto the face on each side of the snout. Optionally, pull a thread between the two eye positions and tighten to sculpt the face. To further sculpt, pinch and pull a thread between the eyes and the underside of the head (this is easiest after the head and neck are sewn together).
Legs
You can change colors to create spots if desired.
R1: 6 sc in MR (6)
R2: 6 inc (12)
R3: 12 sc (12)
R4: 3 dec, 6 sc (9)
R5-10: 9 sc (9)
1 slst to end, cut the yarn and hide the tail into the leg. Make four legs.
When assembling the body you will need to pay attention to the direction the legs face. Always orient the front side of each leg as shown by the pattern direction (keep legs pointing forward for the front pair).
Head
Begin with light brown yarn:
R1: 6 sc in MR (6)
R2: 6 inc (12)
R3: 1 sc, 1 inc (18)
R4: 2 sc, 1 inc (24)
R5: 3 sc, 1 inc (30)
R6: 4 sc, 1 inc (36)
R7-10: 36 sc (36)
Change to white yarn:
R11: 36 sc BLO
R12: 36 sc (36)
R13: 4 sc, 1 dec (30)
R14: 3 sc, 1 dec (24)
R15: 2 sc, 1 dec (18)
R16: 1 sc, 1 dec (12)
1 slst to end, cut the yarn leaving a long tail to sew.
Snout
With white yarn:
R1: 6 sc in MR (6)
R2: 3 inc, 3 sc (9)
R3: 1 sc, 4 inc, 5 sc (13)
R4: 1 dec, 9 sc, 1 dec (11)
R5: 2 inc, 7 sc, 2 inc (15)
R6: (4 sc, 1 inc) x3 (18)
R7: (2 sc, 1 inc) x4, 2 sc, [1 hdc, 1 dc], [1 dc, 1 hdc], 2 sc (24)
Add 8 sc, finish with 1 slst and cut the yarn leaving a long tail to sew. Embroider the nose with black yarn.
Sew the snout to the head when complete.
Ears
Use any color you prefer.
Work 5 ch then turn and work around starting in the 2nd ch from hook:
R1: 3 sc, [3 sc], 2 sc, 1 inc (10)
R2: 1 inc, 2 sc, 3 inc, 2 sc, 2 inc (16)
R3-6: 16 sc (16)
R7: (1 dec, 6 sc) x2 (14)
R8-9: 14 sc (14)
R10: 6 sc on both sides — skip the 7th and last st of R9 (6)
R11: ch 1 to turn, 6 sc FLO, turn and work 6 sc in the remaining free loops.
1 slst, cut the yarn leaving a long tail to sew. Make two ears and sew them onto the head.
Body (Part 1)
With white yarn, begin with the belly:
R1: Ch 6, 4 sc (starting in the 2nd ch from hook), 3 sc in the last ch to turn, 3 sc, 1 inc (12)
R2: 1 inc, 3 sc, 3 inc, 3 sc, 2 inc (18)
Cut the yarn leaving a long tail to sew the legs onto the belly.
Position the belly facing down. Each leg will be sewn using 3 stitches on the leg and 3 stitches on the belly. Follow the diagram in the original pattern to place legs correctly.
Sew leg 1 using 3 sts, then move the thread through the next 3 free sts of the belly and sew leg 2, then leg 3, and finally leg 4. Tie off and hide the tail.
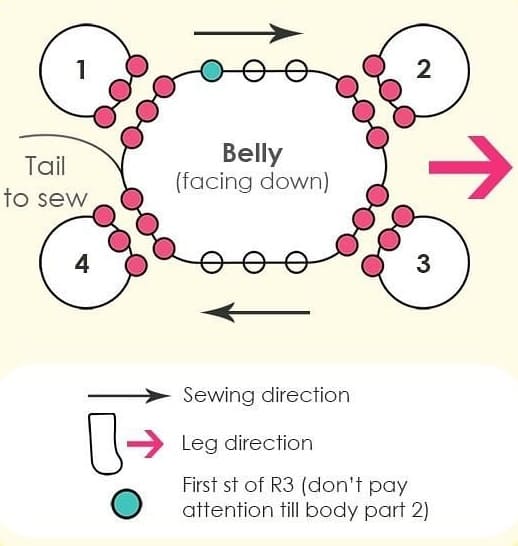
Body (Part 2)
With light brown yarn, begin in the indicated stitch in the diagram:
R3: 3 sc on the left side, 6 sc along the side of the left foreleg, then 6 sc along the right foreleg. Repeat 3 sc on the right side of the belly and finish with the 6+6 sc along both remaining hind legs. (30)
R4-6: 30 sc (30)
R7: 4 sc, 1 dec, 6 sc, 1 dec, 16 sc (28)
R8: 1 sc, 1 dec, 10 sc, (1 dec, 1 sc) x3, (1 sc, 1 dec) x2 (22)
R9: 16 sc, 3 dec (19)
R10: 17 sc, 1 dec (18)
Before R11, work 3 sc and move the marker to the last st.
R11: 3 sc, 1 inc, 2 sc, 1 inc, 3 sc — leave remaining sts unworked (12)
For R12 only use those 12 sts from R11: R12: 12 sc (start in the st right after the marked one) (12)
1 slst to end, cut the yarn leaving a tail and sew the back together. Sew the head onto the body and hide all yarn tails.
Tail
Use any color you like. For a two-tone tail as pictured, start with white:
R1: 6 sc in MR (6)
R2-5: 6 sc (6)
Change to light brown:
R6-9: 6 sc (6)
1 slst to end, cut the yarn leaving a long tail to sew. Attach the tail to the body.
Bow and collar
Using red yarn, make the bow in a MR as follows:
(2 ch, 1 hdc, 1 dc, 1 hdc, 2 ch, 1 slst) x2. Cut the yarn and sew the bow onto the puppy. For a collar, ch 17 then make 16 slst starting in the 2nd ch from hook, cut the yarn and sew around the neck.
Finishing tips: Stuff pieces firmly but not overstuffed to keep stitch definition. Use small stitches when sewing parts together for a neat finish. Embroider facial details before closing the head fully if you prefer easier access.
Congratulations, you have completed the cute amigurumi puppy!