

Make a Cuddly Crochet Teddy Bear Amigurumi — Step-by-Step Pattern
Crochet Teddy Bear Amigurumi is an adorable, beginner-friendly project that makes a heartfelt handmade gift. This step-by-step pattern walks you through crocheting the head, ears, body, arms, legs and a little garland to decorate your bear. Gather your yarn and hook, follow the rounds below, and assemble the pieces to create a charming stuffed companion.
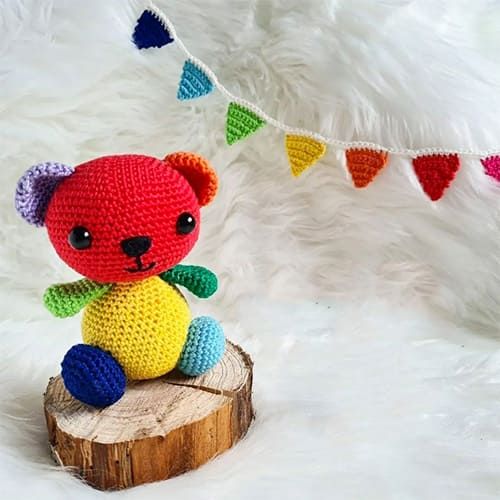
Materials
Thread: yellow, pink, black, red, blue
Fiber for filling
Plastic safety eyes
Scissors
Marker pins
Abbreviations
MR — magic ring
sc — single crochet
inc — increase
dec — decrease
ch — chain
Rnd — round
Head
Rnd 1. 6sc in MR (6)
Rnd 2. (inc) x 6 (12)
Rnd 3. (1sc, inc) x 6 (18)
Rnd 4. (2sc, inc) x 6 (24)
Rnd 5. (3sc, inc) x 6 (30)
Rnd 6. (4sc, inc) x 6 (36)
Rnd 7. (5sc, inc) x 6 (42)
Rnd 8. (6sc, inc) x 6 (48)
Rnd 9. (7sc, inc) x 6 (54)
Rnd 10. (8sc, inc) x 6 (60)
Rnd 11-20. 60sc (10 rounds) (60)
Put safety eyes between rounds 15 and 16 with 12sc (holes) in between
Rnd 21. (8sc, dec) x 6 (54)
Rnd 22. (7sc, dec) x 6 (48)
Rnd 23. (6sc, dec) x 6 (42)
Rnd 24. (5sc, dec) x 6 (36)
Rnd 25. (4sc, dec) x 6 (30)
Rnd 26. (3sc, dec) x 6 (24)
Rnd 27. (2sc, dec) x 6 (18)
Fasten off and cut yarn long for sewing. Fill the head with stuffing.
Ears (x2)
Rnd 1. 6sc in MR (6)
Rnd 2. inc x 6 (12)
Rnd 3. (1sc, inc) x 6 (18)
Rnd 4. (2sc, inc) x 6 (24)
Rnd 5-7. 24sc (3 rounds) (24)
Fasten off and cut yarn long for sewing. Fold the ear together to form a half-round and sew to the head.
Body
Rnd 1. 6sc in MR (6)
Rnd 2. inc x 6 (12)
Rnd 3. (1sc, inc) x 6 (18)
Rnd 4. (2sc, inc) x 6 (24)
Rnd 5. (3sc, inc) x 6 (30)
Rnd 6. (4sc, inc) x 6 (36)
Rnd 7. (5sc, inc) x 6 (42)
Rnd 8. (6sc, inc) x 6 (48)
Rnd 9-15. 48sc (48)
Rnd 16. (6sc, dec) x 6 (42)
Rnd 17. 42sc (42)
Rnd 18. (5sc, dec) x 6 (36)
Rnd 19. 36sc (36)
Rnd 20. (4sc, dec) x 6 (30)
Rnd 21. 30sc (30)
Rnd 22. (3sc, dec) x 6 (24)
Rnd 23. 24sc (24)
Rnd 24. (2sc, dec) x 6 (18)
Rnd 25. 18sc (18)
Fasten off and cut yarn long for sewing. Fill the body with fiber fill and sew to the head.
Arms (x2)
Rnd 1. 6sc in MR (6)
Rnd 2. inc x 6 (12)
Rnd 3. (1sc, inc) x 6 (18)
Rnd 4. 18sc (18)
Rnd 5. (1sc, dec) x 6 (12)
Rnd 6-9. 12sc (4 rounds) (12)
Rnd 10. dec x 6 (6)
Fasten off and cut yarn long for sewing. Sew to the body.
Legs (x2)
Rnd 1. 6sc in MR (6)
Rnd 2. inc x 6 (12)
Rnd 3. (3sc, 3 inc) x 2 (18)
Rnd 4. 3sc, (inc, 1sc) x 3, 3sc, (inc, 1sc) x 3 (24)
Rnd 5. 4sc, (inc, 2sc) x 3, 3sc, (inc, 2sc) x 2, inc, 1sc (30)
Rnd 6-7. 30sc (30)
Rnd 8. (3sc, dec) x 6 (24)
Rnd 9. (2sc, dec) x 6 (18)
Fasten off and cut yarn long for sewing. Fill with fiber fill and sew to the body.
Note: If you pin the legs to the body first, you can arrange them so the bear can sit on its own.
Garland
Triangles (crochet in rows)
Rnd 1. ch 10, 9sc (9)
Rnd 2. dec, 7sc (8)
Rnd 3. dec, 6sc (7)
Rnd 4. dec, 5sc (6)
Rnd 5. dec, 4sc (5)
Rnd 6. dec, 3sc (4)
Rnd 7. dec, 2sc (3)
Rnd 8. dec, 1sc (2)
Rnd 9. dec (1)
Ch 20, (9sc in triangle, ch5)
Repeat for all triangles, ch 20
Finishing & Tips
Use safety eyes and secure them according to the manufacturer's instructions. Pin pieces in place before sewing to check positioning. Sew parts firmly with a yarn needle and weave in ends neatly. Stuff pieces firmly but not overstuffed to keep the shape. Optionally embroider facial features (nose, mouth) with black or brown thread.