

Coco the Cow Amigurumi Crochet Pattern — Easy Step-by-Step Guide
Coco the Cow is an adorable amigurumi crochet pattern that brings a touch of whimsy to any handmade collection. This small plush uses simple amigurumi techniques (magic ring, single crochet, increases and decreases) and is ideal for crocheters who want a quick, satisfying project. The pattern below includes stitch abbreviations, materials, step-by-step rounds for each piece, and assembly instructions.
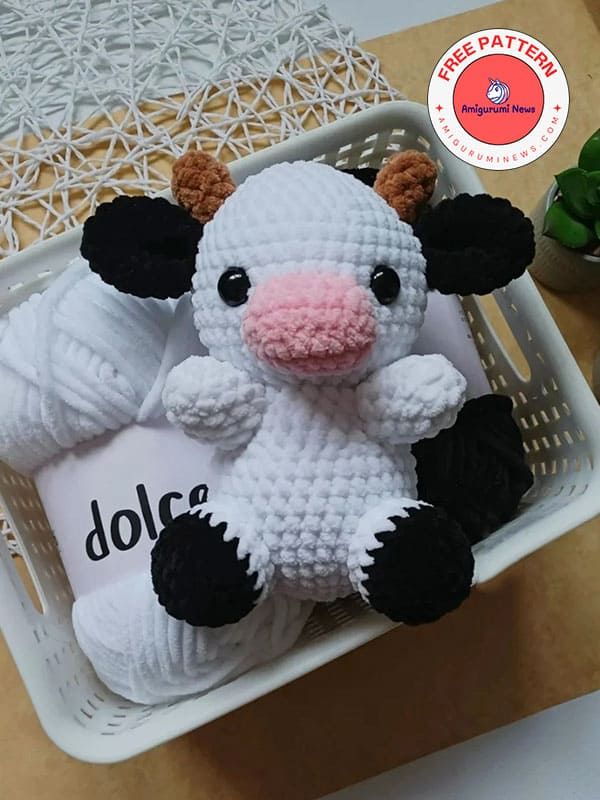
Abbreviations:
MR — magic ring
SC — single crochet
INC — increase
DEC — decrease
FO — fasten off
SLST — slip stitch
Materials:
Yarn (I used himalaya dolphin baby)
Crochet hook (I used 4.5mm)
Polyfill
Scissors
Yarn needle
Stitch marker
Safety eyes
Notes
Use a stitch marker to mark the beginning of rounds. Insert safety eyes before closing the head as instructed. When stuffing, add small amounts of fiberfill gradually to keep a smooth shape. Leave long tails where indicated for sewing pieces together.
Head
In body color:
R1. 6 sc in a MR
R2. 6 inc (12)
R3. (sc,inc)x6 (18)
R4. (2sc,inc)x6 (24)
R5. (3sc,inc)x6 (30)
R6. (4sc,inc)x6 (36)
R7. (5sc,inc)x6 (42)
R8-14. 42 sc *7 rounds*
R15. (5sc,dec)x6 (36)
R16. (4sc,dec)x6 (30)
R17. (3sc,dec)x6 (24)
Slst and fasten off, stuff.
Place safety eyes between R11 and R12 about 7 visible stitches apart.
Body
In body color.
R1. 6 sc in a MR
R2. 6 inc (12)
R3. (sc,inc)x6 (18)
R4. (2sc,inc)x6 (24)
R5. (3sc,inc)x6 (30)
R6. (4sc,inc)x6 (36)
R7-12. 36 sc *6 rounds*
R13. (4sc,dec)x6 (30)
R14-15. 30 sc *2 rounds*
R16. (3sc,dec)x6 (24)
R17. 24 sc
Slst and fasten off, stuff. Leave a long tail for sewing.
Arms X2
In body color.
R1. 5 sc in a MR
R2. 5 inc (10)
R3-6. 10 sc *4 rounds*
Slst and fasten off, stuff. Leave a long tail for sewing.
Leg X2
Start with second color.
R1. 6 sc in a MR
R2. 6 inc (12)
R3. (sc,inc)x6 (18)
R4-5. 18 sc *2 rounds*
Change to body color.
R6. 18 sc
R7. (4sc,dec)x3 (15)
Slst and fasten off.
Stuffing.
Leave a long tail for sewing.
Now we move on to the small details.
Ear X2
In second color.
R1. 6 sc in a MR
R2. (sc,inc)x3 (9)
R3. (2sc,inc)x3 (12)
R4. (3sc,inc)x3 (15)
R5-7. 15 sc *3 rounds*
Don’t stuff. Fold the top of the ear flat and sc through both sides.
Connect first and last stitch to form an ear shape. Leave a long tail for sewing.
I used a different color here to show you, because it’s hard to see on this color.
Muzzle
In pink.
Make a slip knot and ch 7.
R1. Start from the 2nd ch from hook: 5sc, inc, now on the other side of ch: inc, 4sc, inc (15)
R2. inc, 4sc, inc, sc, inc, 5sc, inc, sc (19)
R3-4. 19 sc *2 rounds*
Slst and fasten off, stuff. Leave a long tail for sewing.
Horn X2
In brown.
R1. 6 sc in a MR
R2-4. 6 sc *3 rounds*
Slst and fasten off, stuff. Leave a long tail for sewing.
Assembly
1. First sew head to the body stitch by stitch. Add a little more polyfill at the end for better support.
2. Arms: sew them right under the head, R14-17, 6 visible stitches apart.
3. Legs: sew them between R5-9, 7 visible stitches apart.
4. Muzzle: between R12-15.
5. Ears: between R9-10, I like sewing them 3 stitches behind the eyes.
6. Sew horns between R6-7 just above the ears.
Finishing Tips
Weave in all tails neatly and secure knots on the inside. If desired, embroider nostrils or spots with yarn for extra character. Check that safety eyes are firmly attached, especially if gifting to a child—consider using embroidered eyes for very young children.
Personalization
Change colors for a different look (spotted, pastel, or contrasting muzzle). You can also add a small crochet bow or scarf to personalize Coco.