

Adorable Kawaii Cow–Carrot Amigurumi — Step-by-Step Crochet Pattern
Create an adorable Kawaii Cow–Carrot Amigurumi with this step-by-step crochet pattern. This whimsical mash-up of a cow and a carrot makes a charming handmade gift or a cheerful desk companion. Below you’ll find notes, abbreviations, materials tips and the full pattern for each part.
Crochet Cow Carrot Kawaii Amigurumi creations are an adorable and whimsical way to add a touch of cuteness to your life! These handmade pieces are bursting with charm and are sure to bring a smile to your face. The combination of a cow, a carrot, and the kawaii aesthetic creates a unique and delightful character that is perfect for anyone who appreciates handmade crafts. Whether you display them on your desk or give them as a thoughtful gift, these amigurumi creations are bound to brighten up your day!
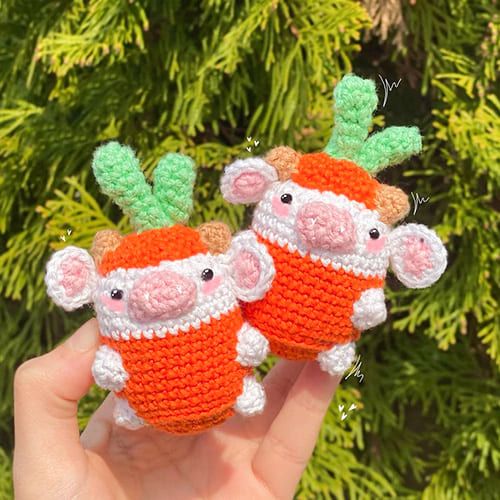
Finished kawaii crochet cow-carrot amigurumi showing the carrot-body and cow features.
Notes
- Instead of regular decreases, I tend to use invisible decreases when I create a plush. I recommend that you use the method of your preference, it will not change the outcome of the work.
- Invisible decrease = an alternative method of decreasing, which makes your decrease stitches more even.
- It’s very important to count your stitches!
- It’s a good idea to make the nose, the horns and the ears first, so you can sew them on before closing the plush.
- Cotton filling.
- Black plastic safety eyes.
- Crochet hook in size 3mm / 2mm.
- Stitch marker.
- 6mm plush yarn / 2mm cotton yarn.
Abbreviations
sc — single crochet
ch — chain
st — stitch
inc — increase (crochet two sc in one st)
dec — decrease (crochet two sts into one)
FLO — Front loop only
BLO — Back loop only
slst — slip stitch
(pattern) x times – the pattern written in parenthesis has to be repeated x times
Body
Rnd 1. Start with orange Magic Ring: 6sc (6)
Rnd 2. 6 inc (12)
Rnd 3. (sc, inc) 6 times (18)
Rnd 4. (2sc, inc) 6 times (24)
Rnd 5. (3sc, inc) 6 times (30)
Rnd 6. (4sc, inc) 6 times (36)
Rnd 7. Work 36sc into the BLO (36)
Rnd 8. Switch back to regular sc (not BLO): 36sc (36)
Rnd 9. 36sc (36)
Rnd 10. 36sc (36)
Rnd 11. 36sc (36)
Rnd 12. 36sc (36)
Rnd 13. 36sc (36) (6 rounds in total)
Rnd 14. Change to color white: 36sc (36)
Rnd 15. 36sc (36)
Rnd 16. 36sc (36)
Rnd 17. 36sc (36) (4 rounds in total)
Rnd 18. (4sc, dec) 6 times (30)
Don’t forget to insert the eyes between rows 17 and 18 about 9 sts away from each other and you can also add blush! Stuff the body!
Rnd 19. (3sc, dec) 6 times (24)
Rnd 20. (2sc, dec) 6 times (18)
Rnd 21. (sc, dec) 6 times (12)
Rnd 22. 6 dec (6)
Stuff the body completely and finish it off.
Leaf (make 3/2 with color green)
Rnd 1. To make the smaller leaves: Magic Ring: 3sc (3)
Rnd 2. 3 inc (6)
Rnd 3. 6sc (6)
Rnd 4. 6sc (6)
Rnd 5. 3 dec (3)
Rnd 6. 3sc (3)
Rnd 7. 3sc (3)
Stuff it lightly, finish it off and leave a long tail so later you can sew it on the plush.
To make the bigger leaf, repeat the previous pattern, but at the end (after row 7) crochet 3 more rounds of 3sc.
Carrot Cap
Rnd 1. With color orange: Magic Ring: 6sc (6)
Rnd 2. 6 inc (12)
Rnd 3. (sc, inc) 6 times (18)
Rnd 4. (2sc, inc) 6 times (24)
Rnd 5. (3sc, inc) 6 times (30)
Secure your yarn with a slst and leave a very long tail. Sew it on the top of the head.
Nose
(With color pink)
Rnd 1. Chain 5 (loop on the hook doesn’t count as a stitch)
• Work 1sc into the 2nd, 3rd and 4th sts
• Work 3sc into the 5th (last) sts
• Rotate your work so you can crochet on the bottom of the foundation chain: work 1sc into the 1st, 2nd and 3rd st
• Work 3sc into the last stitch (12)
Rnd 2. (3sc, 3 inc) 2 times (18)
Finish it off and leave a very long tail.
Ears (x2)
Rnd 1. Chain 2 with color pink.
Rnd 2. Work 6sc into the second st/chain from the hook then fasten off. Repeat this pattern with color white but instead of fastening it off, press the 2 pieces together, and crochet them together with 6 inc using color white.
Finish off your work and leave a long string of yarn so you can sew it on the plush in the line of the eyes, about 2-3 sts to the left/right.
Horns (x2)
With color brown
Rnd 1. Magic Ring: 3sc (3)
Rnd 2. 3 inc (6)
Rnd 3. 6sc (6)
Finish it off and leave a string of yarn. Sew the horns on the head above the ears.
Legs (x4)
With color white
To make the legs, use the same pattern as for creating the horns. Stuff the legs and sew them on, in the line of the eyes approx. 6-7 sts below. There are 4-5 sts between the two front legs and 5-6 sts between the back legs.