

Adorable Crochet Sloth: Easy Amigurumi Pattern & Step-by-Step Instructions
Make an adorable amigurumi sloth with this easy-to-follow pattern. The finished sloth is about 5 inches tall and is worked from the bottom up in continuous rounds. You'll need medium-weight yarn in brown, beige and a little black, a 4.0 mm crochet hook (or a hook that suits your yarn), stuffing, stitch markers and a yarn/embroidery needle. This pattern uses basic single crochet in rounds, a magic ring and invisible decreases.
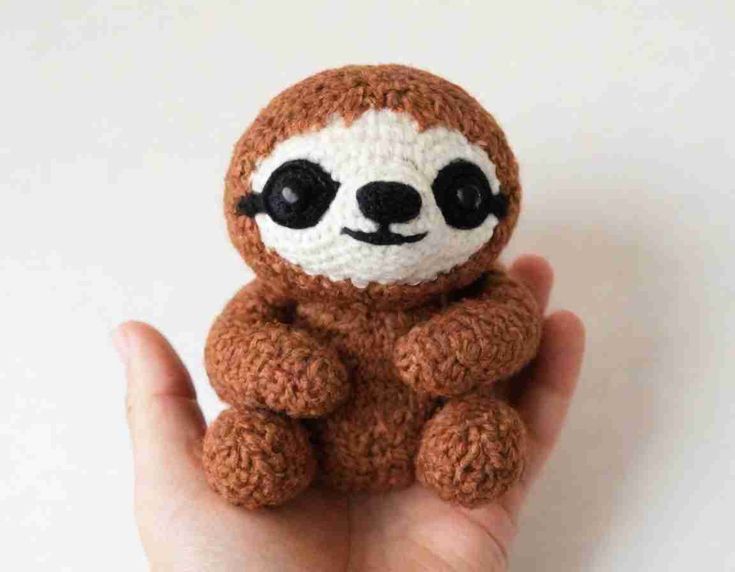
Finished crocheted sloth amigurumi in brown and beige — approximately 5 inches tall.
Materials:
- Yarn: Choose your favorite colors. I used a medium-weight yarn in brown, beige, and a little black for the eyes.
- Crochet Hook: I used a 4.0 mm hook, but you can adjust this depending on your yarn weight.
- Stuffing: Polyester fiberfill works great.
- Stitch Markers: These are super helpful for keeping track of your rounds.
- Embroidery Needle: For weaving in those ends.
Abbreviations (US Terms)
Here’s a quick guide to the abbreviations I’ll be using:
- ch: chain
- sc: single crochet
- inc: increase (2 sc in the same stitch)
- dec: decrease (sc 2 stitches together)
- sl st: slip stitch
- st(s): stitch(es)
Special Stitches
No need to worry about fancy stitches here. We’re keeping it simple!
- Magic Ring: This is the best way to start a round project. If you’re new to it, there are lots of great tutorials online.
- Invisible Decrease: This helps keep your stitches nice and tight. Again, plenty of tutorials out there if you need help.
Finished Size
Your sloth should end up around 5 inches tall, but this can vary based on your yarn and hook size.
Gauge
Gauge isn’t super important for this project. Just make sure your stitches are tight enough so the stuffing doesn’t show through.
Notes
- Work in continuous rounds unless otherwise stated.
- Use a stitch marker to keep track of the beginning of each round.
- The pattern is worked from the bottom up.
Pattern Instructions
Sloth (starting with main color)
Legs (make 2):
- Round 1: Make a magic ring, 6 sc in ring. (6 sts)
- Round 2: Inc in each st around. (12 sts)
- Round 3: Sc around. (12 sts)
- Rounds 4-7: Repeat Round 3.
- Fasten off and make another leg. Do not fasten off the second leg; you’ll continue to the body.
Body:
- Round 8: Join the second leg with a sc to the first leg. Sc around the first leg. When you reach the joining point, sc into the join again, then continue sc around the second leg. (24 sts)
- Rounds 9-12: Sc around. (24 sts)
- Round 13: (Sc in next 2 sts, dec) around. (18 sts)
- Round 14: Sc around. (18 sts)
- Round 15: (Sc in next st, dec) around. (12 sts)
- Rounds 16-20: Sc around. (12 sts)
- Stuff the body firmly.
Arms (make 2):
- Round 1: Make a magic ring, 6 sc in ring. (6 sts)
- Rounds 2-5: Sc around. (6 sts)
- Round 6: Flatten the arm and sc through both layers to close. (3 sts)
- Fasten off, leaving a long tail for attaching.
Head:
- Round 1: Make a magic ring, 6 sc in ring. (6 sts)
- Round 2: Inc in each st around. (12 sts)
- Round 3: (Sc in next st, inc) around. (18 sts)
- Rounds 4-8: Sc around. (18 sts)
- Round 9: (Sc in next st, dec) around. (12 sts)
- Round 10: (Sc in next 2 sts, dec) around. (9 sts)
- Stuff the head firmly.
- Round 11: Dec around. (6 sts)
- Fasten off, leaving a long tail for closing.
Finishing
- Eyes:
- Use black yarn to embroider sleepy eyes or safety eyes if you prefer.
- Face Markings:
- Use beige yarn to stitch a small oval around the eyes. This gives your sloth its characteristic look.
- Assembly:
- Attach the head to the body using the long tail and your embroidery needle. Make sure it’s secure.
- Sew the arms to the sides of the body.
And there you have it!
Finishing tips: Weave in all loose ends neatly and hide knots inside the body. If using safety eyes, insert them before closing the head. Stuff firmly but not overpacked so the toy keeps a soft, cuddly feel. For cleaning, spot clean with a damp cloth and mild soap as needed.