

Make an Adorable Crochet Seal — Full Amigurumi Pattern & Step-by-Step Guide
This step-by-step amigurumi pattern shows how to crochet a charming seal—perfect for gift-making or adding a cuddly companion to your collection. The pattern below includes a full materials list, round-by-round instructions for each part (head, body, back, tail, fins, nose, hat, sweater and accessories), and finishing tips to help you assemble a neat, balanced toy.
Crocheting a beautiful seal can be such a fun and rewarding project! The soft yarn and cute design make it a delightful addition to anyone's collection. With a little bit of patience and creativity, you can bring this adorable aquatic creature to life with your own hands. Whether you're making it as a gift for a friend or simply to add some charm to your space, the process of crafting this lovely seal is sure to bring a smile to your face. So grab your crochet hook, pick out some cozy yarn, and get ready to dive into this charming project!
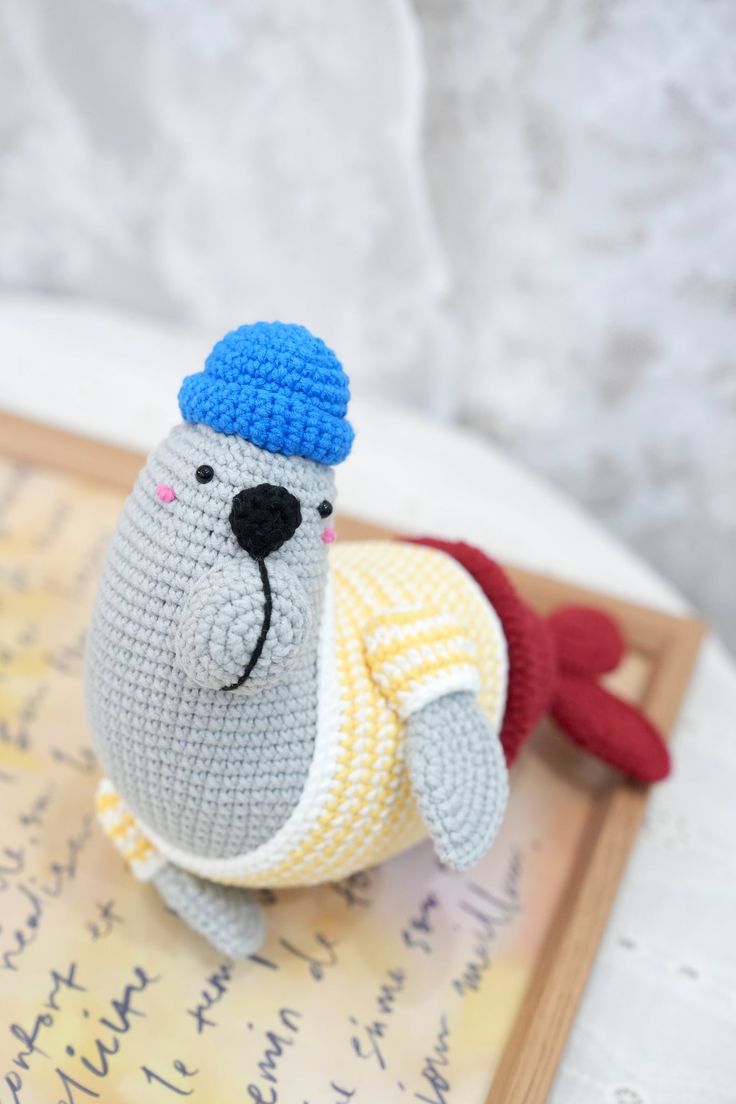
Materials Needed:
- Yarn– Loopara 5ply combed cotton (Green 01, Pink 20, Red 26, Yellow 29, Blue 43 and Grey 56)
- Hook- 3.0mm
- Fiber fill
- Yarn needle
- Eyeball
- Positioning pin
- Scissors
- Tweezers
How to Crochet the Head and Body
- R1: Magic ring, 6 sc in ring, sl.
- R2: Ch 1, 6 sc inc, sl.
- R3: Ch 1, (sc, sc inc) 6 times, sl.
- R4: Ch 1, sc, sc inc, (2 sc, sc inc) 5 times, sc, sl.
- R5: Ch 1, (3 sc, sc inc) 6 times, sl.
- R6: Ch 1, 2 sc, sc inc, (4 sc, sc inc) 5 times, 2 sc, sl.
- R7: Ch 1, (5 sc, sc inc) 6 times, sl.
- R8: Ch 1, 3 sc, sc inc, (6 sc, sc inc) 5 times, 3 sc, sl.
- R9: Ch 1, (7 sc, sc inc) 6 times, sl.
- R10: Ch 1, 4 sc, sc inc, (8 sc, sc inc) 5 times, 4 sc, sl.
- R11: Ch 1, (9 sc, sc inc) 6 times, sl.
- R12-13: Ch 1, 66 sc, sl.
- R14: Ch 1, 5 sc, sc inc, (10 sc, sc inc) 5 times, 5 sc, sl.
- R15: Ch 1, (11 sc, sc inc) 6 times, sl.
- R16: Ch 1, 6 sc, sc inc, (12 sc, sc inc) 5 times, 6 sc, sl.
- R17-18: Ch 1, 84 sc, sl.
- R19: Ch 1, (13 sc, sc inc) 6 times, sl.
- R20-24: Ch 1, 90 sc, sl.
- R25: Ch 1, 7 sc, sc inc, (14 sc, sc inc) 5 times, 7 sc, sl.
- R26-29: Ch 1, 96 sc, sl.
- R30: Ch 1, 42 sc, sl.
- R31-33: Ch 1, 42 sc, sl.
- R34: Ch 1, (5 sc, sc2tog) 6 times, sl.
- R35-38: Ch 1, 36 sc, sl.
- R39: Ch 1, 2 sc, sc2tog, (4 sc, sc2tog) 5 times, 2 sc, sl.
- R40: Ch 1, (3 sc, sc2tog) 6 times, sl.
- R41: Ch 1, sc, sc2tog, (2 sc, sc2tog) 5 times, sc, sl.
- R42: Ch 1, (sc, sc2tog) 6 times, sl.
- R43: Ch 1, 6 sc2tog, sl, leave tail for closing.
How to Crochet the Back
- R1: Ch 1, (7 sc, sc2tog) 6 times, sl.
- R2: Ch 1, 3 sc, sc2tog, (6 sc, sc2tog) 5 times, 3 sc, sl.
- R3: Ch 1, (5 sc, sc2tog) 6 times, sl.
- R4: Ch 1, 2 sc, sc2tog, (4 sc, sc2tog) 5 times, 2 sc, sl.
- R5: Ch 1, (3 sc, sc2tog) 6 times, sl.
- R6: Ch 1, sc, sc2tog, (2 sc, sc2tog) 5 times, sc, sl.
- R7: Ch 1, (sc, sc2tog) 6 times, sl.
- R8: Ch 1, 6 sc2tog, sl, fasten off, close opening.
How to Crochet the Sweater
- R1: Ch 66, join with sl to form ring, 66 sc, change color in last sc, sl.
- R2-R6: Ch, 66 sc, change color in last sc, sl.
- R7: Ch, (10 sc, sc inc) 6 times, change color in last sc, sl.
- R8-R10: Ch, 72 sc, change color in last sc, sl.
- R11: Ch, (10 sc, sc2tog) 6 times, change color in last sc, sl.
- R12-R16: Ch, 66 sc, change color in last sc, sl.
- R17: Ch, (9 sc, sc2tog) 6 times, change color in last sc, sl.
- R18-R19: Ch, 60 sc, change color in last sc, fasten off, weave in ends.
- R20: Change color. Work 66 sl st in r1, fasten off, weave in ends
How to Crochet the Tail
- R1: Magic ring, ch, 6 sc in ring, sl.
- R2: Ch, 6 sc inc, sl.
- R3: Ch, (sc, sc inc) 6 times, sl.
- R4: Ch, 18 sc, sl.
- R5: Ch, sc, sc inc, (2 sc, sc inc) 5 times, sc, sl.
- R6: Ch, (3 sc, sc inc) 6 times, sl.
- R7: Ch, 2 sc, sc inc, (4 sc, sc inc) 5 times, 2 sc, sl.
- R8: Ch, (5 sc, sc inc) 6 times, sl.
- R9: Ch, 42 sc, sl.
- R10: Ch, 3 sc, sc inc, (6 sc, sc inc) 5 times, 3 sc, sl.
- R11: Ch, 48 sc, sl.
- R12: Ch, (7 sc, sc inc) 6 times, sl.
- R13: Ch, 54 sc, sl.
- R14: Ch, 4 sc, sc inc, (8 sc, sc inc) 5 times, 4 sc, sl.
- R15: Ch, 60 sc, sl.
- R16: Ch, (9 sc, sc inc) 6 times, sl.
- R17: Ch, FLO 66 sc, sl.
- R18: Ch, sl, ch, sc around counterclockwise, sl.
How to Crochet the Tail Fin (Make 2)
- R1: Magic ring, ch, 6 sc in ring, sl.
- R2: Ch, 6 sc inc, sl.
- R3: Ch, (sc, sc inc) 6 times, sl.
- R4: Ch, sc, sc inc, (2 sc, sc inc) 5 times, sc, sl.
- R5: Ch, 24 sc, sl.
- R6: Ch, (sc, sc inc) 12 times, sl.
- R7: Fold edges together, 18 sc to close, fasten off leaving long tail for sewing to tail at r1.
How to Crochet the Nose and Mouth
- R1: Magic ring, ch, 6 sc in ring, sl.
- R2: Ch, 6 sc inc, sl.
- R3: Ch, (sc, sc inc) 6 times, sl.
- R4: Ch, sc, sc inc, (2 sc, sc inc) 5 times, sc, sl.
- R5-R6: Ch, 24 sc, sl, cstuff with fiberfill.
How to Crochet the Nose Tip
- R1: Magic ring, ch, 6 sc in ring, sl.
- R2: Ch, (sc, sc inc) 3 times, sl.
- R3: Ch, 9 sc, sl, leave long tail for sewing. Embroider vertical line with black yarn at center of nose/mouth area
How to Crochet the Hat
- R1: Magic ring, ch, 6 sc in ring, sl.
- R2: Ch, 6 sc inc, sl.
- R3: Ch, (sc, sc inc) 6 times, sl.
- R4: Ch, sc, sc inc, (2 sc, sc inc) 5 times, sc, sl.
- R5: Ch, (3 sc, sc inc) 6 times, sl.
- R6-13: Ch, 30 sc, sl, fasten off, weave in ends. Turn r6-13 inside out and sew together, stuff with fiberfill, sew to top of head. Embroider pink cheeks below eyes.
How to Crochet the Pectoral Fins (Make 2)
- R1: Magic ring, ch, 6 sc, sl.
- R2: Ch, 6 sc inc, sl.
- R3: Ch, (sc, sc inc) 6 times, sl.
- R4: Ch, sc, sc inc, (2 sc, sc inc) 5 times, sc, sl.
- R5: Ch, 24 sc, sl.
- R6: Ch, (sc, sc inc) 12 times, sl.
- R7: Fold and sc 18 around edge to close, fasten off, weave in ends.
How to Crochet the Sleeve (Make 2)
- R1: Magic ring, ch, 6 sc, change color in last sc, sl.
- R2: Ch, 6 sc inc, change color in last sc, sl.
- R3: Ch, (sc, sc inc) 6 times, change color in last sc, sl.
- R4-R6: Ch, 18 sc, change color in last sc, sl.
- R7: Ch, (4 sc, sc2tog) 3 times, change color in last sc, sl.
- R8: Ch, 15 sc, change color in last sc, sl.
- R9: Ch, 15 sc, fasten off, weave in ends.
Crochet Seal Assembly
- Sew sleeves to fins.
- Secure with pins for body balance.
- Seam pieces together.
Crochet Tips:
Always stuff the body and head firmly as you go, especially in the neck area, to help maintain the seal's shape and prevent wobbling. Keep consistent tension throughout to ensure pieces fit together neatly.
Assembly Tips:
Use the same color thread as your yarn when sewing parts together for invisible seams. Use positioning pins to check balance and placement before permanently sewing pieces in place.