

Crochet a Charming Whale: Step‑by‑Step Pattern, Materials & Assembly Tips
Create a delightful crocheted whale with this clear, step‑by‑step pattern. Suitable for confident beginners and intermediate crocheters, the project uses 5‑ply combed cotton and a 2.8mm hook to make a soft, whimsical toy with a water spout, side fins, and pink cheeks. Follow the rounds below for the main body, tails, spout, fins and cheeks, then assemble and add finishing details for a polished result.
This pattern includes a full materials list, detailed round‑by‑round instructions, and assembly tips to help you position eyes, cheeks and the water spout so your whale looks playful and well‑balanced.
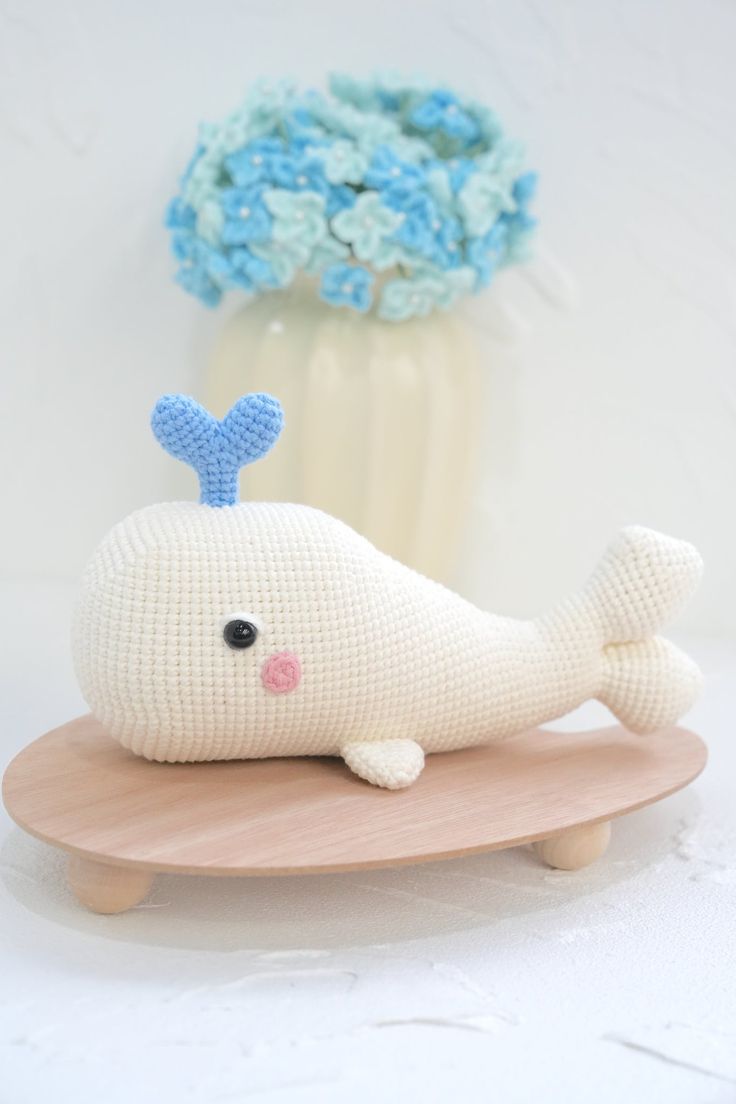
Finished crocheted whale made in blue and white, with pink cheeks and a playful water spout.
Alt: Blue and white crocheted whale toy with pink cheeks and a small water spout.
Materials Needed:
- Yarn – Loopara 5ply combed cotton (Pink 17, Blue 41 and White 61)
- Hook – 2.8mm
- Scissors
- Tweezers
- Fiber fill
- Safety eyes (eyeballs)
- Yarn needle
- Stitch marker
- Hot melt adhesive
- Positioning pin
How to Crochet the Main Body (Make 1)
- R1: Ch 12, sc inc in 2nd ch from hook, 9 sc, 3 sc in next st, 10 sc, sl.
- R2: Ch, 2 sc inc, 9 sc, 3 sc inc, 9 sc, sc inc, sl.
- R3: Ch, (sc, sc inc) 2 times, 9 sc, (sc, sc inc) 3 times, 10 sc, sc inc, sl.
- R4: Ch, (2 sc, sc inc) 2 times, 9 sc, (2 sc, sc inc) 3 times, 11 sc, sc inc, sl.
- R5: Ch, (3 sc, sc inc) 2 times, 9 sc, (3 sc, sc inc) 3 times, 12 sc, sc inc, sl.
- R6: Ch, (4 sc, sc inc) 2 times, 9 sc, (4 sc, sc inc) 3 times, 13 sc, sc inc, sl.
- R7: Ch, (5 sc, sc inc) 2 times, 9 sc, (5 sc, sc inc) 3 times, 14 sc, sc inc, sl.
- R8: Ch, (6 sc, sc inc) 2 times, 9 sc, (6 sc, sc inc) 3 times, 15 sc, sc inc, sl.
- R9: Ch, (7 sc, sc inc) 2 times, 9 sc, (7 sc, sc inc) 3 times, 16 sc, sc inc, sl.
- R10-29: Ch, 72 sc, sl.
- R30: Ch, 28 sc, (2 sc, sc2tog) 6 times, 20 sc, sl.
- R31-32: Ch, 66 sc, sl.
- R33: Ch, 28 sc, (sc2tog, sc) 6 times, 20 sc, sl.
- R34-35: Ch, 60 sc, sl.
- R36: Ch, 28 sc, 6 sc2tog, 20 sc, sl.
- R37-38: Ch, 54 sc, sl.
- R39: Ch, 28 sc, 3 sc2tog, 20 sc, sl.
- R40: Ch, 51 sc, sl.
- R41: Ch, 26 sc, 3 sc2tog, 19 sc, sl.
- R42: Ch, 48 sc, sl.
- R43: Ch, 25 sc, 3 sc2tog, 17 sc, sl (stuff with fiberfill as you go).
- R44: Ch, 45 sc, sl.
- R45: Ch, 24 sc, 3 sc2tog, 15 sc, sl.
- R46: Ch, 42 sc, sl.
- R47: Ch, 22 sc, 3 sc2tog, 14 sc, sl.
- R48: Ch, 39 sc, sl.
- R49: Ch, 21 sc, 3 sc2tog, 12 sc, sl.
- R50-51: Ch, 36 sc, sl.
- R52: Ch, (4 sc, sc2tog) 6 times, sl.
- R53-54: Ch, 30 sc, sl.
- R55: Ch, 3 sc, 2 sc inc, 12 sc, 2 sc2tog, 9 sc, sl.
- R56: Ch, 30 sc, sl.
- R57: Ch, 4 sc, 2 sc2tog, 11 sc, (sc, sc inc) 2 times, 7 sc, sl.
- R58: Ch, 30 sc, sl.
- R59: Ch, 3 sc, 2 sc2tog, 10 sc, (2 sc, sc inc) 2 times, 7 sc, sl.
- R60: Ch, 30 sc, sl.
- R61: Ch, 3 sc, 2 sc2tog, 9 sc, sc inc, 6 sc, sc inc, 6 sc, sl.
- R62: Ch, 30 sc, sl. (Divide the 30 stitches into two parts of 15 stitches each for working the tails)
How to Crochet the Tail (Make 2)
- R1: With white, ch, 15 sc, sl.
- R2: Ch, 2 sc, sc inc, (4 sc, sc inc) 2 times, 2 sc, sl.
- R3: Ch, (5 sc, sc inc) 3 times, sl.
- R4: Ch, 3 sc, sc inc, (6 sc, sc inc) 2 times, 3 sc, sl.
- R5: Ch, 10 sc, 3 sc inc, 11 sc, sl.
- R6: Ch, 27 sc, sl.
- R7: Ch, 11 sc, 3 hdc inc, 13 sc, sl.
- R8: Ch, 11 sc, 6 hdc, 13 sc, sl.
- R9: Ch, 4 sc, sc2tog, (8 sc, sc2tog) 2 times, 4 sc, sl.
- R10:Ch, (7 sc, sc2tog) 3 times, sl.
- R11: Ch, sc2tog, 3 sc, (6 sc, sc2tog) 2 times, 3 sc, sl.
- R12:Ch, (5 sc, sc2tog) 3 times, sl.
- R13: Ch, 2 sc, sc2tog, (4 sc, sc2tog) 2 times, 2 sc, sl.
- R14: Ch, (3 sc, sc2tog) 3 times, sl.
- R15: Ch, (2 sc, sc2tog) 3 times, sl, stuff with fiberfill, fasten off, close opening, weave in ends.
- Tail 2: Follow the same instructions as Tail 1, but work into different insertion points.
How to Crochet the Water Spout (Make 1)
- R1: With blue, magic ring, ch, 6 sc, sl.
- R2: Ch, 6 sc inc, sl.
- R3-5: Ch, 12 sc, sl, fasten off spout 1, continue with spout 2.
- R6: Ch, 12 sc (spout 1), 12 sc (spout 2), sl.
- R7: Ch, (sc, sc2tog) 8 times, sl.
- R8: Ch, (2 sc, sc2tog) 4 times, sl.
- R9: Ch, (2 sc, sc2tog) 3 times, sl.
- R10-12: Ch, 9 sc, sl, fasten off leaving long tail.
How to Crochet the Side Fins (Make 2)
- R1: With white, magic ring, ch, 6 sc, sl.
- R2: Ch, (sc, sc inc) 3 times, sl.
- R3: Ch, (2 sc, sc inc) 3 times, sl.
- R4: Ch, (3 sc, sc inc) 3 times, sl.
- R5: Ch, (4 sc, sc inc) 3 times, sl.
- R6: Ch, 18 sc, sl.
- R7: Ch, (4 sc, sc2tog) 3 times, sl, fasten off leaving long tail.
How to Crochet the Cheeks (Make 2)
- R1: With pink, magic ring, ch, 8 sc, sl, fasten off leaving long tail.
Crochet Whale Assembly
- Attach the water spout between Rounds 16 and 20 of the head. Use whip stitch to sew through both the whale's head and water spout stitches, adjusting the position as you go. After securing, weave ends inside the head for a clean, sturdy finish.
- Sew the side fins between Rounds 28 and 37 of the body. After attaching each fin, bring the threads to the back of the head, tie several secure knots, and weave the ends into the head.
- Place and attach the safety eyes between Rounds 16 and 17 of the main body.
- Position the pink cheeks between Rounds 19 and 22, one stitch below the eyes.
- Using white thread, embroider detail lines above the eyes.
Quick Crochet Tips:
- Keep your tension consistent and mark the beginning of each round with a stitch marker. This helps maintain the whale's smooth shape and makes it easier to track your progress as you work.
- Stuff gradually as you close the head to avoid lumps — add small amounts of fiberfill and shape as you go.
Assembly Tips:
- Pin pieces in place before sewing to check symmetry and spacing.
- Take your time positioning the water spout — a little adjustment can change the toy's expression dramatically.
- Weave in all ends securely and hide knots inside the body to keep the finish tidy and safe for gifting.