


Crochet Matcha — Free Pattern to Make an Adorable Little Snake Toy
Make Matcha the Little Snake Toy with this easy-to-follow crochet pattern. Matcha is a small, cuddly amigurumi snake worked in rounds with simple increases and decreases, finished with safety eyes, a curled tail, and a tiny red tongue. The pattern below includes abbreviation key, materials list, step-by-step rounds for the head/body, tail and tongue, plus assembly notes.
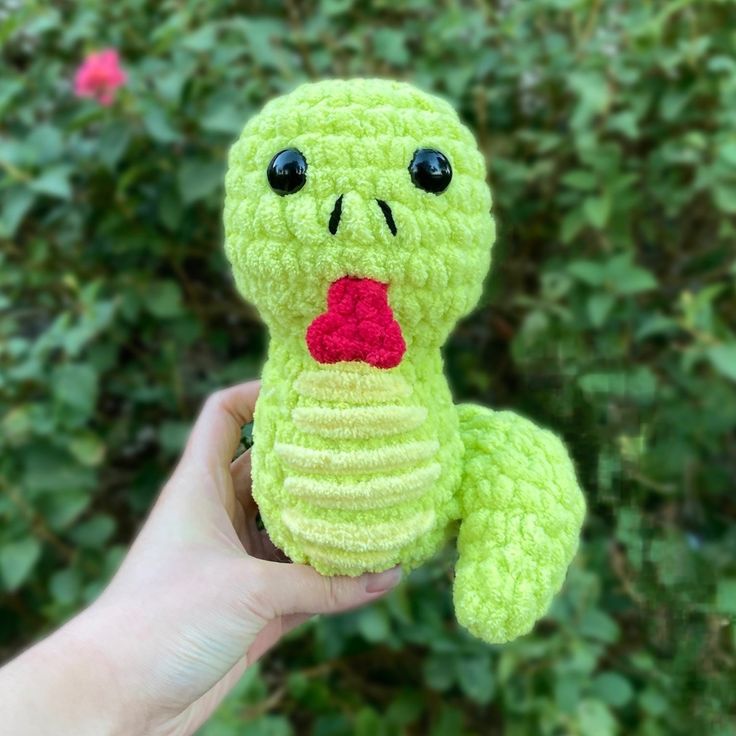
Caption: Matcha the Little Snake — crocheted in green with yellow belly stripes and a red tongue.
Skills and Abbreviations (In U.S. terms)
- MR = Magic Ring (Magic Circle)
- SC = Single Crochet
- SL ST = Slip Stitch
- HDC = Half Double Crochet
- CH = Chain
- INC = Increase
- DEC = Decrease
- FO = Fasten off
- R = Round
- Slip Knot
- Turn
Recommended Materials:
(Based on what was used to make the snake in the sample photo.)
- Super Bulky Weight Yarn (#6) in Green, Yellow, and Red (or colors of your choice)
- Worsted Weight Yarn (#4) in Black (for the nostril detailing)
- 6 mm Crochet Hook (or a similar size)
- Two 16 mm Safety Eyes
- Stuffing
- Yarn Needle
- Scissors
- Stitch Markers (Optional)
- Pins (Optional)
Base (Head and Body)
Using Green
R1 8 SC in a MR
R2 [INC] x 8 (16)
R3 [SC, INC] x 8 (24)
R4-6 24 SC (24) — 3 Rounds
R7 9 SC, 6 INC, 9 SC (30)
R8 30 SC (30)
R9 9 SC, 6 DEC, 9 SC (24)
R10 [DEC] x 12 (12)
Place the eyes between rounds 5 and 6, about 4 stitches apart.
Add stuffing to the head.
R11 [5 SC, INC] x 2 (14)
R12 [6 SC, INC] x 2 (16)
R13 [7 SC, INC] x 2 (18)
R14 [8 SC, INC] x 2 (20)
R15-17 20 SC (20) — 3 Rounds
R18 [8 SC, DEC] x 2 (18)
Start stuffing and continue stuffing as you go.
R19 [SC, DEC] x 6 (12)
R20 [DEC] x 6 (6)
FO leaving a long tail for sewing. Finish stuffing and use the tail to sew the plushie closed.
Tail
Using Green
R1 4 SC in a MR
R2 [SC, INC] x 2 (6)
R3 [2 SC, INC] x 2 (8)
R4 [3 SC, INC] x 2 (10)
R5 [4 SC, INC] x 2 (12)
R6-12 5 SL ST, 7 HDC (12) — 7 Rounds
FO leaving a long tail for sewing. Add stuffing.
Tongue
Using Red
CH 4
Turn and in the second chain from the hook, make a SL ST
CH 2
Turn and in the second chain from the hook, make a SL ST
Make 2 SL ST back down the chains made in Step 1
FO leaving a long tail for sewing.
Assembly and Details
Tail: Sew the tail onto rounds 16 through 18 on the back of the body. To hold the tail close to the body, continue sewing the tail against the body along the curl of the tail until you reach round 6 of the tail.
Tongue: Sew the tongue between rounds 8 and 9 on the front of the head.
Nostrils: Using Black worsted weight yarn, embroider the nostrils onto round 7 of the head.
Belly: Using Yellow, and starting between rounds 11 and 12 of the body, embroider stripes down the belly of the snake until you reach the bottom. The sample uses two lines of yellow yarn per row and moves one round down to make the next stripe.
Finishing tips: Weave in all ends neatly and make sure the stuffing is distributed evenly for a smooth shape. Use pins to position parts before sewing to ensure correct placement.