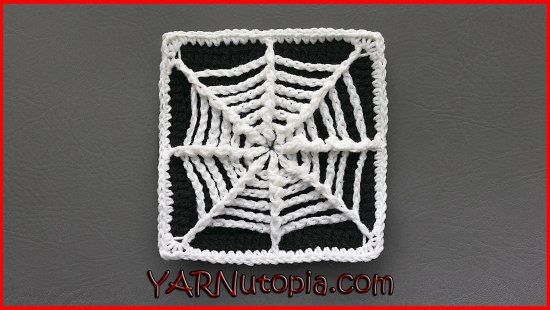
Crochet Web Weave Granny Square
Create a beautiful granny square by using a crochet technique known as web weave. This intricate method involves weaving the yarn in a way that creates a unique and eye-catching design. By incorporating the web weave technique into your granny square, you can add a touch of elegance and sophistication to your crochet projects. Experiment with different colors and yarn weights to achieve the desired look for your granny square. The crochet web weave granny square is a versatile and fun project that allows you to showcase your creativity and skills. Whether you are a beginner or an experienced crocheter, this technique can be a great way to add a new dimension to your work. With a bit of practice and patience, you can master the art of web weaving and create stunning granny squares that will impress everyone who sees them. So grab your crochet hook and yarn, and start weaving your way to a beautiful and unique granny square masterpiece.
Materials:
–Red Heart Super Saver Yarn in White
–Red Heart Super Saver Yarn in Black
–H-5.00mm Crochet Hook
–Yarn Needle
–Scissors
NOTES:
-You can use a smaller or larger hook to make this square depending on your tension. I wouldn’t use anything larger than an I-5.5mm Crochet Hook though.
-The finished square measures 6.5 inches
-This square is worked from the center outward
Special stitches:
Ch(s): chain(s)
YO: Yarn Over
St(s): Stitch(es)
Sl st: slip stitch
SK: Skip
SC: Single Crochet
HDC: Half-Double Crochet
DC: Double Crochet
FPDC: Front Post Double Crochet
Pattern;
With Black:
SOLID GRANNY SQUARE:
Ch 4, sl st to beginning to form a ring
Rnd 1: Ch 4 (counts as DC + Ch 1 Sp), [DC, Ch 1] 7 times into ring. Sl st to 3rd ch of beg. ch 4. (8ch sps, 8 DC)
Rnd 2: Sl st into Ch sp, ch up 3, [2dc, ch 2, 3 dc] in same sp, *3dc in next ch sp, [3dc, ch 2, 3dc] in next ch sp, repeat from * around. Sl st to beg. ch up 3.
Rnd 3-5: Ch up 3, DC in each st around putting [2DC, ch 2, 2 DC] in corners
WEB:
With white, Attach yarn in center ring (see video tutorial)
Rnd 1: Ch up 5 (counts as DC + Ch 2 sp), [DC, ch 2] 7 times in center ring, sl st to 3rd ch of beg. ch 5. If this gets confusing, see the video tutorial, it explains it a lot better.
Rnd 2: Ch 1, FPDC around ch up 3, [ch 3, FPDC around next st] 7 times, ch 3, sl st around FPDC
Rnd 3: Ch 1, FPDC around FPDC, [ch 4, FPDC around next st] 7 times, ch 4, sl st around FPDC
Rnd 4: Ch 1, FPDC around FPDC, [ch 5, FPDC around next st] 7 times, ch 5, sl st around FPDC
Rnd 5: Ch 1, FPDC around FPDC, [ch 6, FPDC around next st] 7 times, ch 6, sl st around FPDC
Rnd 6: Ch 1, FPDC around FPDC, [ch 7, FPDC around next st] 7 times, ch 7, sl st around FPDC
Rnd 7: Ch 1, FPDC around FPDC, [ch 8, FPDC around next st] 7 times, ch 8, sl st around FPDC
Rnd 8: Sl st into ch 8 sp, Sc in center st on background square and in next sts until the corner working in the ch sp and in each st (see video tutorial for visual instructions), *In corner, work in the FPDC st and in the corner ch 2 sp and put [sc, ch 2, sc], then work in the next ch 8 sp and in the next 10 sts and put a sc in each st, then sc in the fpdc and in the st behind it on the background square, then work in the next ch 8 sp and in the rest of the sts on the side until you get to the corner and then repeat from * around.
Fasten off, Weave in ends.