Crochet Basket Weave Granny Square
Crochet Basket Weave Granny Squares are such a charming and versatile pattern to work on! This design combines the classic granny square technique with basket weave stitches, creating a unique and textured look that adds depth to your projects. The alternating front and back post double crochets give the square a cozy and warm feel, making it ideal for blankets, bags, or even coasters. Whether you're a crochet beginner looking to practice new stitches or a seasoned crafter exploring creative techniques, the Crochet Basket Weave Granny Square is a fun and rewarding project to dive into. So grab your hook and yarn, and let's get weaving!
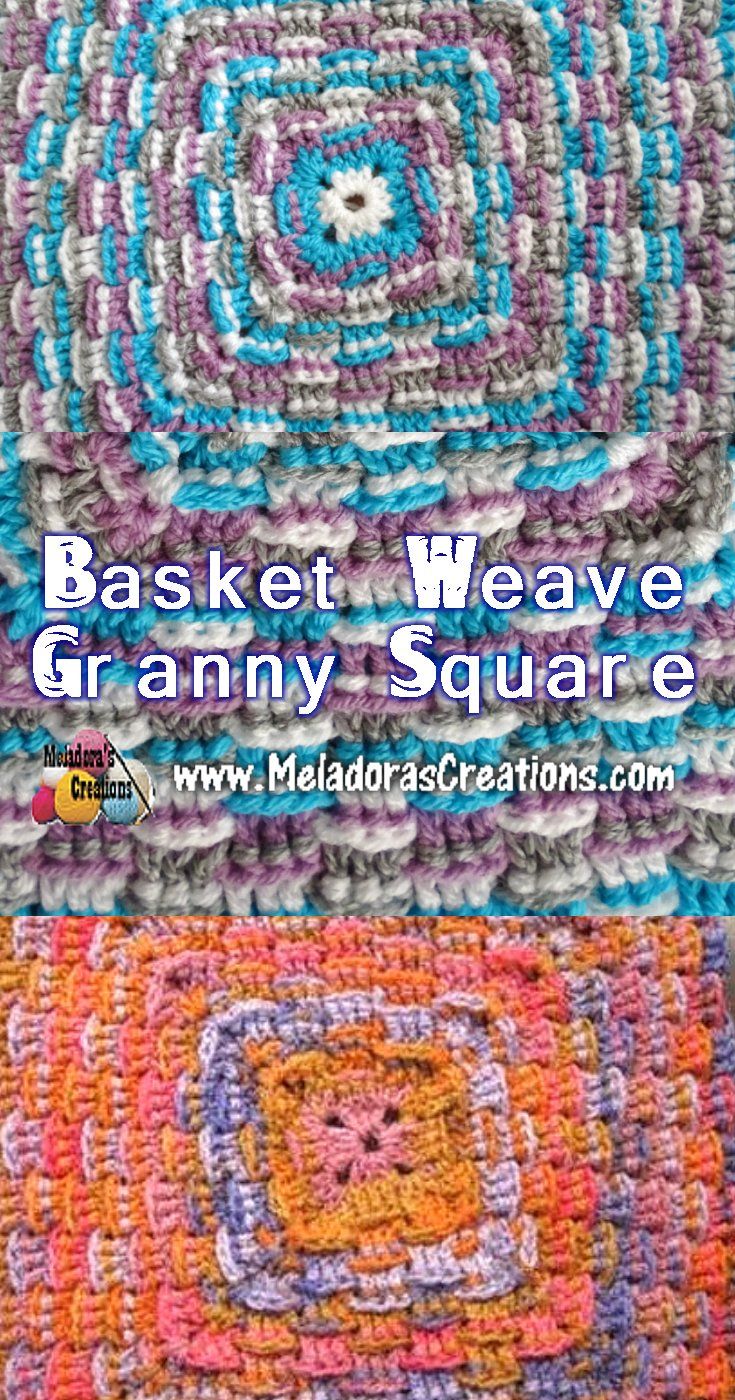
For this Basket Weave Granny Afghan project you will need:
- HOOK: 5 mm hook or size H hook for the US
- Yarn: Variegated yarn is preferred for this stitch just because it helps the stitch show better, but any worst weight 4 ply US / 10 ply AU yarn can be used for this project.
ABBREVIATIONS
- ch = Chain
- sl st = Slip Stitch
- st = Stitch
- sk = Skip
- YO = Yarn Over
- DC = Double Crochet
- FPDC = Front Post Double Crochet
- BPDC = Back Post Double Crochet
- * = Repeat what’s in between * for rest of round
To Start
Ch 5, and sl st in the beginning ch to form a ring.
Round 1
Ch 2 (counts as first st) Do 2 dc’s and ch 2 (repeat 3 dc’s, ch 2) 3 more times for 4 sections and 16 sts. sl st into top of beginning ch 2 to end round.
Round 2
Ch 1 and pull up some yarn (Does not count as a stitch, just a step up) and FPDC into the first dc post to the left. And do the same in the following 2 post. (we will be working with sets of 3 every time we can)
For the corner spaces do, Dc 2, ch 1, Dc 2.
Continue working the front post’s and corners til you reach the end of this round. Sl st into beginning dc of the round.
Round 3
Ch 1 and pull up your yarn a little (this does not count as a stitch just a step up)
(Now where you have done FPDC’s from the previous round, you need to do BPDC’s. Remember we are working in sets of 3 here when ever possible.)
Do 3 BPDC’s, do 2 FPDC’s,
then in corner, (and you will always do this in every corner of this project) do DC 1, ch 1, DC 1,
(now whatever you do on this side of the corner, mimic it on the other side of the corner. (Stay consistent and mimic corner stitches on both sides)
So we do 2 FPDC on other side of corner then 3 BPDC’s. Repeat doing this for the remainder of this round. Sl st in to top of beginning dc to end round.
Round 4
ch 1 and pull up yarn (does not count as a stitch) and FPDC the next 3 post. Then in then using the new corner st from the previous round do 3 BPDC’s into the next 3 posts, Do the corner as always DC 1, ch 1, DC 1. the mimic on this side what you did on the other side of the corner, 3 BPDC’s using the next two stitches, then 3 FPDC’s.
TIP 1: Always try to use in sets of three whenever you can, as soon as you have your set of 3 done, then start using the opposite’s stitch. This is important for when you are doing corners.
Tip 2: Always mimic what you did on one corner, to the other side of the corner as well.
Tip 3: Corners are always made the same after row 2, from row 3 on always do dc 1, ch 1, dc 1, then mimic what you did before the corner.
Stay Consistent! Pay attention. It just takes one time to mess up your pattern.